소개
이 안내서는 PS4 내부에 도포된 서멀 페이스트를 재도포하는 방법을 보여줍니다.
서멀 페이스트는 발열이 큰 부품의 열을 기기 내부의 냉각 부품으로 효율적으로 전달하기 위해 도포하는 은색이나 회색을 띄는 점성을 가진 액체입니다. 전자제품의 서멀 페이스트는 시간이 지나면 점점 마르며 굳어가는데, 이때 열 전도 효율이 저하됩니다. 이에 서멀 페이스트는 몇 년이 지나면 재도포해주는 것이 좋습니다.
PS4에서 서멀 페이스트가 도포된 보드는 방열판 바로 아래에 있으며, 방열판은 많은 먼지가 쌓이는 곳입니다. 이에 방열판의 먼지를 청소하고 서멀 페이스트를 재도포해주면 PS4가 새 것같은 성능으로 작동하는데 큰 도움이 될 것입니다.
이 작업은 생각보다 많이 간단하여, 이 작업에 요구되는 유일한 기술적 능력으로는 나사를 풀고 조이는 것입니다. 하지만 이 작업은 매우 쉬운데, 한편으로는 매우 지루하거나 조금은 긴 시간이 소요될 수 있으므로 시간이 한가한 날을 골라 작업을 진행하세요.
필요한 것
-
-
상단 커버의 틈을 따라 양손으로 PS4를 잡으세요.
-
엄지 손가락으로 광택이 있는 상단 커버가 옆으로 튀어나올 때까지 밀어주세요.
-
광택이 있는 상단 커버를 위아래로 들어 올려서 PS4에서 분리하세요.
-
-
-
핀셋으로 각 모서리에 위치한 플라스틱 나사 커버를 조심히 분리하여 나사 두 개를 더 노출하세요.
What If my PS4 doesn't have the two screws on the side
I should imagine that plastic cover will come off?
How did you go?
Cary B -
-
-
-
Torx security 드라이버를 사용하여 PS4 후면에서 7.2mm 나사 네 개를 풀어주세요.
I only have two screws, those in the middle of the console.
Have you removed the plastic covers mentioned in the previous step? That will expose the other two screws.
same, here. there are only the middle screws, no covers or screws on the sides. and it sits pretty tight
turns out 12XX models are different. Look at this for reference: https://www.youtube.com/watch?v=Hpr0z0ve...
This video guide is very useful, thank you. The disc drive itself is different than this ifixit guide too
Yes there is slight variations between the first models, and the second gen and on models. I have an original and only has the two screws in the middle, removal of the cover remains the same.
-
-
-
엄지 손가락을 사용하여 PS4 하단 케이스를 들어올려 분리하세요.
-
-
-
핀셋을 사용하여 전원 공급 케이블을 분리하고 마더보드에서 전원 공급 장치를 연결 해제하세요.
What you need to do here is be patient. Do not pull the wires. Get some fine nosed pliers, wiggle the white connector from left to right in small movements and edge it out slowly. You can also use your nails one finger at each edge of the white connector to do this.
Its really hard but i managed it with both of the tweezers/pincers at the same time
1. Keep in mind to pull not too hard on the wires and make step 2 and 3 simultaneously!2. the straigt and wider tweezer to pull the white connector itself
(top and bottom grip)
3. the small and angled tweezer to pull the wires carefully
(as shown on the picture above)Another option, is to remove the screws holding it down, leave the cable in place and lift it out carefully, revealing the other end of the connection. The hidden side of the connection wire is easier to get a handle on.
-
-
-
9.7mm Torx Security TR8 나사 세 개를 풀어주세요.
-
41mm Phillips 나사 두 개를 풀고 브래킷을 분리하세요.
-
-
-
전원 공급 장치를 똑바로 들어 올려 PS4에서 분리하세요.
Retirar en vertical, derecho hacia arriba. Sino puedes doblar uno de los tornillos largos
-
-
-
-
스퍼저(Spudger)의 뾰족한 끝부분으로 마더보드에 연결된 안테나 케이블 커넥터를 연결 해제하세요.
dumb question but I’m very new to this. when reconnecting the wifi antenna, does it just click back on? I'm hesitant to try this procedure if I need to solder anything since I have zero experience.
Yup! Hold it in place and press straight down on top of it with your finger or a spudger. If you have any other cable/connector questions see this guide.
-
-
-
안테나를 고정하는 9.8mm Torx security 나사 한 개를 풀어주세요.
This does not work on the newer 12 series
Thank you! I thought I was insane. I've been trying to figure out where the hell this thing goes and the seat for it is like an inch from the corner. It's driving me mental trying to figure out how to put this back on
-
-
-
Wi-Fi 안테나를 분리하세요.
When I’m connected to wifi it does good for awhile then it disconnects from the wifi and I can’t use the controller. I have to turn the game off and disconnect power source. Do you think the wifi antenna could be the problem or doin have another situation.
I would check the antenna connection to the motherboard, if it's properly seated I don't think it's the problem.
hazelrat -
-
-
-
손톱으로 광학 드라이브 위 리본 케이블의 금속 잠금 해제 레버를 누르세요.
-
손가락이나 핀셋으로 검정색 탭을 당겨 리본 케이블을 분리하세요.
Please note that the younger generations of PS4 have a different setup of connectors to the driver, its sometimes 3 of these as presented but with different sizes and no pad to press down. However, dont be alarmed, just use the pair of tweezers and gently pull them off the connectors of the motherboard. Grab on tight on the blue area of the ribbon cable and pull gently! They tend to sit tight so take some time and patience on this.
Thank you!!!
-
-
-
손톱으로 마더보드에 연결된 리본 케이블의 금속 잠금 해제 레버를 누르세요.
-
손가락이나 핀셋으로 리본 케이블의 검정색 탭을 잡아당겨 리본 케이블을 분리하세요.
-
재조립을 위해 리본 케이블을 따로 보관하 세요.
bei mir ist das leider defekt Plastikteil abgebrochen wie kann ich das ersetzen
Is it possible to buy the white port for ps4? My one seems to be damaged so won't hold the ribbon cable.
This may be a difficult fix, as the white port seems to be integrated into the motherboard. You could try simply holding the ribbon cable down with electrical tape, if it's just a fitting issue?
hazelrat -
-
-
-
상단 케이스를 위아래로 들어 올려 PS4에서 분리하세요.
“Significant force” is a bit of an understatement. It’s like it’s superglued together..
You absolutely should not need a lot of force for this. In the picture above, press upward using the left thumb from under the outer lip of the cover. You may need to pull it slightly toward you as well. Once that half is lifted, the right-hand side is still firmly attached. Keeping the left-hand side of the top separated, flip the unit over. Along the right-hand side, press the outside lip with your thumb about 2 thumb-widths down from the corner. There is a tab here and once released, the cover comes off easily and off in the back. Otherwise, you’ll be placing stress vertically (and rotationally) on the first tab on the side.
I appreciate this feedback – thank you. This sounds like a safer method. I’ll test it on our guide unit and update the procedure.
THIS SET OF INSTRUCTIONS FROM YOU, IS ABSOLUTELY SENSATIONAL.
I got this cover off quite easily. Still some resistance, but I didn't need this significant force at all.
THANK YOU!!
:)
Cary B -
I found an easier method for myself is to have the console upright and pointed away from myself. From this position, wrap your fingers over the top of the cover, hooking it in its front with the last digits of each finger. This allows you to press with your palm into the top of the console and pry in an upward/outward motion. This feels safer as it took much less force to disengage the problematic clip.
-
-
-
상단 EMI 쉴드를 고정하는 9.7mm Torx 나사 열 두개를 풀어주세요.
In my PS4, there is a small black Philips screw behind where the power lead connects to the motherboard. That screw connects the EMI shield to the inner metal where the power supply sits.
I had exactly the same thing, and mine is a fairly old model of PS4. Confused me for a moment until I spotted it.
Tom G -
Can confirm this.
This screw was on mine. To anyone reading this, flip the PS4 over and look where the pain in the ass power supply connector is.
Black screw right there.
If you have that screw of course. :)
Cary B -
-
-
-
15.6mm Phillips 나사 두 개를 풀어주세요.
-
각 나사를 한 번에 반 바퀴씩 돌려서 압력판을 서서히 풀어주세요.
-
압력판의 압력을 균일하게 유지하기 위해 두 나사를 번갈아가며 풀어주세요.
My PS4 also has 2 metal rings around each screw hole and 4 metal pieces 2 on each side closing in the same shape as the pressure plate as you take the pressure plate off?
Geoff King - 답글
How strong do you tighten the screws when re-applying the plate?
To the max, or stop one to two turns before?
I've tightened mine until the screws became taut and I've not had any stability issues.
hazelrat -
-
-
-
상단 EMI 쉴드 분리하기.
This is the 2nd PS4 I have disassembled and on both units I have found there is a black Phillips screw securing the upper EMI shield. This should be mentioned in the teardown as the EMI shield cannot be removed completely without first removing this screw and you risk damaging the EMI shield in the process . To locate the screw turn the unit over and you will see a small black Phillips screw located near the power supply prongs. There will be a set of arrows pointing to the screw. Once you remove this screw then you can fully release the upper EMI shield.
Geoff King - 답글
Ditto. This is my first time disassembling a PS4. EMI shield didn’t lift off easily on one corner. Noticed the black Phillips screw holding it in place. I scrolled up in the tutorial to see if I missed it. Easy enough.
throw it way, electromagnetic fields dont exist
-
-
-
팬 케이블과 마더보드 사이에 스퍼저의 평평한 끝을 끼우세요.
-
스퍼저를 비틀어 커넥터를 똑바로 들어올려 마더보드에서 분리하세요.
-
-
-
PS4에서 마더보드 들어 올리세요.
That shiny metal cover box on the opposite side of the hdi port shown in picture 30 at the very front is showing over heating signs I guess very brown around the edges I think is causing my PS4 not to show up on tv any ideas how to fix that hdi port looks fairly good to me but the black plastic port shows burnt signs as well that's on the same side of the HDMI port but the shiny metal cover is on the opposite side
-
-
-
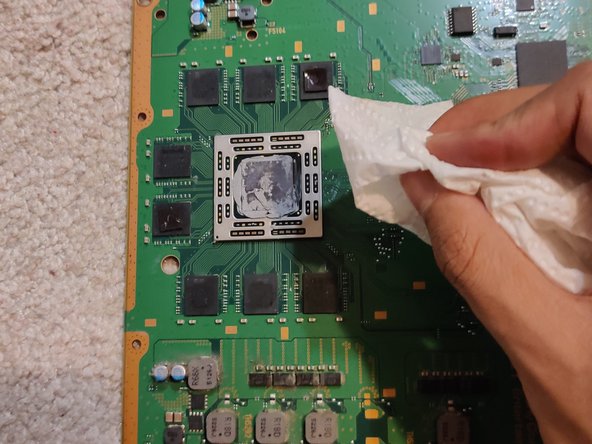
보풀이 날리지 않는 키친타올이나 휴지 등으로 기존에 도포되어 있는 서멀 페이스트를 닦아내세요. 이때 물티슈 사용은 추천하지 않으며, 알코올을 사용했을 경우 완벽히 건조시켜주세요.
-
완벽히 닦아내었고, 알코올 등을 사용한 경우 모두 마른 후, 새로운 서멀 페이스트를 닦아낸 칩셋의 가운데에 소량의 서멀 페이스트를 도포해주세요.
-


기기를 재조립하려면, 이 안내서를 역순으로 수행하세요.
기기를 재조립하려면, 이 안내서를 역순으로 수행하세요.
다른 144명이 해당 안내서를 완성하였습니다.

팀

CSU Los Angeles, Team S12-G1, Harris Fall 2020 CSU Los Angeles, Team S12-G1, Harris Fall 2020 회원
CSULA-HARRIS-F20S12G1
1 회원
안내서 9개 작성하였습니다
댓글 17개
Se me hizo muy buena la guia, sobre todo para no cometer algun error al trabajar en la reparacion, mi PS4 dejo de zumbar el abanico con el cambio de pasta termica y una limpieza general de polvo y pelusa.
I followed this guide step by step, including reversing the order to reassemble my unit.
My PS4 is still loud but not as loud as before, so everything worked well. Thanks for the writeup!
i might be a little late to reply, but i followed this guide aswell BUT after step 31 i took off the extra metal/aluminum plating and saw thats that where the bulk of the dust will be built up, this plate has the vents that go to the cooling fan on the opposite side of it after unscrewing. i bought an original ps4, it sounded like a jet engine taking off. The vents on my ps4 were just about covered in dust almost no airflow was able to get through, after taking the extra step and taking off the 1 extra panel (the one under the motherboard in step 31) and of course after replacing the thermal paste made my ps4 run and sound like new again,
Beau -
I cannot reply to Beau's comment.
I also went the extra step of taking that metal shroud that sits below the motherboard (step 31).
I completely recommend this step. It is then you can get access to the heat sink fins to remove dust. There are 3 screws that hold this metal shroud in place. Easy to get out.
Then you can also now remove the fan - 2 screws for this.
You can then clean out the accumulated dust from the fan and in the plastic shroud, that the fan sits in.
Holy cow, dust factory. :)
Great guide! Just did it and now the console is dead silent during gameplay of super demanding games <3 I just went a step further after Step 31 and removed the plate there so that I could properly take care of the heat sink underneath that had lots of dust on it.
“Great guide! Just did it and now the console is dead“ I just read that and was shocked for a second, you had me in the first half.
What thermal paste did yall use
I just used Arctic Silver 5, it’s for sale on iFixit’s store and works great. However, it is not a lot if you repair or build a lot of devices.
I had to replace my fan and thermal paste. My fan bearings were not gliding at all. Before fixing I would just hear a click, like the fan was trying to spin but couldn't. There was a huge blockage of dust on the heat sink too. Not sure which did the trick but now I'm playing the latest COD on PS4 and it's absolutely silent. I do have two tiny Phillips head screws leftover though. Oh well?
When I take my PS4 apart I always write down where the screws came from on a piece of paper. It helps if you're a little forgetful.
Some Guy -
What screw driver do i need?
Micah Gout - 답글
Habe gestern die Sony PlayStation die weiße Version die Wärmeleitpaste und Kühlpad erneuert und jetzt ist sie wieder leise und nicht mehr laut
Super Anleitung!!! Meine PS4 ist vom startenden Düsenjet zu absolut nicht hörbar gerettet. Dank Dir!!!!!!
Habe auch Schritt 31 noch gemacht und der Kühler war komplett voller Staub.
Kostenpunkt der Reinigung: 8,99,- für Druckluftspray und 15,- für Wärmeleitpaste.
Nochmal großes Danke!!!
Simply remarkable. I replaced the fan and thermal paste in my PS4 and it has made the WORLD of difference. Cleaned all the dust from every part with my Dyson along the way, especially the heatsink which was absolutely clogged.
This guide is incredible. My PS4 sounded like a harrier jet taking off, now it is whisper quiet - no exaggeration. Even the wifey cannot believe it.
Really wish i had done this sooner. Whole job took around an hour with my 8 year old son helping, he had a blast.
I have a CUH-1102A version of this PS4.
Would this teardown work for it?
Cary B - 답글