주요 콘텐츠로 건너뛰기

PlayStation Vita PS Button Replacement

필요한 것

  1. PlayStation Vita PS Button Replacement, Case Separation: 1 단계, 이미지 1/2 PlayStation Vita PS Button Replacement, Case Separation: 1 단계, 이미지 2/2
    • Power off and remove the memory card.

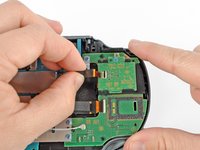
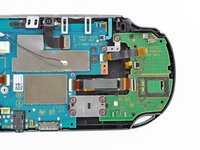
    • Using a Phillips #00 screwdriver, remove the four 6.4mm screws on the back casing.

  2. PlayStation Vita PS Button Replacement: 2 단계, 이미지 1/3 PlayStation Vita PS Button Replacement: 2 단계, 이미지 2/3 PlayStation Vita PS Button Replacement: 2 단계, 이미지 3/3
    • Using your fingernail or a spudger, pry open the accessory port cover on the top of the device.

    • Using a Phillips #00 screwdriver, remove the two 5.4mm screws hidden beneath the accessory port cover.

  3. PlayStation Vita PS Button Replacement: 3 단계, 이미지 1/2 PlayStation Vita PS Button Replacement: 3 단계, 이미지 2/2
    • Remove the two 5.4mm Phillips #00 screws on the bottom of the device near the charging port.

  4. PlayStation Vita PS Button Replacement: 4 단계, 이미지 1/3 PlayStation Vita PS Button Replacement: 4 단계, 이미지 2/3 PlayStation Vita PS Button Replacement: 4 단계, 이미지 3/3
    • Beginning at the sides of the device, use a plastic opening tool to separate the front and rear cases.

    • Continue working your way around the device gently prying it open.

    • There are still wires holding the front and rear cases together. You may damage the connections if you yank the cases completely apart.

  5. PlayStation Vita PS Button Replacement: 5 단계, 이미지 1/2 PlayStation Vita PS Button Replacement: 5 단계, 이미지 2/2
    • Gently separate the two cases, minding the battery and the touch screen controller connectors holding the two cases together.

  6. PlayStation Vita PS Button Replacement: 6 단계, 이미지 1/1
    • Using a spudger, free the touch screen controller flex cable by gently prying up the connection.

  7. PlayStation Vita PS Button Replacement: 7 단계, 이미지 1/1
    • Free the battery cable by gently prying up on the connection with a spudger.

  8. PlayStation Vita PS Button Replacement: 8 단계, 이미지 1/1
    • Separate the front and rear cases.

  9. PlayStation Vita PS Button Replacement, Left Shoulder Button: 9 단계, 이미지 1/3 PlayStation Vita PS Button Replacement, Left Shoulder Button: 9 단계, 이미지 2/3 PlayStation Vita PS Button Replacement, Left Shoulder Button: 9 단계, 이미지 3/3
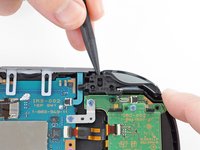
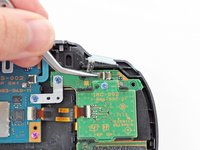
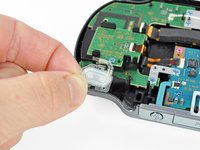
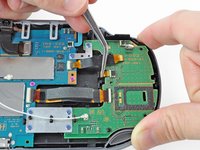
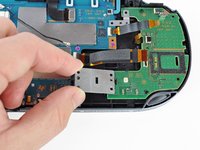
    • Pry up the left shoulder button casing with a spudger.

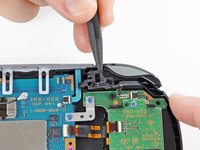
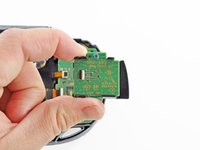
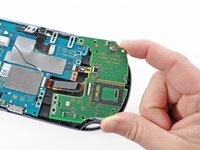
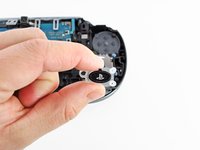
    • Remove the left shoulder button casing.

  10. PlayStation Vita PS Button Replacement: 10 단계, 이미지 1/2 PlayStation Vita PS Button Replacement: 10 단계, 이미지 2/2
    • Remove the translucent, plastic left shoulder button cover.

  11. PlayStation Vita PS Button Replacement: 11 단계, 이미지 1/3 PlayStation Vita PS Button Replacement: 11 단계, 이미지 2/3 PlayStation Vita PS Button Replacement: 11 단계, 이미지 3/3
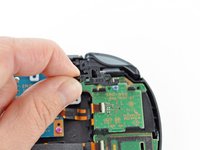
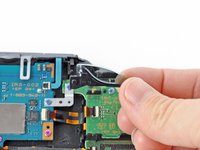
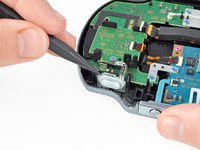
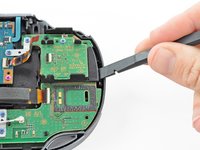
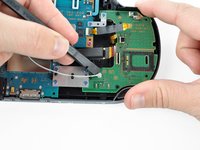
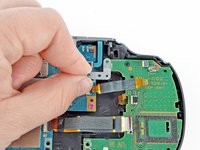
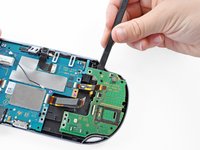
    • Release the left shoulder button flex cable socket by using a spudger to pry open the tab.

    • Be careful to not break off this small black tab!

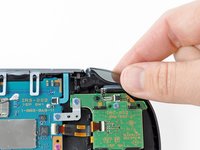
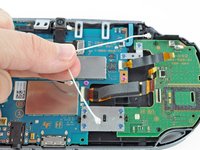
    • Using tweezers, slide the flex cable out of the socket. Do not pull on the black tab! Instead, pull the thin flex cable away from the connector (to the left in this image).

  12. PlayStation Vita PS Button Replacement: 12 단계, 이미지 1/2 PlayStation Vita PS Button Replacement: 12 단계, 이미지 2/2
    • Using a spudger, gently peel up the left shoulder button from the light adhesive connecting it to casing.

  13. PlayStation Vita PS Button Replacement, Left Button Board: 13 단계, 이미지 1/2 PlayStation Vita PS Button Replacement, Left Button Board: 13 단계, 이미지 2/2
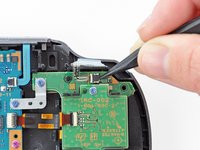
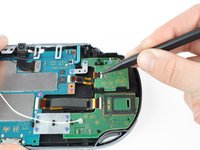
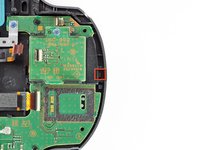
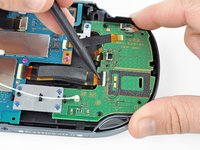
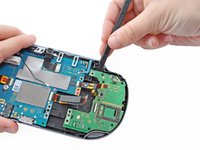
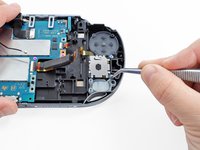
    • Using a spudger, lift and release the tab on the ZIF socket sitting on the SIM card reader.

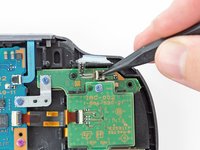
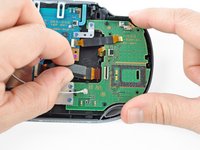
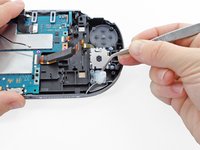
    • Carefully pull the flex cable out of the ZIF socket, and rest it out of the way.

  14. PlayStation Vita PS Button Replacement: 14 단계, 이미지 1/3 PlayStation Vita PS Button Replacement: 14 단계, 이미지 2/3 PlayStation Vita PS Button Replacement: 14 단계, 이미지 3/3
    • Use a spudger to release the tab between the SIM card reader and the back casing assembly.

    • Lift the SIM card reader off the back casing assembly.

  15. PlayStation Vita PS Button Replacement: 15 단계, 이미지 1/2 PlayStation Vita PS Button Replacement: 15 단계, 이미지 2/2
    • Release the plastic tab on the small flex cable socket by prying it up with a spudger.

    • Using tweezers, gently remove the small flex cable from the socket, and rest it out of the way.

  16. PlayStation Vita PS Button Replacement: 16 단계, 이미지 1/2 PlayStation Vita PS Button Replacement: 16 단계, 이미지 2/2
    • Use a spudger to lift up the tab on the large ZIF socket.

    • Gently pull the flex cable out of the ZIF socket, and rest it out of the way.

  17. PlayStation Vita PS Button Replacement: 17 단계, 이미지 1/2 PlayStation Vita PS Button Replacement: 17 단계, 이미지 2/2
    • Disconnect the white Wi-Fi antenna cable with a spudger.

    • Remove the Wi-Fi antenna cable.

  18. PlayStation Vita PS Button Replacement: 18 단계, 이미지 1/3 PlayStation Vita PS Button Replacement: 18 단계, 이미지 2/3 PlayStation Vita PS Button Replacement: 18 단계, 이미지 3/3
    • Using a Phillips #00 screwdriver, remove the six screws on the two metal brackets:

    • Two 5.0mm, blue screws on the L-bracket securing the upper left button board to the motherboard.

    • Four 5.0mm, blue screws on the square bracket securing the lower left button board to the motherboard.

  19. PlayStation Vita PS Button Replacement: 19 단계, 이미지 1/3 PlayStation Vita PS Button Replacement: 19 단계, 이미지 2/3 PlayStation Vita PS Button Replacement: 19 단계, 이미지 3/3
    • Starting from the upper left corner, use a spudger to pry up and remove the left button board.

  20. PlayStation Vita PS Button Replacement, PS Button: 20 단계, 이미지 1/3 PlayStation Vita PS Button Replacement, PS Button: 20 단계, 이미지 2/3 PlayStation Vita PS Button Replacement, PS Button: 20 단계, 이미지 3/3
    • Using tweezers, peel up and remove the PS button.

결론

To reassemble your device, follow these instructions in reverse order.

다른 7명이 해당 안내서를 완성하였습니다.

Brittany McCrigler

회원 가입일: 03/05/12

88,898 평판

안내서 131개 작성하였습니다

iFixit iFixit 회원

Staff

136 회원들

안내서 16,562개 작성하였습니다

댓글 0개

댓글 쓰기

조회 통계:

24 시간 전: 3

7일 전: 17

30일 전: 67

전체 시간: 10,190