이 버전에는 잘못된 편집 사항이 있을 수 있습니다. 최신 확인된 스냅샷으로 전환하십시오.
필요한 것
-
이 단계는 번역되지 않았습니다. 번역을 도와주십시오
-
Using a Phillips #00 screwdriver, remove the four 6.4mm screws on the back casing.
-
-
이 단계는 번역되지 않았습니다. 번역을 도와주십시오
-
Using your fingernail or a spudger, pry open the accessory port cover on the top of the device.
-
Using a Phillips #00 screwdriver, remove the two 5.4mm screws hidden beneath the accessory port cover.
-
-
이 단계는 번역되지 않았습니다. 번역을 도와주십시오
-
Remove the two 5.4mm Phillips #00 screws on the bottom of the device near the charging port.
-
-
이 단계는 번역되지 않았습니다. 번역을 도와주십시오
-
Beginning at the sides of the device, use a plastic opening tool to separate the front and rear cases.
-
Continue working your way around the device gently prying it open.
-
-
이 단계는 번역되지 않았습니다. 번역을 도와주십시오
-
Gently separate the two cases, minding the battery and the touch screen controller connectors holding the two cases together.
-
-
-
이 단계는 번역되지 않았습니다. 번역을 도와주십시오
-
Using a spudger, free the touch screen controller flex cable by gently prying up the connection.
-
-
이 단계는 번역되지 않았습니다. 번역을 도와주십시오
-
Free the battery cable by gently prying up on the connection with a spudger.
-
-
이 단계는 번역되지 않았습니다. 번역을 도와주십시오
-
Using the pointy end of the spudger, disconnect the three antenna cable connectors on top of the wireless card.
-
Deroute the antenna cables so that they are out of the wireless card casing. Rest the wires out of the way.
-
-
이 단계는 번역되지 않았습니다. 번역을 도와주십시오
-
Hook the spudger beneath the tab on the wireless card casing and release the tab.
-
Peel up and remove the wireless card casing.
-
-
이 단계는 번역되지 않았습니다. 번역을 도와주십시오
-
Remove the two 4.4mm Phillips #00 screws on the wireless card.
-
Pull out the wireless card.
-
-
이 단계는 번역되지 않았습니다. 번역을 도와주십시오
-
Pry up the right shoulder button casing with a spudger and set it aside.
-
-
이 단계는 번역되지 않았습니다. 번역을 도와주십시오
-
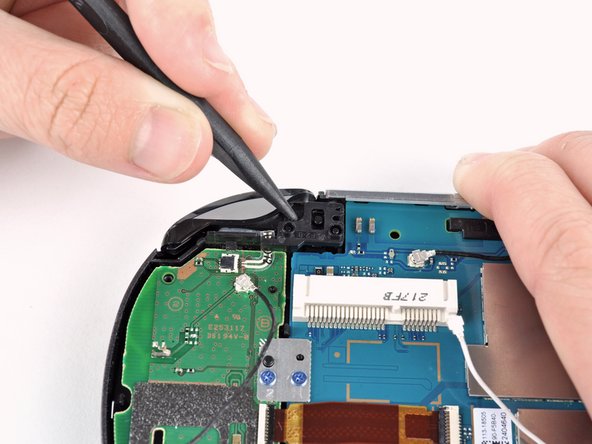
Release the right shoulder button flex cable socket by using a spudger to gently pry open the tab.
-
Using tweezers, slide the flex cable out of the socket.
-
-
이 단계는 번역되지 않았습니다. 번역을 도와주십시오
-
Using a spudger, gently peel up the right shoulder button from the light adhesive connecting it to casing.
-


다른 4명이 해당 안내서를 완성하였습니다.


댓글 5개
Is anyone else experiencing the button getting stuck?
Yes, mine is getting stuck, too. I am hoping a replacement will solve this problem.
aseelau -
i am replacing the whole front part of my vita do to screen cracked and wont turn on, when i put the button back on, how would i do so to make it stick back on? would i need to reglue it or will it stick back on by itself?