이 버전에는 잘못된 편집 사항이 있을 수 있습니다. 최신 확인된 스냅샷으로 전환하십시오.
필요한 것
-
이 단계는 번역되지 않았습니다. 번역을 도와주십시오
-
Place the blaster upside down on the table, and remove the screw in the bottom of the handle
-
Remove the battery door and take the batteries out.
-
-
이 단계는 번역되지 않았습니다. 번역을 도와주십시오
-
Set the blaster on its side with the screws facing up (the blaster will be placed on its left side). Remove all 14 phillips head, 8.2 mm screws and set them aside.
-
Lift the side of the blaster off exposing its internal parts.
-
-
-
이 단계는 번역되지 않았습니다. 번역을 도와주십시오
-
Remove the two phillips head, 8.2 mm screws holding the barrel in place.
-
-
이 단계는 번역되지 않았습니다. 번역을 도와주십시오
-
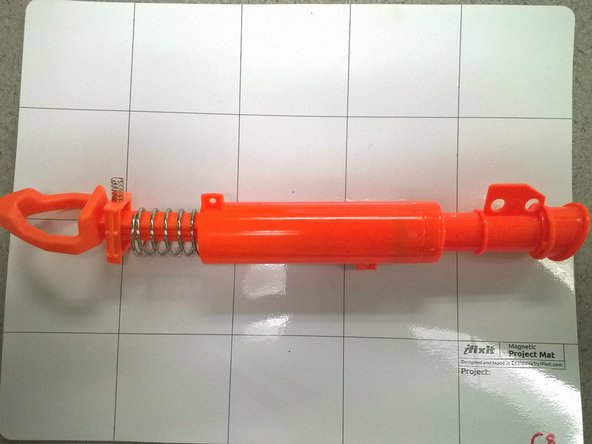
Lift the barrel and plunger strait up being carful to not lose the locking spring.
-
Pull the plunger out of the barrel
-
-
이 단계는 번역되지 않았습니다. 번역을 도와주십시오
-
At this point you will be able to tell whether the O-ring has failed or if the plunger has broken.
-
If the O-ring has failed, simply buy a replacement O-ring of appropriate size from a hardware store and slip it over the end of the plunger.
-
If the plunger has broken see step 6
-
-
이 단계는 번역되지 않았습니다. 번역을 도와주십시오
-
Attempting to glue the plunger will most likely result in a bad O-ring seal causing the blaster to not function correctly.
-
The best course of action would be to obtain an new plunger and replace it.
-
Be sure to put the locking mechanism on in the correct orientation.
-


다른 한 분이 해당 안내서를 완성하였습니다.
팀

Michigan Tech, Team 5-8, Lauer Spring 2014 Michigan Tech, Team 5-8, Lauer Spring 2014 회원
MTU-LAUER-S14S5G8
3 회원들
안내서 13개 작성하였습니다