이 버전에는 잘못된 편집 사항이 있을 수 있습니다. 최신 확인된 스냅샷으로 전환하십시오.
필요한 것
-
이 단계는 번역되지 않았습니다. 번역을 도와주십시오
-
Release the back handle of the PowerMac. Slowly pull out the cube by holding the end of the handle. Watch for any parts that may become entangled with the outer case.
-
Push back the handle after you have taken the core out of the case.
-
-
이 단계는 번역되지 않았습니다. 번역을 도와주십시오
-
Place the cube upside down and remove the four T10 Torx screws on the front plate. Then remove the two screws on each side.
-
-
-
이 단계는 번역되지 않았습니다. 번역을 도와주십시오
-
Remove the power cord from the hard drive.
-
Remove the IDE cable from the hard drive.
-
Grip the sides of the hard drive and slowly pull outward.
-
-
이 단계는 번역되지 않았습니다. 번역을 도와주십시오
-
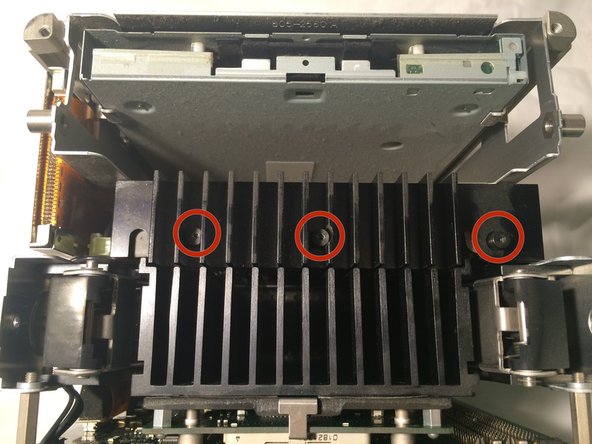
Remove the three top screws of the hard drive use a T8 bit and remove the heat sink.
-
Carefully slide the hard drive to the open side (side without the IDE and power cables) to remove the drive.
-
Turn the drive over, remove the sled rail with a T10 driver for its two screws. Transfer the rail to the same side on the new drive.
-
Insert new hard drive.
-


다른 21명이 해당 안내서를 완성하였습니다.

팀

Cal Poly, Team 2-7, Johann Summer 2010 Cal Poly, Team 2-7, Johann Summer 2010 회원
CPSU-JOHANN-R10S2G7
5 회원들
안내서 14개 작성하였습니다
댓글 한 개
Strictly speaking, steps 2 through 4 aren’t necessary: you can just unscrew the heatsink from the hard drive, as in step 7, and carefully lift it out (I found that tilting it toward the optical drive and then pivoting it out worked).