주요 콘텐츠로 건너뛰기

Power Mac G5 CD-ROM Drive Replacement

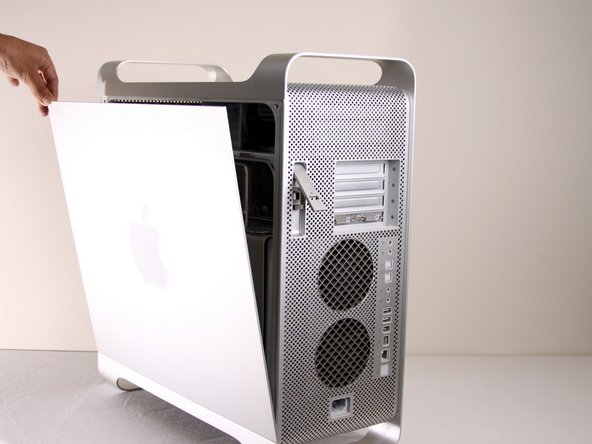
  1. Power Mac G5 CD-ROM Drive Replacement, Side Panel: 1 단계, 이미지 1/1
    • To avoid electrocution, shut down the computer. Do not open the computer or attempt to install any items inside it while the computer is on.

    • To avoid being burned, wait at least 10 minutes to allow the computer's internal components to cool.

  2. Power Mac G5 CD-ROM Drive Replacement: 2 단계, 이미지 1/1
    • Remove all the cables, including the power cables before opening the unit.

  3. Power Mac G5 CD-ROM Drive Replacement: 3 단계, 이미지 1/2 Power Mac G5 CD-ROM Drive Replacement: 3 단계, 이미지 2/2
    • Lift the tab to unlock the side panel.

    • The panel should fall out. If the panel does not fall out by itself pull a little from the edges.

  4. Power Mac G5 CD-ROM Drive Replacement: 4 단계, 이미지 1/3 Power Mac G5 CD-ROM Drive Replacement: 4 단계, 이미지 2/3 Power Mac G5 CD-ROM Drive Replacement: 4 단계, 이미지 3/3
    • Remove the air deflector (the clear plastic cover) by pulling on the handle.

  5. Power Mac G5 CD-ROM Drive Replacement, CD-ROM Drive: 5 단계, 이미지 1/1
    • Locate the CD-ROM Drive on the top left corner of desktop.

    The front of the existing photo does not show a polished faceplate that Apple added to the drive, at least on my late 2004 G5. At first I was concerned that I'd damage it, as if it were physically attached to the chassis, but thankfully it was not. My drive ended up sliding out as the instructions show.

    That faceplate is easily popped off the old drive and placed atop your new drive. BE ADVISED: The door of your new drive is unlikely to completely clear the opening of your G5. Until I shave off a couple of millimeters from the new drive's top door face, I have to help it by pulling the tray with my two index fingers. You will too.

    mdlaliberte - 답글

    Best would be to remove the front bezel from the tray, leaving just the tray itself.

    Yishai Sered - 답글

  6. Power Mac G5 CD-ROM Drive Replacement: 6 단계, 이미지 1/3 Power Mac G5 CD-ROM Drive Replacement: 6 단계, 이미지 2/3 Power Mac G5 CD-ROM Drive Replacement: 6 단계, 이미지 3/3
    • Pull and rotate latches to the left.

  7. Power Mac G5 CD-ROM Drive Replacement: 7 단계, 이미지 1/1
    • Wiggle and pull out the CD Drive.

    Be careful here - my G5 had the ribbon cable taped to the top of the drive. I had to peel it off before I could remove the drive from the case.

    Phil Calvert - 답글

    The service manual deals with this differently: detach the other end of the ribbon cable from the logic board, and let the cable come out with the drive. You need to remove the intake fans to see it, but that's no big deal.

    You can then peel off the tape from the old drive (they recommend "gently, so the double-sided tape stays on the cable"), and re-tape the cable to the new drive.

    When re-assembling, let the cable fall behind the logic board, feed it through the slot and plug it in. Then put the fans back in place.

    Yishai Sered - 답글

  8. Power Mac G5 CD-ROM Drive Replacement: 8 단계, 이미지 1/2 Power Mac G5 CD-ROM Drive Replacement: 8 단계, 이미지 2/2
    • Detach the first cable from the CD-ROM drive.

    • Detach the second cable from the CD-ROM drive.

    • On some models, the IDE cable is stuck to the top of the CD-ROM with foam tape. It is easier to unplug the IDE connector from the motherboard, and de-route the IDE cable as you remove the drive.

  9. Power Mac G5 CD-ROM Drive Replacement: 9 단계, 이미지 1/1
    • After the CD-ROM drive is removed, the area should look like this.

결론

To reassemble your device, follow these instructions in reverse order.

다른 43명이 해당 안내서를 완성하였습니다.

Jessica Chaidez

회원 가입일: 01/13/10

7,956 평판

안내서 3개 작성하였습니다

Cal Poly, Team 5-8, Forte Winter 2010 Cal Poly, Team 5-8, Forte Winter 2010 회원

CPSU-FORTE-W10S5G8

7 회원들

안내서 20개 작성하였습니다

댓글 한 개

Is it possible to use an IDE to SATA connector? I want to install my Pioneer BDR burner to potentially use the PMG5 for data disc burning only. Any thoughts?

nirv - 답글

댓글 쓰기

조회 통계:

24 시간 전: 1

7일 전: 18

30일 전: 52

전체 시간: 34,620