주요 콘텐츠로 건너뛰기

Processor of why! Replace W253EU

필요한 것

  1. Processor of why! Replace W253EU, Battery from why! Remove W253EU: 1 단계, 이미지 1/3 Processor of why! Replace W253EU, Battery from why! Remove W253EU: 1 단계, 이미지 2/3 Processor of why! Replace W253EU, Battery from why! Remove W253EU: 1 단계, 이미지 3/3
    • Turn off the computer.

    • Before each operation it is important to start with the removal of the accumulator.

    • Take the slide unlocked into position, remove the battery.

  2. Processor of why! Replace W253EU, Access to RAM and CPU from why! W253EU: 2 단계, 이미지 1/2 Processor of why! Replace W253EU, Access to RAM and CPU from why! W253EU: 2 단계, 이미지 2/2
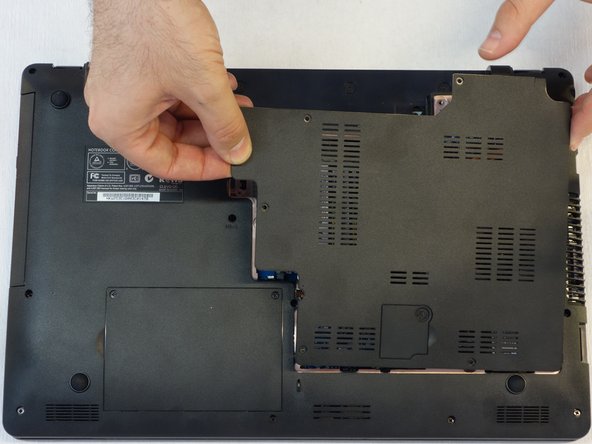
    • Using a Philips #1 screwdriver, unscrew the 5 screws securing the cover.

  3. Processor of why! Replace W253EU: 3 단계, 이미지 1/3 Processor of why! Replace W253EU: 3 단계, 이미지 2/3 Processor of why! Replace W253EU: 3 단계, 이미지 3/3
    • Push the screwdriver a few millimeters under the cover so that it can be touched with your fingers.

    • Now lift the cover carefully.

    • Attention! Disconnect the ventillator cable so that the cover can be completely removed (see next step).

  4. Processor of why! Replace W253EU: 4 단계, 이미지 1/1
    • Since the ventillator is mounted under the cover, its power supply cable must first be disconnected so that the cover can then be completely removed.

  5. Processor of why! Replace W253EU, processor: 5 단계, 이미지 1/3 Processor of why! Replace W253EU, processor: 5 단계, 이미지 2/3 Processor of why! Replace W253EU, processor: 5 단계, 이미지 3/3
    • Using the Phillips # 1 screwdriver, unscrew the 3 mounting screws of the processor heat sink.

    • Note position of marker triangle as this will determine the positioning of the processor during replacement.

    • Unlock the coupling system of the processor with a classic screwdriver.

    • Make sure that you do not remove the heat-dissipating paste between the processor and the heat sink, as this is the only way to ensure that the processor is properly cooled.

  6. Processor of why! Replace W253EU: 6 단계, 이미지 1/3 Processor of why! Replace W253EU: 6 단계, 이미지 2/3 Processor of why! Replace W253EU: 6 단계, 이미지 3/3
    • Carefully disconnect the processor from its holder.

    • Now place the processor aside, taking into account the position of the triangle.

결론

For reassembly, follow the instructions in the reverse order

다음 번역가들에게 특별히 감사 드립니다:

de en

100%

이 번역자 분들은 저희가 세상을 수리하는데 동참해 주시는 분입니다! 기여하시겠습니까?
번역 시작하기 ›

Felice Suglia

회원 가입일: 06/15/13

30,731 평판

안내서 261개 작성하였습니다

댓글 0개

댓글 쓰기

조회 통계:

24 시간 전: 0

7일 전: 0

30일 전: 1

전체 시간: 399