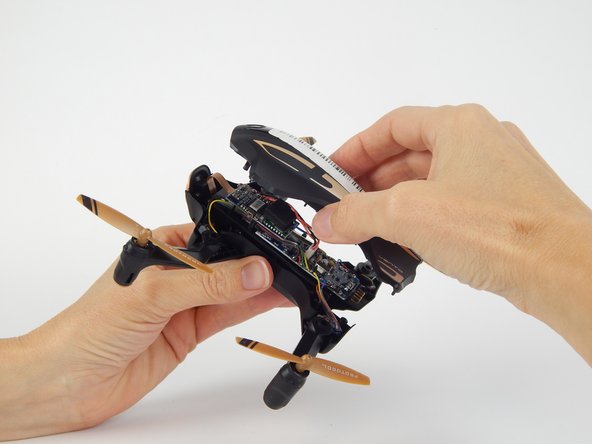
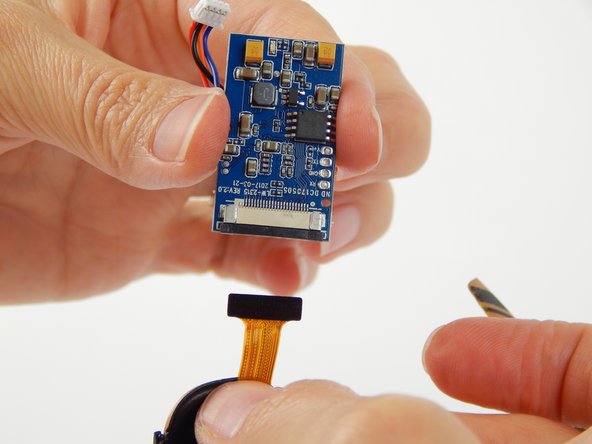
주요 콘텐츠로 건너뛰기

Protocol Vento Transmitter Board Replacement

필요한 것

  1. Protocol Vento Transmitter Board Replacement, Battery: 1 단계, 이미지 1/1
    • Grasp the tail end of the drone where the lip of the battery protrudes.

  2. Protocol Vento Transmitter Board Replacement: 2 단계, 이미지 1/1
    • Pull away from the drone to remove the battery.

    • Do not attempt any repairs or replacements before removing the battery from the drone.

  3. Protocol Vento Transmitter Board Replacement, Transmitter Board: 3 단계, 이미지 1/1
    • To get into the drone, twelve total screws need to be removed:

    • Ten 5.7mm Phillips #000 screws from the bottom of the drone body.

    • Two 4.5mm Phillips #000 screws at the front of the drone.

    • It is not necessary to remove the four screws on the arms of the drone.

  4. Protocol Vento Transmitter Board Replacement: 4 단계, 이미지 1/3 Protocol Vento Transmitter Board Replacement: 4 단계, 이미지 2/3 Protocol Vento Transmitter Board Replacement: 4 단계, 이미지 3/3
    • Flip the drone over and lift off the top plastic shell of the drone.

  5. Protocol Vento Transmitter Board Replacement: 5 단계, 이미지 1/2 Protocol Vento Transmitter Board Replacement: 5 단계, 이미지 2/2
    • Remove the foam adhesive pad located on the Wi-Fi transmitter board.

  6. Protocol Vento Transmitter Board Replacement: 6 단계, 이미지 1/2 Protocol Vento Transmitter Board Replacement: 6 단계, 이미지 2/2
    • Pry the gold Wi-Fi antenna connector, located under the previously removed foam pad, away from the Wi-Fi transmitter board to disconnect it.

    • Be sure to only apply force to the gold connector and not the black wire attached to it, as the connection between the two is very fragile.

  7. Protocol Vento Transmitter Board Replacement: 7 단계, 이미지 1/1
    • Remove the two 3.8mm Phillips #000 screws from the Wi-Fi transmitter board.

    • Be careful with the delicate ribbon cable attached to the camera.

  8. Protocol Vento Transmitter Board Replacement: 8 단계, 이미지 1/1
    • Disconnect the white clip that connects the four colored wires (black, orange, red, blue) to the motherboard.

    • Be sure to pull only on the white clip, as to avoid damaging the wires.

  9. Protocol Vento Transmitter Board Replacement: 9 단계, 이미지 1/2 Protocol Vento Transmitter Board Replacement: 9 단계, 이미지 2/2
    • Gently pull the black wedge away from the main board until it shifts to a stop. You will feel it slide out, then stop.

    • The black insert acts as a wedge to keep the ribbon cable attached to the board. The wedge needs to be jostled loose before the cable can be removed.

    • Lightly pull the ribbon cable away from the connector.

결론

To reassemble your device, follow these instructions in reverse order.

다른 3명이 해당 안내서를 완성하였습니다.

Maria Larcomb

회원 가입일: 02/15/18

926 평판

안내서 5개 작성하였습니다

USF Tampa, Team S1-G2, Leahy Spring 2018 USF Tampa, Team S1-G2, Leahy Spring 2018 회원

USFT-LEAHY-S18S1G2

4 회원들

안내서 6개 작성하였습니다

댓글 0개

댓글 쓰기

조회 통계:

24 시간 전: 0

7일 전: 0

30일 전: 0

전체 시간: 263