주요 콘텐츠로 건너뛰기

RCA Pro10 Edition Speaker Replacement

필요한 것

  1. RCA Pro10 Edition Speaker Replacement, Speaker: 1 단계, 이미지 1/2 RCA Pro10 Edition Speaker Replacement, Speaker: 1 단계, 이미지 2/2
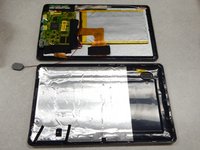
    • Using a separating tool, look for a seam in the plastic casing that looks most accessible.

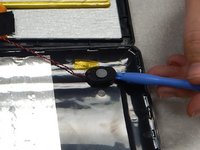
    • Use the prying tool to separate the front and back casing, working your way around the perimeter.

    • Utilize a card tool or a pick to assist in keeping the case separated.

    • To reassemble the device simply align the two casing halves and pinch to snap together or press down on the edges while the device in on a table.

  2. RCA Pro10 Edition Speaker Replacement: 2 단계, 이미지 1/1
    • Flip over the back of the device while keeping it close to the front, the speaker is attached to it.

    • Remove the yellow tape securing the speaker to the back casing.

  3. RCA Pro10 Edition Speaker Replacement: 3 단계, 이미지 1/2 RCA Pro10 Edition Speaker Replacement: 3 단계, 이미지 2/2
    • Use the separating tool to pry the speaker from its surface.

    • Use caution when removing the speaker, you may damage the screen.

    • Cut or desolder the wires to replace or repair the speaker.

결론

To reassemble your device, follow these instructions in reverse order.

Dayne Russell

회원 가입일: 01/27/15

401 평판

안내서 4개 작성하였습니다

Pasco Hernando, Team 1-1, Prince Winter 2015 Pasco Hernando, Team 1-1, Prince Winter 2015 회원

PHSC-PRINCE-W15S1G1

6 회원들

안내서 10개 작성하였습니다

댓글 0개

댓글 쓰기

조회 통계:

24 시간 전: 0

7일 전: 0

30일 전: 0

전체 시간: 746