주요 콘텐츠로 건너뛰기

RIDGID Belt Sander R2740 Power Cord Replacement

필요한 것

  1. RIDGID Belt Sander R2740 Power Cord Replacement, Power Cord: 1 단계, 이미지 1/2 RIDGID Belt Sander R2740 Power Cord Replacement, Power Cord: 1 단계, 이미지 2/2
    • Orient the belt sander so that the RIDGID logo is facing you.

    • Remove the six 19 mm and three 51 mm T20 screws that hold the cover into place.

    • Remove the cover from the belt sander.

    • Make sure you remember the correct placement of each screw.

  2. RIDGID Belt Sander R2740 Power Cord Replacement: 2 단계, 이미지 1/2 RIDGID Belt Sander R2740 Power Cord Replacement: 2 단계, 이미지 2/2
    • Remove the two 16 mm T10 screws.

    • Remove the support bracket that holds the power cord into place.

  3. RIDGID Belt Sander R2740 Power Cord Replacement: 3 단계, 이미지 1/3 RIDGID Belt Sander R2740 Power Cord Replacement: 3 단계, 이미지 2/3 RIDGID Belt Sander R2740 Power Cord Replacement: 3 단계, 이미지 3/3
    • Lift the power cord from the resting grooves.

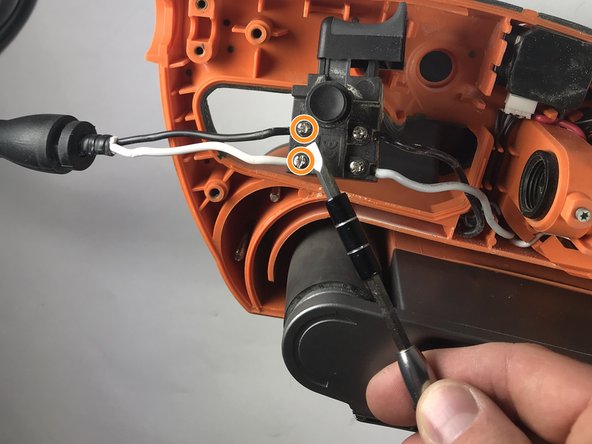
    • Rotate the switch so that the lock-on button is facing you.

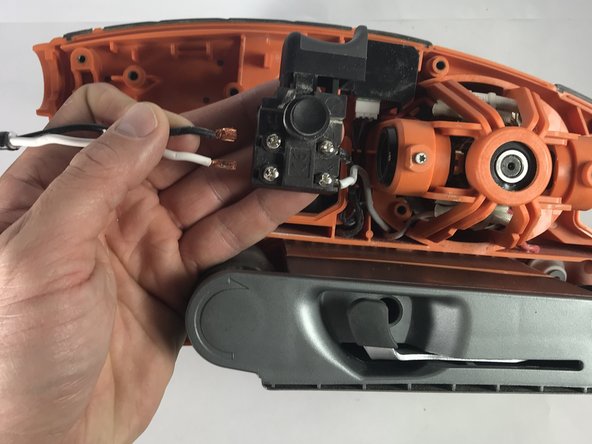
    • Loosen the two 8 mm Phillips #3 screws.

    • Pull the two wires away from the switch.

결론

To reassemble your device, follow these instructions in reverse order.

다른 3명이 해당 안내서를 완성하였습니다.

Cameron Smith

회원 가입일: 01/10/19

303 평판

안내서 2개 작성하였습니다

댓글 0개

댓글 쓰기

조회 통계:

24 시간 전: 0

7일 전: 0

30일 전: 9

전체 시간: 637