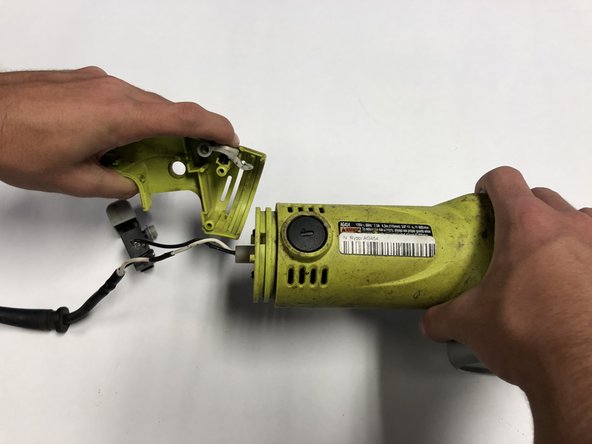
주요 콘텐츠로 건너뛰기

RYOBI AG454 Motor Replacement

필요한 것

  1. RYOBI AG454 Motor Replacement, Rotator Handle: 1 단계, 이미지 1/1
    • Lay the handle on it's side, with the screws facing up.

  2. RYOBI AG454 Motor Replacement: 2 단계, 이미지 1/1
    • Remove the five 14mm screws from the rotating handle using the Phillips #1 screwdriver.

  3. RYOBI AG454 Motor Replacement: 3 단계, 이미지 1/1
    • Take the top part of the handle off.

  4. RYOBI AG454 Motor Replacement: 4 단계, 이미지 1/1
    • Unscrew the two 14mm screws from the clear bracket using the Phillips #1 screwdriver.

    • Remove the bracket.

  5. RYOBI AG454 Motor Replacement: 5 단계, 이미지 1/2 RYOBI AG454 Motor Replacement: 5 단계, 이미지 2/2
    • Push handle rotation latch and seperate the rest of the handle from main body.

  6. RYOBI AG454 Motor Replacement, Carbon Brush: 6 단계, 이미지 1/1
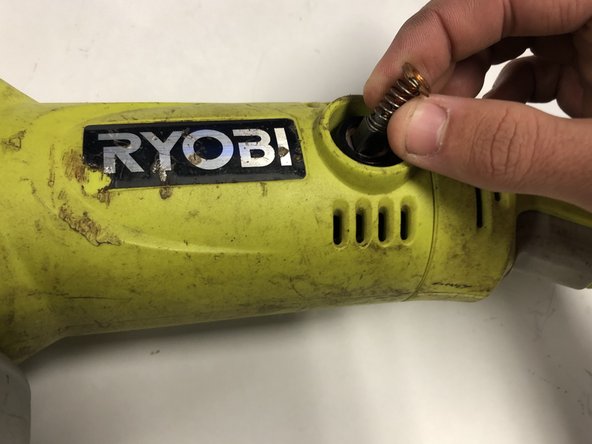
    • Remove the brush caps from each side of the body using the 4 mm flat head screwdriver.

  7. RYOBI AG454 Motor Replacement: 7 단계, 이미지 1/1
    • Remove the carbon brushes.

  8. RYOBI AG454 Motor Replacement, Driveshaft: 8 단계, 이미지 1/2 RYOBI AG454 Motor Replacement, Driveshaft: 8 단계, 이미지 2/2
    • Remove the two carbon brushes from both sides of the device.

  9. RYOBI AG454 Motor Replacement: 9 단계, 이미지 1/1
    • Remove the four 20mm screws that secures the gear box using a Phillips #1 screwdriver.

  10. RYOBI AG454 Motor Replacement: 10 단계, 이미지 1/1
    • Seperate the gear box case from body.

  11. RYOBI AG454 Motor Replacement: 11 단계, 이미지 1/1
    • Pull out drive shaft and remove it from the device.

  12. RYOBI AG454 Motor Replacement, Motor: 12 단계, 이미지 1/2 RYOBI AG454 Motor Replacement, Motor: 12 단계, 이미지 2/2
    • Remove the carbon brushes on both sides of the grinder.

  13. RYOBI AG454 Motor Replacement: 13 단계, 이미지 1/1
    • Remove the four 20mm screws securing gear box case using a Phillips #1 screwdriver.

  14. RYOBI AG454 Motor Replacement: 14 단계, 이미지 1/1
    • Seperate gear box case from body.

  15. RYOBI AG454 Motor Replacement: 15 단계, 이미지 1/1
    • Pull drive shaft from body of device.

  16. RYOBI AG454 Motor Replacement: 16 단계, 이미지 1/1
    • After removing the drive shaft pull out the cap.

  17. RYOBI AG454 Motor Replacement: 17 단계, 이미지 1/1
    • To remove the handle, remove the five screws using a Phillips #1 screwdriver.

  18. RYOBI AG454 Motor Replacement: 18 단계, 이미지 1/1
    • Cut the white wire that's located below the trigger in rear rotator handle with wire strippers.

    • When reassembling the handle twist the ends of the two wires together and crimp them.

  19. RYOBI AG454 Motor Replacement: 19 단계, 이미지 1/2 RYOBI AG454 Motor Replacement: 19 단계, 이미지 2/2
    • Using a Phillips #1 screwdriver, remove the two screws from the bracket on the bottom of the body.

    • Remove the bracket from the device.

    • When reassembling be sure to pull the wires back through these two holes.

  20. RYOBI AG454 Motor Replacement: 20 단계, 이미지 1/1
    • Remove two screws from the motor using the Phillips #1 screwdriver.

  21. RYOBI AG454 Motor Replacement: 21 단계, 이미지 1/1
    • From the bottom of the body, slide the two coils off the brushes with a Jimmy.

    • When putting the coils back in place, use the Jimmy on top of the coils and push down the roll around the edges to push the coil down.

    • Another way of putting the coils back on is to push the Jimmy on top of coil and use another Jimmy to push down the back of the coil.

    • Putting on the coils may take multiple attempts so do not get frustrated if you can't get it on first try.

  22. RYOBI AG454 Motor Replacement: 22 단계, 이미지 1/1
    • Carefully pull motor along with wires straight out from the body and remove it from the device.

결론

To reassemble your device, follow these instructions in reverse order.

Erica Faulkner

회원 가입일: 09/18/19

716 평판

안내서 5개 작성하였습니다

댓글 0개

댓글 쓰기

조회 통계:

24 시간 전: 2

7일 전: 3

30일 전: 11

전체 시간: 560