주요 콘텐츠로 건너뛰기

Razer Blade RZ09-0130 2015 Motherboard Replacement

필요한 것

  1. Razer Blade RZ09-0130 2015 Motherboard Replacement, Back Panel: 1 단계, 이미지 1/2 Razer Blade RZ09-0130 2015 Motherboard Replacement, Back Panel: 1 단계, 이미지 2/2
    • Be sure to power off the device before beginning.

    • Use a Torx T5 screwdriver to remove the ten 3 mm screws along the edge of the back panel.

  2. Razer Blade RZ09-0130 2015 Motherboard Replacement: 2 단계, 이미지 1/2 Razer Blade RZ09-0130 2015 Motherboard Replacement: 2 단계, 이미지 2/2
    • Remove the back panel from the laptop by sliding it away from the hinge.

    • This device is missing the battery. Make sure to detach the battery connector before proceeding with laptop repairs.

  3. Razer Blade RZ09-0130 2015 Motherboard Replacement, Speaker: 3 단계, 이미지 1/1
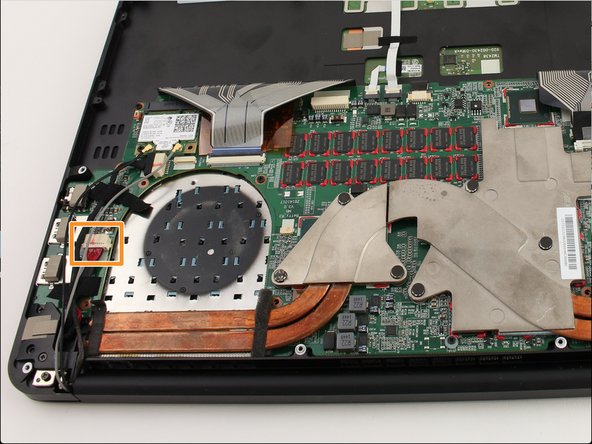
    • Using the Phillips #0 screwdriver, remove the two 3mm screws from the right speaker.

  4. Razer Blade RZ09-0130 2015 Motherboard Replacement: 4 단계, 이미지 1/2 Razer Blade RZ09-0130 2015 Motherboard Replacement: 4 단계, 이미지 2/2
    • Using your fingers, gently pull on the wire connecting the speaker to the motherboard until it disconnects.

  5. Razer Blade RZ09-0130 2015 Motherboard Replacement: 5 단계, 이미지 1/1
    • Pick up and remove the speaker.

  6. Razer Blade RZ09-0130 2015 Motherboard Replacement: 6 단계, 이미지 1/1
    • Repeat the preceding steps to remove the second speaker.

  7. Razer Blade RZ09-0130 2015 Motherboard Replacement, Fan: 7 단계, 이미지 1/2 Razer Blade RZ09-0130 2015 Motherboard Replacement, Fan: 7 단계, 이미지 2/2
    • Remove the three screw caps by pulling them upward with your fingers.

  8. Razer Blade RZ09-0130 2015 Motherboard Replacement: 8 단계, 이미지 1/1
    • Remove the three 3mm Phillips #0 screws.

  9. Razer Blade RZ09-0130 2015 Motherboard Replacement: 9 단계, 이미지 1/2 Razer Blade RZ09-0130 2015 Motherboard Replacement: 9 단계, 이미지 2/2
    • Peel back the two adhesive strips from the fan until they are removed.

  10. Razer Blade RZ09-0130 2015 Motherboard Replacement: 10 단계, 이미지 1/3 Razer Blade RZ09-0130 2015 Motherboard Replacement: 10 단계, 이미지 2/3 Razer Blade RZ09-0130 2015 Motherboard Replacement: 10 단계, 이미지 3/3
    • Remove the connector by pulling it away from the motherboard with your fingers.

  11. Razer Blade RZ09-0130 2015 Motherboard Replacement: 11 단계, 이미지 1/1
    • Holding the rounded edge of the fan, slowly lift upwards until it is removed.

  12. Razer Blade RZ09-0130 2015 Motherboard Replacement: 12 단계, 이미지 1/1
    • Repeat the preceding steps to remove the second fan.

  13. Razer Blade RZ09-0130 2015 Motherboard Replacement, Motherboard: 13 단계, 이미지 1/1
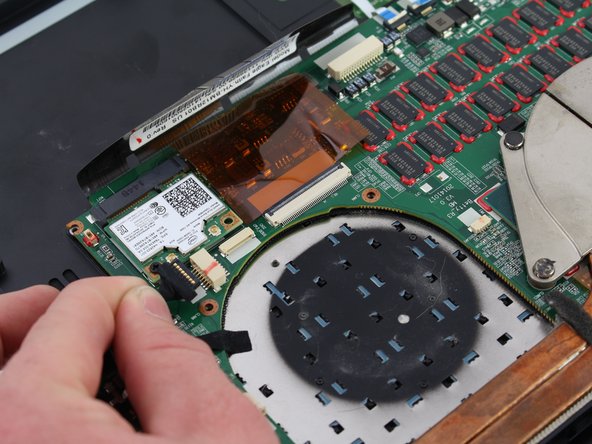
    • Using the Phillips #0 screwdriver, remove the four 3mm screws connecting the motherboard to the chassis of the device.

  14. Razer Blade RZ09-0130 2015 Motherboard Replacement: 14 단계, 이미지 1/3 Razer Blade RZ09-0130 2015 Motherboard Replacement: 14 단계, 이미지 2/3 Razer Blade RZ09-0130 2015 Motherboard Replacement: 14 단계, 이미지 3/3
    • Using the Phillips #0 screwdriver, remove the three 3mm screws connecting the charging port to the chassis of the device.

    • Gently pull on the cables connecting the charging port to the motherboard until it disconnects.

    • Lift the port out of the device.

  15. Razer Blade RZ09-0130 2015 Motherboard Replacement: 15 단계, 이미지 1/2 Razer Blade RZ09-0130 2015 Motherboard Replacement: 15 단계, 이미지 2/2
    • Remove the paper connector by first flipping the plastic crimp upwards and then pulling it away from the motherboard.

    • Repeat for the paper connector on the other side of the motherboard.

  16. Razer Blade RZ09-0130 2015 Motherboard Replacement: 16 단계, 이미지 1/2 Razer Blade RZ09-0130 2015 Motherboard Replacement: 16 단계, 이미지 2/2
    • Remove the cable connecting the motherboard to the display by gently puling it upwards with your fingers.

  17. Razer Blade RZ09-0130 2015 Motherboard Replacement: 17 단계, 이미지 1/3 Razer Blade RZ09-0130 2015 Motherboard Replacement: 17 단계, 이미지 2/3 Razer Blade RZ09-0130 2015 Motherboard Replacement: 17 단계, 이미지 3/3
    • Using a plastic spudger, push the plastic crimps holding the paper connector to the motherboard until they unlock.

    • Pull the paper connector away from the motherboard.

  18. Razer Blade RZ09-0130 2015 Motherboard Replacement: 18 단계, 이미지 1/2 Razer Blade RZ09-0130 2015 Motherboard Replacement: 18 단계, 이미지 2/2
    • Remove the small connectors connecting the motherboard to the trackpad by first flipping up the plastic crimps and then pulling them away from the motherboard with your fingers.

  19. Razer Blade RZ09-0130 2015 Motherboard Replacement: 19 단계, 이미지 1/3 Razer Blade RZ09-0130 2015 Motherboard Replacement: 19 단계, 이미지 2/3 Razer Blade RZ09-0130 2015 Motherboard Replacement: 19 단계, 이미지 3/3
    • Remove the two small cables connecting the display to the motherboard by lifting them away from the motherboard with your fingers.

    • Disconnect the last cable connecting the display to the motherboard by pulling on it gently with your fingers.

  20. Razer Blade RZ09-0130 2015 Motherboard Replacement: 20 단계, 이미지 1/1
    • With the trackpad away from your body, lift the right side of the motherboard up.

    • Then, pull it up and to the right to remove the motherboard from the chassis.

    • If you do not lift your motherboard out and to the right, you might snap the audio port of your device since it protrudes slightly outside of the chassis.

결론

To reassemble your device, follow these instructions in reverse order.

Carson Kellerman

회원 가입일: 01/29/20

495 평판

안내서 4개 작성하였습니다

Cal Poly, Team S18-G1, White Winter 2020 Cal Poly, Team S18-G1, White Winter 2020 회원

CPSU-WHITE-W20S18G1

4 회원들

안내서 6개 작성하였습니다

댓글 0개

댓글 쓰기

조회 통계:

24 시간 전: 1

7일 전: 3

30일 전: 15

전체 시간: 1,012