주요 콘텐츠로 건너뛰기

이 버전에는 잘못된 편집 사항이 있을 수 있습니다. 최신 확인된 스냅샷으로 전환하십시오.

필요한 것

  1. 이 단계는 번역되지 않았습니다. 번역을 도와주십시오

    : 1 단계, 이미지 1/1
    • Opening the mouse casing will void any warranty that exists for the mouse.

    • Turn the mouse over so the bottom is facing up.

  2. 이 단계는 번역되지 않았습니다. 번역을 도와주십시오

    : 2 단계, 이미지 1/2 : 2 단계, 이미지 2/2
    • Use the blunt end of the spudger to pry the adhesive rubber pads from the top left and right edges.

  3. 이 단계는 번역되지 않았습니다. 번역을 도와주십시오

    : 3 단계, 이미지 1/2 : 3 단계, 이미지 2/2
    • Use a Phillips #0 screwdriver to remove two 6.7 mm screws.

  4. 이 단계는 번역되지 않았습니다. 번역을 도와주십시오

    : 4 단계, 이미지 1/1
    • Use your fingers to identify the location of the screw under the bottom label.

  5. 이 단계는 번역되지 않았습니다. 번역을 도와주십시오

    : 5 단계, 이미지 1/1
    • Use a Phillips #0 screwdriver to remove one 6.7 mm screw.

    • Clear the label away from around the screw for easier removal.

  6. 이 단계는 번역되지 않았습니다. 번역을 도와주십시오

    : 6 단계, 이미지 1/3 : 6 단계, 이미지 2/3 : 6 단계, 이미지 3/3
    • Turn the mouse over so the bottom is facing down.

    • Separate the top casing from the bottom base by pulling the top casing upwards.

    • Separating the casing too quickly could damage the ribbon connector between the motherboard and the LED lights.

  7. 이 단계는 번역되지 않았습니다. 번역을 도와주십시오

    : 7 단계, 이미지 1/2 : 7 단계, 이미지 2/2
    • Disconnect the ribbon connector between the motherboard and the LED lights by pulling upward.

    • Pulling too hard could damage the wire connections.

  8. 이 단계는 번역되지 않았습니다. 번역을 도와주십시오

    : 8 단계, 이미지 1/2 : 8 단계, 이미지 2/2
    • Disconnect the ribbon connector between the motherboard and the USB cable by pulling upward.

  9. 이 단계는 번역되지 않았습니다. 번역을 도와주십시오

    : 9 단계, 이미지 1/1
    • Use a Phillips #0 screwdriver to remove three 5.5 mm screws.

  10. 이 단계는 번역되지 않았습니다. 번역을 도와주십시오

    : 10 단계, 이미지 1/2 : 10 단계, 이미지 2/2
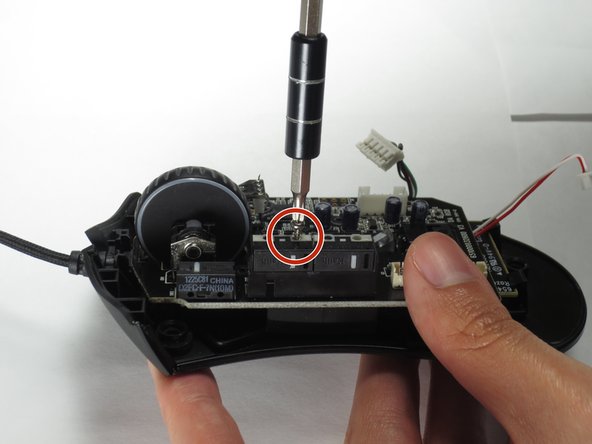
    • Use a Phillips #0 screwdriver to remove two 11.5 mm screws on the side buttons.

  11. 이 단계는 번역되지 않았습니다. 번역을 도와주십시오

    : 11 단계, 이미지 1/1
    • Use a Phillips #000 screwdriver to remove one 5.0 mm screw.

  12. 이 단계는 번역되지 않았습니다. 번역을 도와주십시오

    : 12 단계, 이미지 1/2 : 12 단계, 이미지 2/2
    • Disconnect the ribbon connector between the motherboard and the optical sensor.

  13. 이 단계는 번역되지 않았습니다. 번역을 도와주십시오

    : 13 단계, 이미지 1/2 : 13 단계, 이미지 2/2
    • Remove the motherboard by grasping the sides and gently pulling upward.

  14. 이 단계는 번역되지 않았습니다. 번역을 도와주십시오

    : 14 단계, 이미지 1/1
    • Locate the USB cable.

  15. 이 단계는 번역되지 않았습니다. 번역을 도와주십시오

    : 15 단계, 이미지 1/2 : 15 단계, 이미지 2/2
    • Remove the USB cable by pulling it up and out.

결승점

다른 7명이 해당 안내서를 완성하였습니다.

Henry Shi

회원 가입일: 03/26/17

221 평판

안내서 1개 작성함

Baylor, Team S5-G2, Williams Spring 2017 Baylor, Team S5-G2, Williams Spring 2017 회원

BU-WILLIAMS-S17S5G2

3 회원들

안내서 6개 작성하였습니다

댓글 5개

Thank you! It realy worked. Btw: The cable for the Deathadder 2013 is working for the Chroma and Elite as well. I Just tried it :)

Pokefreeks - 답글

Thanks for the advice

João Costa Santos -

Great and easy guide thanx alot, saved me a new mouse :)

jesperkb - 답글

Is there a reliable website where I can get a replacement cable with low delivery time?

Bubbles EXE - 답글

where can i get the cable from?

Mourya Singham - 답글

댓글 쓰기

조회 통계:

24 시간 전: 2

7일 전: 17

30일 전: 44

전체 시간: 14,375