주요 콘텐츠로 건너뛰기

Razer Kraken Ultimate Volume Wheel Replacement

필요한 것

  1. Razer Kraken Ultimate Volume Wheel Replacement, Ear Pads: 1 단계, 이미지 1/3 Razer Kraken Ultimate Volume Wheel Replacement, Ear Pads: 1 단계, 이미지 2/3 Razer Kraken Ultimate Volume Wheel Replacement, Ear Pads: 1 단계, 이미지 3/3
    • Grab the ear piece from one of the sides and lightly pull it outwards.

    • Ideally, do not pull the ear piece directly away from the speaker; it may damage the piece.

  2. Razer Kraken Ultimate Volume Wheel Replacement: 2 단계, 이미지 1/2 Razer Kraken Ultimate Volume Wheel Replacement: 2 단계, 이미지 2/2
    • Once you have taken off one side, you can then remove the whole piece by slowly prying the pad away from the headphones.

  3. Razer Kraken Ultimate Volume Wheel Replacement: 3 단계, 이미지 1/2 Razer Kraken Ultimate Volume Wheel Replacement: 3 단계, 이미지 2/2
    • Repeat steps on the other side.

  4. Razer Kraken Ultimate Volume Wheel Replacement, Speaker: 4 단계, 이미지 1/3 Razer Kraken Ultimate Volume Wheel Replacement, Speaker: 4 단계, 이미지 2/3 Razer Kraken Ultimate Volume Wheel Replacement, Speaker: 4 단계, 이미지 3/3
    • Remove the four 10 mm Phillips #00 screws securing the right speaker.

    • Be sure the device is unplugged before attempting to remove any of the screws.

  5. Razer Kraken Ultimate Volume Wheel Replacement: 5 단계, 이미지 1/2 Razer Kraken Ultimate Volume Wheel Replacement: 5 단계, 이미지 2/2
    • Remove the 10 mm Phillips #00 screws securing the left speaker.

    • Note that one of the screws is hidden behind the product information sticker. Use your screw driver to punch a hole in the sticker.

  6. Razer Kraken Ultimate Volume Wheel Replacement: 6 단계, 이미지 1/2 Razer Kraken Ultimate Volume Wheel Replacement: 6 단계, 이미지 2/2
    • To fully detach the speakers cut the wires as close as possible to the connection point, leaving plenty of room to solder the new speaker on.

  7. Razer Kraken Ultimate Volume Wheel Replacement, Microphone: 7 단계, 이미지 1/3 Razer Kraken Ultimate Volume Wheel Replacement, Microphone: 7 단계, 이미지 2/3 Razer Kraken Ultimate Volume Wheel Replacement, Microphone: 7 단계, 이미지 3/3
    • Remove the two 10 mm Phillips #00 screws securing the microphone.

  8. Razer Kraken Ultimate Volume Wheel Replacement: 8 단계, 이미지 1/1
    • Gently pry the bottom connection away from the casing with the iFixit opening tool.

  9. Razer Kraken Ultimate Volume Wheel Replacement: 9 단계, 이미지 1/2 Razer Kraken Ultimate Volume Wheel Replacement: 9 단계, 이미지 2/2
    • Pull the microphone down and out of the casing.

  10. Razer Kraken Ultimate Volume Wheel Replacement: 10 단계, 이미지 1/1
    • Open up the casing the microphone retracks into.

    • Cut the cable as close to the microphone as possible, leaving behind enough to solder the new microphone to.

    • The casing the microphone if removed correctly in the previous step is easily opened by hand

  11. Razer Kraken Ultimate Volume Wheel Replacement, Volume Wheel: 11 단계, 이미지 1/2 Razer Kraken Ultimate Volume Wheel Replacement, Volume Wheel: 11 단계, 이미지 2/2
    • The volume wheel is located on the daughterboard.

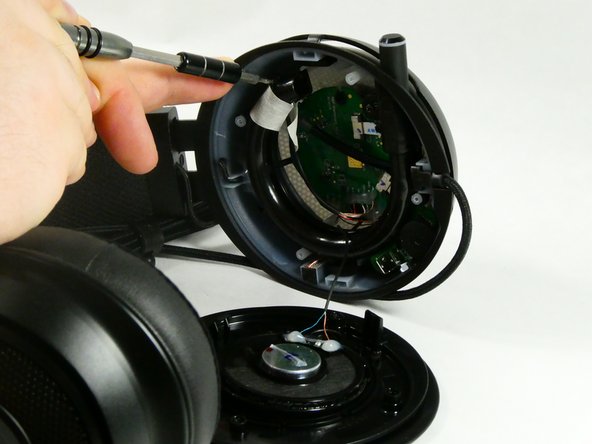
    • Remove the single 6.0 mm Philips #00 screw.

  12. Razer Kraken Ultimate Volume Wheel Replacement: 12 단계, 이미지 1/1
    • Gently pull the board out of the housing.

    • Be careful not to tug on the connected ribbon cable.

  13. Razer Kraken Ultimate Volume Wheel Replacement: 13 단계, 이미지 1/2 Razer Kraken Ultimate Volume Wheel Replacement: 13 단계, 이미지 2/2
    • The wheel can be easily removed after removing the daughterboard.

결론

To reassemble your device, follow these instructions in reverse order.

Alex Broggi

회원 가입일: 10/24/22

342 평판

안내서 3개 작성하였습니다

UMass Dartmouth, Team 1-4, Petersen Fall 2022 UMass Dartmouth, Team 1-4, Petersen Fall 2022 회원

UMASSD-PETERSEN-F22S1G4

5 회원들

안내서 6개 작성하였습니다

댓글 0개

댓글 쓰기

조회 통계:

24 시간 전: 3

7일 전: 6

30일 전: 23

전체 시간: 798