주요 콘텐츠로 건너뛰기

Razer Naga Trinity LED Light Ribbon Cable Replacement

필요한 것

  1. Razer Naga Trinity LED Light Ribbon Cable Replacement, Razer Naga Trinity Disassembly: 1 단계, 이미지 1/2 Razer Naga Trinity LED Light Ribbon Cable Replacement, Razer Naga Trinity Disassembly: 1 단계, 이미지 2/2
    • Remove the interchangeable side plate.

  2. Razer Naga Trinity LED Light Ribbon Cable Replacement: 2 단계, 이미지 1/2 Razer Naga Trinity LED Light Ribbon Cable Replacement: 2 단계, 이미지 2/2
    • Remove the mouse's feet using the opening pick.

  3. Razer Naga Trinity LED Light Ribbon Cable Replacement: 3 단계, 이미지 1/1
    • Remove the four 6mm screws by using a JIS #1 screwdriver.

  4. Razer Naga Trinity LED Light Ribbon Cable Replacement: 4 단계, 이미지 1/2 Razer Naga Trinity LED Light Ribbon Cable Replacement: 4 단계, 이미지 2/2
    • Separate the top mouse housing from the bottom mouse housing using the opening pick.

    • Be careful not to tug too hard on the ribbon connector.

  5. Razer Naga Trinity LED Light Ribbon Cable Replacement: 5 단계, 이미지 1/1
    • Unlock the ribbon connector that is held down by the main board clips using the spudger's pointed end.

  6. Razer Naga Trinity LED Light Ribbon Cable Replacement: 6 단계, 이미지 1/1
    • Remove the side housing using the opening pick.

  7. Razer Naga Trinity LED Light Ribbon Cable Replacement: 7 단계, 이미지 1/2 Razer Naga Trinity LED Light Ribbon Cable Replacement: 7 단계, 이미지 2/2
    • Remove the top housing LED 3-Pin connector that is near the main board.

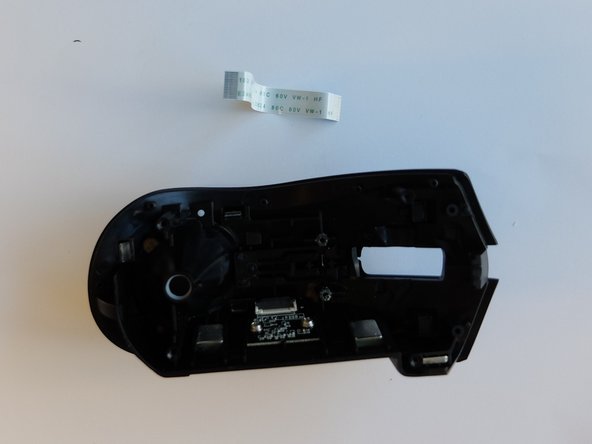
  8. Razer Naga Trinity LED Light Ribbon Cable Replacement, LED Light Ribbon Cable: 8 단계, 이미지 1/2 Razer Naga Trinity LED Light Ribbon Cable Replacement, LED Light Ribbon Cable: 8 단계, 이미지 2/2
    • Using the flat end of a spudger, unlock the ribbon cable holding the clips.

    • Remove the ribbon cable.

결론

To reassemble your device, follow these instructions in reverse order.

Alexandros Andreou

회원 가입일: 09/16/19

700 평판

안내서 3개 작성하였습니다

댓글 0개

댓글 쓰기

조회 통계:

24 시간 전: 0

7일 전: 2

30일 전: 19

전체 시간: 1,486