주요 콘텐츠로 건너뛰기

이 안내서에는 최근 변경 사항이 더 있습니다. 최신 비검증 버전으로 전환하십시오.

Razer Naga Trinity OMRON D2FC-F-K(50M) Micro Switch Replacement

필요한 것

  1. Razer Naga Trinity OMRON D2FC-F-K(50M) Micro Switch Replacement, Razer Naga Trinity Disassembly: 1 단계, 이미지 1/2 Razer Naga Trinity OMRON D2FC-F-K(50M) Micro Switch Replacement, Razer Naga Trinity Disassembly: 1 단계, 이미지 2/2
    • Remove the interchangeable side plate.

  2. Razer Naga Trinity OMRON D2FC-F-K(50M) Micro Switch Replacement: 2 단계, 이미지 1/2 Razer Naga Trinity OMRON D2FC-F-K(50M) Micro Switch Replacement: 2 단계, 이미지 2/2
    • Remove the mouse's feet using the opening pick.

  3. Razer Naga Trinity OMRON D2FC-F-K(50M) Micro Switch Replacement: 3 단계, 이미지 1/1
    • Remove the four 6mm screws by using a JIS #1 screwdriver.

  4. Razer Naga Trinity OMRON D2FC-F-K(50M) Micro Switch Replacement: 4 단계, 이미지 1/2 Razer Naga Trinity OMRON D2FC-F-K(50M) Micro Switch Replacement: 4 단계, 이미지 2/2
    • Separate the top mouse housing from the bottom mouse housing using the opening pick.

    • Be careful not to tug too hard on the ribbon connector.

  5. Razer Naga Trinity OMRON D2FC-F-K(50M) Micro Switch Replacement: 5 단계, 이미지 1/1
    • Unlock the ribbon connector that is held down by the main board clips using the spudger's pointed end.

  6. Razer Naga Trinity OMRON D2FC-F-K(50M) Micro Switch Replacement: 6 단계, 이미지 1/1
    • Remove the side housing using the opening pick.

  7. Razer Naga Trinity OMRON D2FC-F-K(50M) Micro Switch Replacement: 7 단계, 이미지 1/2 Razer Naga Trinity OMRON D2FC-F-K(50M) Micro Switch Replacement: 7 단계, 이미지 2/2
    • Remove the top housing LED 3-Pin connector that is near the main board.

  8. Razer Naga Trinity OMRON D2FC-F-K(50M) Micro Switch Replacement, Scroll Wheel Housing: 8 단계, 이미지 1/2 Razer Naga Trinity OMRON D2FC-F-K(50M) Micro Switch Replacement, Scroll Wheel Housing: 8 단계, 이미지 2/2
    • Remove one 4mm black Phillips #000 screw from the left side of the mouse holding the scroll wheel LED controller board.

    • Then pull the LED controller board upwards and out.

  9. Razer Naga Trinity OMRON D2FC-F-K(50M) Micro Switch Replacement: 9 단계, 이미지 1/1
    • Pry and remove the scroll wheel feedback bar from its hold-down clips using the hook end of a halberd spudger.

  10. Razer Naga Trinity OMRON D2FC-F-K(50M) Micro Switch Replacement: 10 단계, 이미지 1/1
    • Remove the scroll wheel feedback bar from the scroll wheel by holding down the spring and using angled tweezers to remove it from its placement.

  11. Razer Naga Trinity OMRON D2FC-F-K(50M) Micro Switch Replacement: 11 단계, 이미지 1/2 Razer Naga Trinity OMRON D2FC-F-K(50M) Micro Switch Replacement: 11 단계, 이미지 2/2
    • Remove the scroll wheel optical encoder 3-pin connector from the main board by wiggling the connector upwards.

  12. Razer Naga Trinity OMRON D2FC-F-K(50M) Micro Switch Replacement: 12 단계, 이미지 1/3 Razer Naga Trinity OMRON D2FC-F-K(50M) Micro Switch Replacement: 12 단계, 이미지 2/3 Razer Naga Trinity OMRON D2FC-F-K(50M) Micro Switch Replacement: 12 단계, 이미지 3/3
    • Using the opening tool, pry the black bracket holding the scroll wheel in place backwards until the scroll wheel housing pops out.

  13. Razer Naga Trinity OMRON D2FC-F-K(50M) Micro Switch Replacement, OMRON D2FC-F-K(50M) Micro Switch: 13 단계, 이미지 1/2 Razer Naga Trinity OMRON D2FC-F-K(50M) Micro Switch Replacement, OMRON D2FC-F-K(50M) Micro Switch: 13 단계, 이미지 2/2
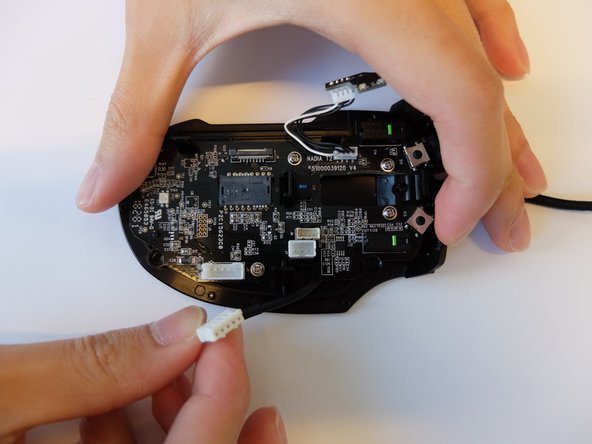
    • Remove the USB Type A to 5-pin connector from the main board by pinching and pulling upwards.

  14. Razer Naga Trinity OMRON D2FC-F-K(50M) Micro Switch Replacement: 14 단계, 이미지 1/2 Razer Naga Trinity OMRON D2FC-F-K(50M) Micro Switch Replacement: 14 단계, 이미지 2/2
    • Remove four 3mm JIS #1 screws holding the main board.

  15. Razer Naga Trinity OMRON D2FC-F-K(50M) Micro Switch Replacement: 15 단계, 이미지 1/2 Razer Naga Trinity OMRON D2FC-F-K(50M) Micro Switch Replacement: 15 단계, 이미지 2/2
    • Place the tip of the soldering iron onto the micro switch contact pins.

    • Work around the micro switch pins while prying the switch with an opening pick.

  16. Razer Naga Trinity OMRON D2FC-F-K(50M) Micro Switch Replacement: 16 단계, 이미지 1/3 Razer Naga Trinity OMRON D2FC-F-K(50M) Micro Switch Replacement: 16 단계, 이미지 2/3 Razer Naga Trinity OMRON D2FC-F-K(50M) Micro Switch Replacement: 16 단계, 이미지 3/3
    • Remove and replace OMRON D2FC-F-K(50M) micro switch.

    • Solder all three micro switch pins with soldering iron.

    • Ensure the micro switch is bonded by performing a tug test.

결론

To reassemble your device, follow these instructions in reverse order.

다른 10명이 해당 안내서를 완성하였습니다.

Zackary Tempert

회원 가입일: 09/16/19

229 평판

안내서 1개 작성함

댓글 12개

dont bother. It took me 2 hours to get it replace and left click still dident work even when i heared it click. Just work some over time at work and buy a new

incognito666z - 답글

If the switch is still clicking and you tried replacing it, the issue surely is somewhere else.

You should look if there are other parts inside that look “

Andreas -

I was in contact with Razer support for about a week now before getting the usual response “sorry I checked, we don’t have any replacement parts” and basically told me to go &&^& myself and buy a new one.

I spent more than 100€ on this thing yet whenever I ask support ANYTHING it always boils down to this. This is the third time with three different Razer devices and I always get the same answer.

I’ll try this fix here and if that doesn’t work, this was surely the last time Razer got a single cent out of me.

Andreas - 답글

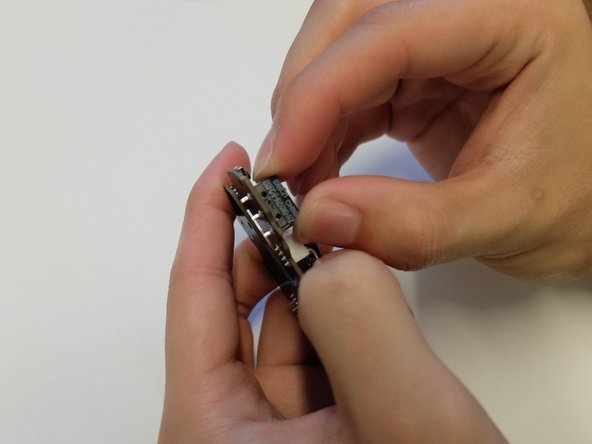
If you're not afraid of working with very small parts you can also try fixing the switch itself. You have to bend a small metal lip and that should fix the issue.

Here is a guide on how to do it, fixed my mouse with that one just half an hour ago.

https://www.youtube.com/watch?v=eDoXMJyi...

Andreas - 답글

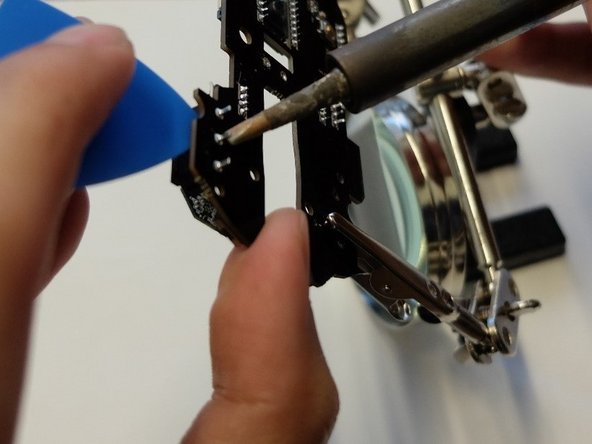
30-60 minutes? The author is liar! Took me 4 hours to complete just the step 15 “desolder the faulty switch” :D. For some reason I could not suck out all of the molten solder and it was always stuck somewhere. Really pain in the a**. Other parts of the guide made opening the mouse, disassembly and assembly rather very easy process. Soldering in new part as well. Transplantation is now complete and the patient survived. Thanks for the guide

Jan - 답글

댓글 쓰기

조회 통계:

24 시간 전: 10

7일 전: 94

30일 전: 351

전체 시간: 18,536