주요 콘텐츠로 건너뛰기

Razer Phone Earpiece Speaker Replacement

필요한 것

  1. Razer Phone Earpiece Speaker Replacement, Display Assembly: 1 단계, 이미지 1/3 Razer Phone Earpiece Speaker Replacement, Display Assembly: 1 단계, 이미지 2/3 Razer Phone Earpiece Speaker Replacement, Display Assembly: 1 단계, 이미지 3/3
    • Remove the plastic speaker grills by using the metal spudger to pry underneath the strips.

    • Peel off the plastic speaker grill to reveal the screws.

    • Heating up the plastic grills make them easier to remove.

    • Peeling off the plastic speaker grill will ruin the adhesive used to keep it in place. A new adhesive must be used to put the grill back on the device.

  2. Razer Phone Earpiece Speaker Replacement: 2 단계, 이미지 1/2 Razer Phone Earpiece Speaker Replacement: 2 단계, 이미지 2/2
    • Pry the top plastic grill off with the metal spudger and reveal the screws.

  3. Razer Phone Earpiece Speaker Replacement: 3 단계, 이미지 1/3 Razer Phone Earpiece Speaker Replacement: 3 단계, 이미지 2/3 Razer Phone Earpiece Speaker Replacement: 3 단계, 이미지 3/3
    • Remove five (two bottom, three top) 2.5 mm screws with the Phillips #000 screwdriver.

    • Remove five (four bottom, one top) 5.5 mm screws with the Torx Head T5 screwdriver.

  4. Razer Phone Earpiece Speaker Replacement: 4 단계, 이미지 1/2 Razer Phone Earpiece Speaker Replacement: 4 단계, 이미지 2/2
    • Remove the display assembly by using the Jimmy to separate the assembly from the phone's frame.

    • Lift the display assembly away from the other half of the phone.

  5. Razer Phone Earpiece Speaker Replacement: 5 단계, 이미지 1/3 Razer Phone Earpiece Speaker Replacement: 5 단계, 이미지 2/3 Razer Phone Earpiece Speaker Replacement: 5 단계, 이미지 3/3
    • Remove one 2.5 mm screw holding down the metal bracket connector using the Phillips #000 screwdriver.

    • Peel back the metallic shielding over the connector using tweezers.

    • Remove the metal bracket connector.

  6. Razer Phone Earpiece Speaker Replacement: 6 단계, 이미지 1/2 Razer Phone Earpiece Speaker Replacement: 6 단계, 이미지 2/2
    • Grab hold of the the screen ribbon with the tweezers and remove it from the rest of the phone to free the assembly display.

  7. Razer Phone Earpiece Speaker Replacement, Battery: 7 단계, 이미지 1/3 Razer Phone Earpiece Speaker Replacement, Battery: 7 단계, 이미지 2/3 Razer Phone Earpiece Speaker Replacement, Battery: 7 단계, 이미지 3/3
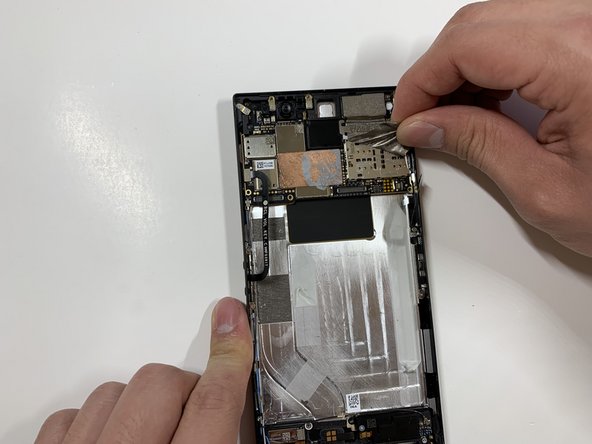
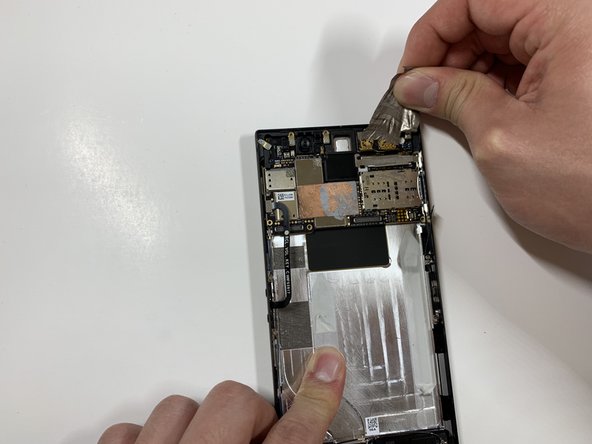
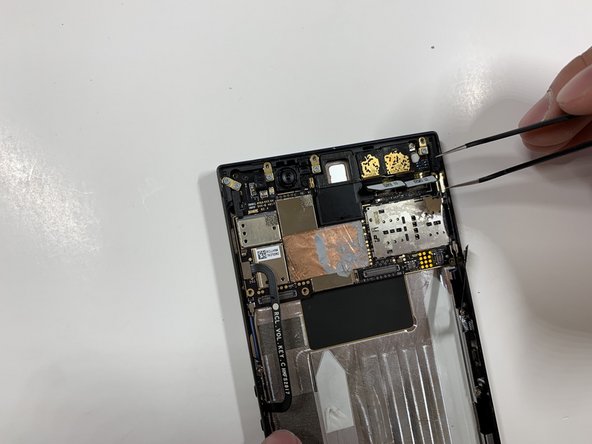
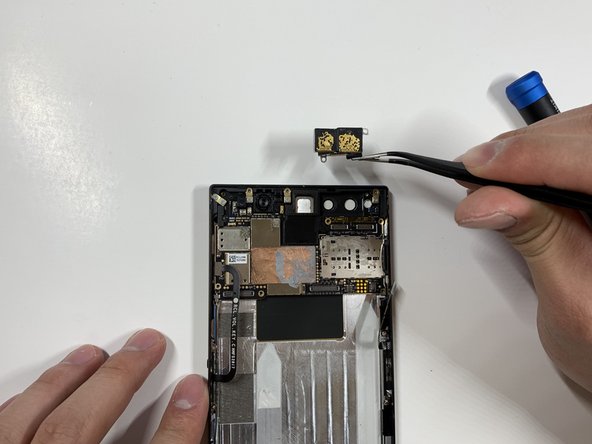
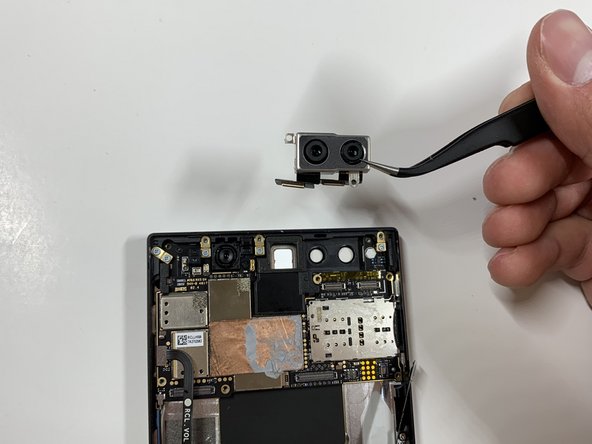
    • Grab hold of the connector on the right side of the phone (just above the battery) using the tweezers.

    • Remove the connector.

  8. Razer Phone Earpiece Speaker Replacement: 8 단계, 이미지 1/2 Razer Phone Earpiece Speaker Replacement: 8 단계, 이미지 2/2
    • Remove the 2.5 mm screw holding down the bracket with a Phillips #000 screwdriver.

    • Grab the bracket with the tweezers and remove it.

  9. Razer Phone Earpiece Speaker Replacement: 9 단계, 이미지 1/3 Razer Phone Earpiece Speaker Replacement: 9 단계, 이미지 2/3 Razer Phone Earpiece Speaker Replacement: 9 단계, 이미지 3/3
    • Peel off and pull out the elastic tabs at the bottom of the battery.

  10. Razer Phone Earpiece Speaker Replacement: 10 단계, 이미지 1/2 Razer Phone Earpiece Speaker Replacement: 10 단계, 이미지 2/2
    • Carefully use the Jimmy to wedge the battery out of the phone.

  11. Razer Phone Earpiece Speaker Replacement, Charging Port: 11 단계, 이미지 1/2 Razer Phone Earpiece Speaker Replacement, Charging Port: 11 단계, 이미지 2/2
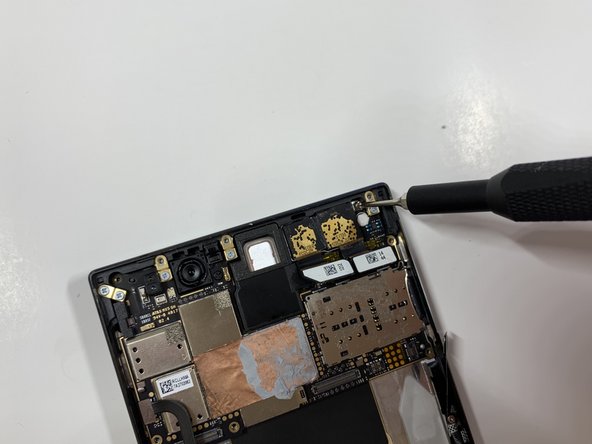
    • Using a Phillips #000 screwdriver, take out the seven 1 mm screws on the bottom panel of the device.

    • There are a few gold brackets under some of the screws. Make sure to remove these and keep them for reassembly.

  12. Razer Phone Earpiece Speaker Replacement: 12 단계, 이미지 1/2 Razer Phone Earpiece Speaker Replacement: 12 단계, 이미지 2/2
    • Grab hold of the blue connector on the upper left side of the phone with the tweezers.

    • Remove the connector.

  13. Razer Phone Earpiece Speaker Replacement: 13 단계, 이미지 1/2 Razer Phone Earpiece Speaker Replacement: 13 단계, 이미지 2/2
    • Use the tweezers to grab hold of the connector for the blue wire (bottom of the device), and remove the connector.

    • Use the tweezers to grab hold of the connector for the white wire, and remove the connector.

  14. Razer Phone Earpiece Speaker Replacement: 14 단계, 이미지 1/1
    • Using the tweezers, grab the detached charging port and ribbon.

  15. Razer Phone Earpiece Speaker Replacement, Rear Camera: 15 단계, 이미지 1/2 Razer Phone Earpiece Speaker Replacement, Rear Camera: 15 단계, 이미지 2/2
    • Remove the one 2.5 mm screw with the Phillips #000 screwdriver.

  16. Razer Phone Earpiece Speaker Replacement: 16 단계, 이미지 1/3 Razer Phone Earpiece Speaker Replacement: 16 단계, 이미지 2/3 Razer Phone Earpiece Speaker Replacement: 16 단계, 이미지 3/3
    • Remove the protective peel covering the rear cameras using your hands.

  17. Razer Phone Earpiece Speaker Replacement: 17 단계, 이미지 1/1
    • Use the tweezers to remove the white tab connector.

  18. Razer Phone Earpiece Speaker Replacement: 18 단계, 이미지 1/1
    • Grab and remove the metal tab with the tweezers.

  19. Razer Phone Earpiece Speaker Replacement: 19 단계, 이미지 1/3 Razer Phone Earpiece Speaker Replacement: 19 단계, 이미지 2/3 Razer Phone Earpiece Speaker Replacement: 19 단계, 이미지 3/3
    • Grab the connectors with the tweezers and gently lift the connectors loose.

  20. Razer Phone Earpiece Speaker Replacement: 20 단계, 이미지 1/2 Razer Phone Earpiece Speaker Replacement: 20 단계, 이미지 2/2
    • Remove the one 2.5 mm screw with the Phillips #000 screwdriver.

  21. Razer Phone Earpiece Speaker Replacement: 21 단계, 이미지 1/1
    • Remove the one 2.5 mm screw underneath the connectors with the Phillips #000 screwdriver.

  22. Razer Phone Earpiece Speaker Replacement: 22 단계, 이미지 1/3 Razer Phone Earpiece Speaker Replacement: 22 단계, 이미지 2/3 Razer Phone Earpiece Speaker Replacement: 22 단계, 이미지 3/3
    • Grab the loose connectors with a tweezer and gently remove the rear camera unit from the phone.

  23. Razer Phone Earpiece Speaker Replacement, Motherboard: 23 단계, 이미지 1/1
    • Grab and remove the blue connector with the tweezers.

  24. Razer Phone Earpiece Speaker Replacement: 24 단계, 이미지 1/2 Razer Phone Earpiece Speaker Replacement: 24 단계, 이미지 2/2
    • Remove the five 1 mm screws holding down the gold antenna line brackets to the motherboard using the Phillips #000 screwdriver.

  25. Razer Phone Earpiece Speaker Replacement: 25 단계, 이미지 1/2 Razer Phone Earpiece Speaker Replacement: 25 단계, 이미지 2/2
    • Remove the 2.5 mm screw next to the front-facing camera with the Phillips #000 screwdriver.

  26. Razer Phone Earpiece Speaker Replacement: 26 단계, 이미지 1/2 Razer Phone Earpiece Speaker Replacement: 26 단계, 이미지 2/2
    • Remove the four gold antenna line brackets with the tweezers.

  27. Razer Phone Earpiece Speaker Replacement: 27 단계, 이미지 1/1
    • Using the tweezers remove the SIM card tray from the body of the phone.

  28. Razer Phone Earpiece Speaker Replacement: 28 단계, 이미지 1/1
    • Carefully lift up the motherboard away from the device.

  29. Razer Phone Earpiece Speaker Replacement, Earpiece Speaker: 29 단계, 이미지 1/2 Razer Phone Earpiece Speaker Replacement, Earpiece Speaker: 29 단계, 이미지 2/2
    • Lift earpiece speaker up with the tweezers.

결론

To reassemble your device, follow these instructions in reverse order.

다른 2명이 해당 안내서를 완성하였습니다.

Guneet Kohli

회원 가입일: 01/24/19

162 평판

안내서 1개 작성함

Cal Poly, Team S19-G6, White Winter 2019 Cal Poly, Team S19-G6, White Winter 2019 회원

CPSU-WHITE-W19S19G6

5 회원들

안내서 12개 작성하였습니다

댓글 한 개

This job shouldn’t take more than an hour.

Lucano - 답글

댓글 쓰기

조회 통계:

24 시간 전: 0

7일 전: 4

30일 전: 25

전체 시간: 6,338