주요 콘텐츠로 건너뛰기

RedMax Trimmer Carburetor Replacement

필요한 것

  1. RedMax Trimmer Carburetor Replacement, Carburetor: 1 단계, 이미지 1/3 RedMax Trimmer Carburetor Replacement, Carburetor: 1 단계, 이미지 2/3 RedMax Trimmer Carburetor Replacement, Carburetor: 1 단계, 이미지 3/3
    • Locate the red knob that locks the air filter cover to the air filter housing.

    • Rotate the knob clockwise.

    • Remove the air filter cover, exposing the air filter.

  2. RedMax Trimmer Carburetor Replacement: 2 단계, 이미지 1/2 RedMax Trimmer Carburetor Replacement: 2 단계, 이미지 2/2
    • Remove the air filter by gently pulling it away from the unit.

  3. RedMax Trimmer Carburetor Replacement: 3 단계, 이미지 1/3 RedMax Trimmer Carburetor Replacement: 3 단계, 이미지 2/3 RedMax Trimmer Carburetor Replacement: 3 단계, 이미지 3/3
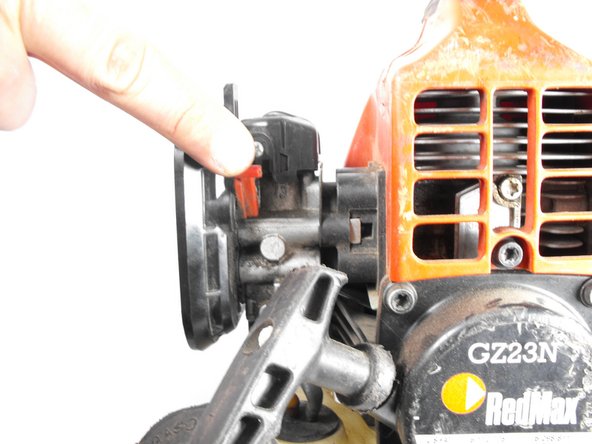
    • The red panel hides a second screw. In order to expose it, locate the red choke lever on the right side of the air filter housing.

    • Push the red choke lever down.

  4. RedMax Trimmer Carburetor Replacement: 4 단계, 이미지 1/3 RedMax Trimmer Carburetor Replacement: 4 단계, 이미지 2/3 RedMax Trimmer Carburetor Replacement: 4 단계, 이미지 3/3
    • Be aware that there may still be gasoline in the lines.

    • Disconnect the yellow and black fuel lines from the carburetor assembly by pinching the clamp and sliding it down the tube.

    • Gently pull the yellow and black lines away from the assembly.

  5. RedMax Trimmer Carburetor Replacement: 5 단계, 이미지 1/3 RedMax Trimmer Carburetor Replacement: 5 단계, 이미지 2/3 RedMax Trimmer Carburetor Replacement: 5 단계, 이미지 3/3
    • Using the T27 screwdriver, unscrew the two 55mm screws that hold the air filter housing and carburetor to the trimmer.

    • Separate the carburetor from the trimmer and air filter housing.

  6. RedMax Trimmer Carburetor Replacement: 6 단계, 이미지 1/3 RedMax Trimmer Carburetor Replacement: 6 단계, 이미지 2/3 RedMax Trimmer Carburetor Replacement: 6 단계, 이미지 3/3
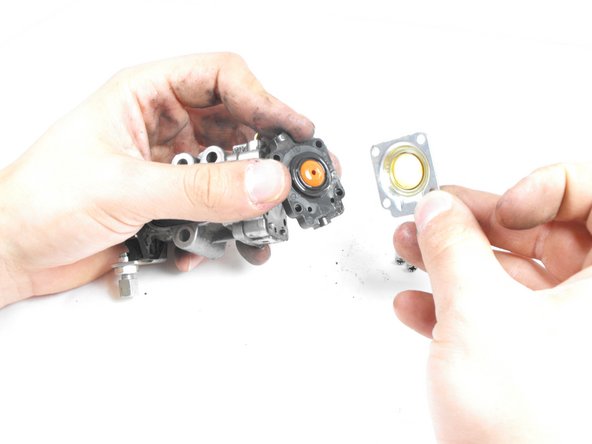
    • Unscrew the four 24 mm long screws that hold the carburetor together, using the #1 Phillips head screw driver.

    • Once the screws are removed, the rest of the carburetor should separate easily.

  7. RedMax Trimmer Carburetor Replacement: 7 단계, 이미지 1/3 RedMax Trimmer Carburetor Replacement: 7 단계, 이미지 2/3 RedMax Trimmer Carburetor Replacement: 7 단계, 이미지 3/3
    • Carefully remove the gaskets and carburetor and replace them in the same order that they were removed.

결론

To reassemble your device, follow these instructions in reverse order.

다른 4명이 해당 안내서를 완성하였습니다.

Kevin Ydrovo

회원 가입일: 02/28/17

299 평판

안내서 1개 작성함

University of Memphis, Team S4-G7, Baddour Spring 2017 University of Memphis, Team S4-G7, Baddour Spring 2017 회원

UM-BADDOUR-S17S4G7

3 회원들

안내서 1개 작성하였습니다

댓글 0개

댓글 쓰기

조회 통계:

24 시간 전: 0

7일 전: 15

30일 전: 48

전체 시간: 5,376