주요 콘텐츠로 건너뛰기

Remove corrosion from battery terminal

필요한 것

  1. 주의: 1-5 단계들은 진행 중으로 표시된 안내서에서 제공되었습니다.

    Remove corrosion from battery terminal, Face plate removal: 1 단계, 이미지 1/1
    • Start by removing the 4 screws to take off the aluminum face-plate.

  2. Remove corrosion from battery terminal: 2 단계, 이미지 1/2 Remove corrosion from battery terminal: 2 단계, 이미지 2/2
    • Pry the aluminum face-plate carefully using a plastic spudger while applying gentle pressure. This will reveal the 4 black screws underneath.

    • You will need a micro phillips screwdriver to remove these tiny screws. You will find that it requires considerable torque to loosen them, so to avoid stripping the head, really push in with the screwdriver while applying torque.

  3. Remove corrosion from battery terminal: 3 단계, 이미지 1/1
    • Carefully pry the plastic cover with a pick to pop the insert out. Watch the micro USB port that is sticking out.

  4. Remove corrosion from battery terminal: 4 단계, 이미지 1/1
    • Gently pry up the battery from underneath the connector. But remember the orientation, red wires to the outside exposed wire on the connector facing upward.

    • The battery MAY still be attached to the plate. Buy some double sided tape, because disposal of the old battery will likely include the existing tape.

  5. Remove corrosion from battery terminal: 5 단계, 이미지 1/1
    • Two Lithium polymer batteries are connected back to back and in parallel to the regulator. The batteries are rated at 9.47w @ 3.75v each.

    • When you are satisfied that the battery is properly installed, the new battery should have enough charge that you will see at least one of several LED's light up. You can then close up. But if not, charge the unit via USB to see if the LED's are functioning. If not, check the battery connection.

  6. Remove corrosion from battery terminal, Examine the motherboard for any corrosion: 6 단계, 이미지 1/2 Remove corrosion from battery terminal, Examine the motherboard for any corrosion: 6 단계, 이미지 2/2
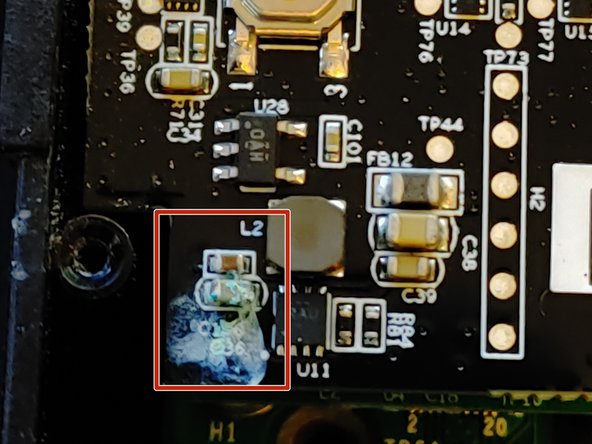
    • Examine your ring video doorbell motherboard for corrosion on any resistors, capacitors, or battery terminals.

  7. Remove corrosion from battery terminal, Disconnect battery and Un-mount motherboard: 7 단계, 이미지 1/1
    • Disconnect the battery by lifting the connector straight up.

    • Remove the three philips size 0 screws

    • Lift the board carefully and rotate it to the right so as to leave the camera connection alone.

    • Examine the rear of the top pcb, and the face of the lower pcb.

  8. Remove corrosion from battery terminal, Clean corrosion with vinegar, alcohol, and coat with dielectric grease: 8 단계, 이미지 1/1
    • Using white vinegar, clean any corrosion off of the battery terminals or anywhere else you find it, including the battery cables.

    • Then use isopropyl alcohol to clean the vinegar off of the pcb.

    • Coat the problem areas you just cleaned with dielectric grease of your choice.

    • Reassemble in reverse order.

결론

Once complete, follow the battery removal guide in reverse order to reassemble.

JACOB SCHRIER

회원 가입일: 05/02/20

97 평판

안내서 1개 작성함

댓글 0개

댓글 쓰기

조회 통계:

24 시간 전: 1

7일 전: 11

30일 전: 45

전체 시간: 2,311