주요 콘텐츠로 건너뛰기

이 안내서에는 최근 변경 사항이 더 있습니다. 최신 비검증 버전으로 전환하십시오.

Removing the Dell Inspiron 1150 Display Assembly

필요한 것

  1. Removing the Dell Inspiron 1150 Display Assembly, Removing Dell Inspiron 1150 Battery: 1 단계, 이미지 1/3 Removing the Dell Inspiron 1150 Display Assembly, Removing Dell Inspiron 1150 Battery: 1 단계, 이미지 2/3 Removing the Dell Inspiron 1150 Display Assembly, Removing Dell Inspiron 1150 Battery: 1 단계, 이미지 3/3
    • Place the laptop upside down on a clean, flat surface.

    • Locate the battery release button with the padlock symbol above it.

    • Slide the battery release button towards the padlock symbol and hold it there. Note that the button is spring loaded and will return if released.

    • The battery is now released from the battery compartment.

    • Gently remove the battery from the side of the laptop.

  2. Removing the Dell Inspiron 1150 Display Assembly, Hard Drive: 2 단계, 이미지 1/2 Removing the Dell Inspiron 1150 Display Assembly, Hard Drive: 2 단계, 이미지 2/2
    • Place laptop upside down on a clean flat surface.

    • Remove 2ea M2.5 x 5 mm screws.

    • Pull the HDD from main body of the laptop.

  3. Removing the Dell Inspiron 1150 Display Assembly, Optical Drive (Based on Dell Service Manual): 3 단계, 이미지 1/3 Removing the Dell Inspiron 1150 Display Assembly, Optical Drive (Based on Dell Service Manual): 3 단계, 이미지 2/3 Removing the Dell Inspiron 1150 Display Assembly, Optical Drive (Based on Dell Service Manual): 3 단계, 이미지 3/3
    • Place laptop upsid down on a clean flat work surface.

    • Remove the Philips M2.5 x 8 mm screw

    • Loosen the screw that holds the memory compartment closed

    • remove the memory module compartment cover

    • Press the Optical Drive release lever to the right and the optical drive should slide out of the case

  4. Removing the Dell Inspiron 1150 Display Assembly, Keyboard: 4 단계, 이미지 1/3 Removing the Dell Inspiron 1150 Display Assembly, Keyboard: 4 단계, 이미지 2/3 Removing the Dell Inspiron 1150 Display Assembly, Keyboard: 4 단계, 이미지 3/3
    • Use a spudger to lift the notched right edge of the hinge cover, and pry it loose

    • You need to lay the LCD screen down flat to allow the hinge cover to be lifted off

    • Lift the hinge cover off and set aside

  5. Removing the Dell Inspiron 1150 Display Assembly: 5 단계, 이미지 1/3 Removing the Dell Inspiron 1150 Display Assembly: 5 단계, 이미지 2/3 Removing the Dell Inspiron 1150 Display Assembly: 5 단계, 이미지 3/3
    • Remove 4ea M2 x 3mm keyboard screws

    • Lift up keyboard from the rear to expose the connector below

    • Disconnect the keyboard ribbon cable from the mother board

  6. Removing the Dell Inspiron 1150 Display Assembly, Display Assembly: 6 단계, 이미지 1/3 Removing the Dell Inspiron 1150 Display Assembly, Display Assembly: 6 단계, 이미지 2/3 Removing the Dell Inspiron 1150 Display Assembly, Display Assembly: 6 단계, 이미지 3/3
    • Remove 1ea M2.5 x 8mm screw holding the EMI shield in place

    • Remove the EMI shield to expose the LCD ribbon cable

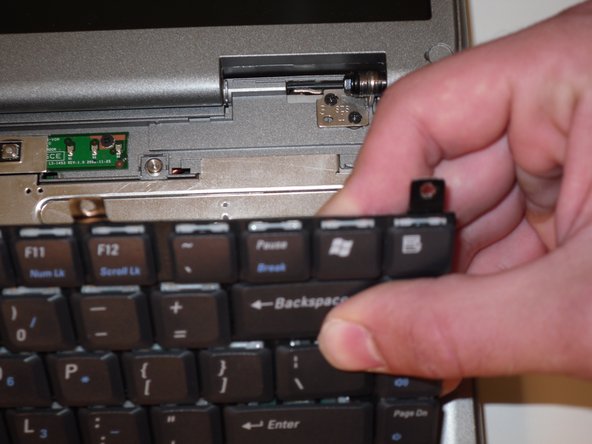
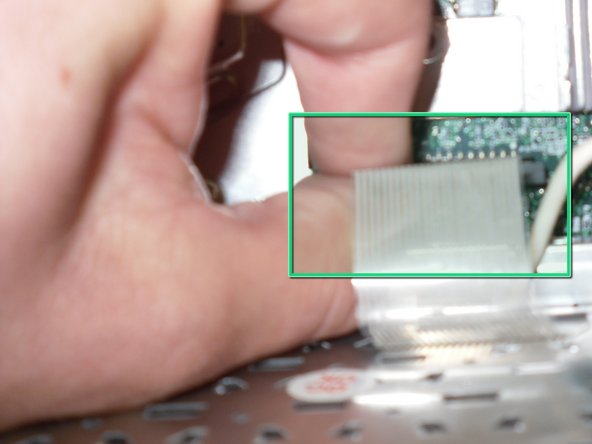
    • Gently pull up on the tab to disconnect the ribbon cable from the main board

    • Close the lid carefully and remove the two M2.5 x 5-mm screws from the rear of the case

  7. Removing the Dell Inspiron 1150 Display Assembly: 7 단계, 이미지 1/3 Removing the Dell Inspiron 1150 Display Assembly: 7 단계, 이미지 2/3 Removing the Dell Inspiron 1150 Display Assembly: 7 단계, 이미지 3/3
    • Open the lid and support the Display Assembly while performing the next step to avoid it falling down when the hinge screws are removed

    • Remove 2e M2.5 x 5mm screws from each hinge bracket

    • The Display Assembly can now be lifted free of the laptop body

결론

To reassemble your device, follow these instructions in reverse order.

다른 2명이 해당 안내서를 완성하였습니다.

Daniel

회원 가입일: 04/25/10

87 평판

안내서 2개 작성하였습니다

Cal Poly, Team 16-2, Maness Spring 2010 Cal Poly, Team 16-2, Maness Spring 2010 회원

CPSU-MANESS-S10S16G2

4 회원들

안내서 9개 작성하였습니다

댓글 0개

댓글 쓰기

조회 통계:

24 시간 전: 0

7일 전: 0

30일 전: 0

전체 시간: 6,856