주요 콘텐츠로 건너뛰기

Removing the HP Elitebook 6930p Switch Cover

필요한 것

  1. Removing the HP Elitebook 6930p Switch Cover, Battery Removal: 1 단계, 이미지 3개 중 1개 Removing the HP Elitebook 6930p Switch Cover, Battery Removal: 1 단계, 이미지 3개 중 2개 Removing the HP Elitebook 6930p Switch Cover, Battery Removal: 1 단계, 이미지 3개 중 3개
    • Flip laptop over and locate the battery release button

    • Push release button to the left to release battery and gently pull battery from the laptop

  2. Removing the HP Elitebook 6930p Switch Cover, Keyboard: 2 단계, 이미지 3개 중 1개 Removing the HP Elitebook 6930p Switch Cover, Keyboard: 2 단계, 이미지 3개 중 2개 Removing the HP Elitebook 6930p Switch Cover, Keyboard: 2 단계, 이미지 3개 중 3개
    • Loosen the three Phillips 2.5×9.0 captive screws that secure the keyboard to the laptop

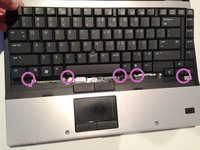
    • Turn the laptop so the keyboard is facing up and locate the 4 retention tabs along the back edge of the keyboard

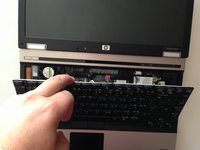
    • Slide the retention clips toward the keyboard to release the keyboard

  3. Removing the HP Elitebook 6930p Switch Cover: 3 단계, 이미지 3개 중 1개 Removing the HP Elitebook 6930p Switch Cover: 3 단계, 이미지 3개 중 2개 Removing the HP Elitebook 6930p Switch Cover: 3 단계, 이미지 3개 중 3개
    • Use a plastic pry tool to lift the rear edge of the keyboard.

    • Pull the keyboard slightly towards the display to disengage the tabs along the front of the keyboard from the laptop palm rest.

    • Lift the keyboard up to reveal the ribbon connectors

  4. Removing the HP Elitebook 6930p Switch Cover: 4 단계, 이미지 3개 중 1개 Removing the HP Elitebook 6930p Switch Cover: 4 단계, 이미지 3개 중 2개 Removing the HP Elitebook 6930p Switch Cover: 4 단계, 이미지 3개 중 3개
    • Release the larger ribbon cable by flipping the brown retainer up so it is parallel with the ribbon cable

    • Release the smaller ribbon cable by lifting up the white retainer

    • I found it easier to reinstall both cables with the new keyboard resting on the back edge

  5. Removing the HP Elitebook 6930p Switch Cover, Switch Cover: 5 단계, 이미지 3개 중 1개 Removing the HP Elitebook 6930p Switch Cover, Switch Cover: 5 단계, 이미지 3개 중 2개 Removing the HP Elitebook 6930p Switch Cover, Switch Cover: 5 단계, 이미지 3개 중 3개
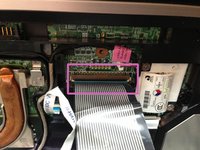
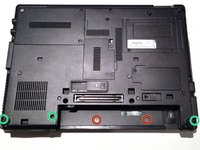
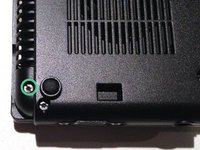
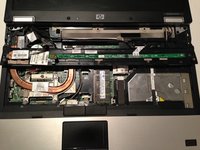
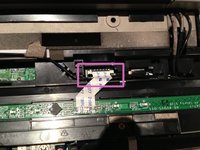
    • Remove the two M2.0×4.0 broad-head screws.

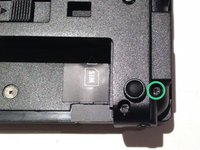
    • Remove the three Torx T8 M2.5×7.0 screws.

  6. Removing the HP Elitebook 6930p Switch Cover: 6 단계, 이미지 3개 중 1개 Removing the HP Elitebook 6930p Switch Cover: 6 단계, 이미지 3개 중 2개 Removing the HP Elitebook 6930p Switch Cover: 6 단계, 이미지 3개 중 3개
    • Turn the computer over with the front toward you and the open the computer as far as possible.

    • Release the ZIF connector for the power button board cable.

    • Remove the switch cover by lifting it straight up and flip it forward.

    • Release the ZIF connector for the LED board cable.

결론

To reassemble your device, follow these instructions in reverse order.

다른 4명이 해당 안내서를 완성하였습니다.

작성자

1다른 기여자 명과 함께

Richdave

회원 가입일: 04/09/10

32,729 평판

안내서 30개를 작성함

Master Techs Master Techs 회원

Community

329 회원들

안내서 1,452개를 작성함

0가이드 댓글

댓글 쓰기

조회 통계:

지난 24시간: 1

지난 7일: 2

지난 30일: 16

전체 시간: 2,153