주요 콘텐츠로 건너뛰기

JLab Pro-7 Battery Replacement

필요한 것

  1. JLab Pro-7 Battery Replacement, JLab Pro-7 Disassembly: 1 단계, 이미지 1/1
    • The tools needed in order to complete this task are above in the tools section.

    • Grab your tablet and have your tools ready in order to open it and fix the components inside.

  2. JLab Pro-7 Battery Replacement: 2 단계, 이미지 1/1
    • At the bottom of the tablet there are two screws.

    • One screw is on the bottom left corner and the other is in the bottom right corner.

    • Here, you need to grab a small Phillips screwdriver and carefully take out these screws. Be careful not to strip the screws when taking them out.

  3. JLab Pro-7 Battery Replacement: 3 단계, 이미지 1/1
    • Now grab your iFixit prying tool and try to carefully pry off the back casing.

    • The back doesn't want to dislodge easily so make sure the end of your pry tool is underneath the screen in order to get enough leverage to start popping off the back case from the screen.

    • Be careful when prying the edge of your tablet! Avoid snapping the volume and lock buttons. Also try not to dig into the tablet too deep with your prying tool so you don't damage any components inside.

  4. JLab Pro-7 Battery Replacement: 4 단계, 이미지 1/1
    • Make sure to make your way around the perimeter of the tablet in order to take off the back casing.

    • Put small amounts of pressure around the perimeter until you see that section pop off.

    • Keep moving your way clockwise or counterclockwise until the back is fully removed.

  5. JLab Pro-7 Battery Replacement: 5 단계, 이미지 1/1
    • There you have it now the back should be fully removed.

    • Make sure to inspect your tablet for any damage from prying off the back panel of your panel.

    • If any internals did fall out or seem to be damaged check out our guides we may be able to help you!

  6. JLab Pro-7 Battery Replacement, Battery: 6 단계, 이미지 1/1
    • Once the prerequisite guide has been completed you will notice a large grey rectangle that takes up most of the back panel

    • This is the item that you will be replacing

  7. JLab Pro-7 Battery Replacement: 7 단계, 이미지 1/1
    • Taking off a battery should be handled with immense care. Take your time and make sure not to puncture the outer case of the battery. This can be both harmful to you and your device.

    • In the red circles are thermal tape that needs to be removed .

    • Gently remove each peace of thermal tape

    • The thermal tape itself isn't very sticky so there aren't any specialty tools needed

  8. JLab Pro-7 Battery Replacement: 8 단계, 이미지 1/2 JLab Pro-7 Battery Replacement: 8 단계, 이미지 2/2
    • Taking off a battery should be handled with immense care. Take your time and make sure not to puncture the outer case of the battery. This can be both harmful to you and your device.

    • Once the thermal tape is removed, we need to remove the solder joints shown in the red circle and pointed to by our tweezers.

    • These are the only wires connecting the battery to the mother board.

  9. JLab Pro-7 Battery Replacement: 9 단계, 이미지 1/2 JLab Pro-7 Battery Replacement: 9 단계, 이미지 2/2
    • Soldering is a very useful, but dangerous technique to use. The iron itself gets very hot. In order to minimize and chance of bodily harm or damage of your product follow our links to soldering safety and instructions pages before proceeding

    • Soldering Instructions Soldering Safety

    • Taking off a battery should be handled with immense care. Take your time and make sure not to puncture the outer case of the battery. This can be both harmful to you and your device.

    • The first picture taken is from our speaker replacement guide.

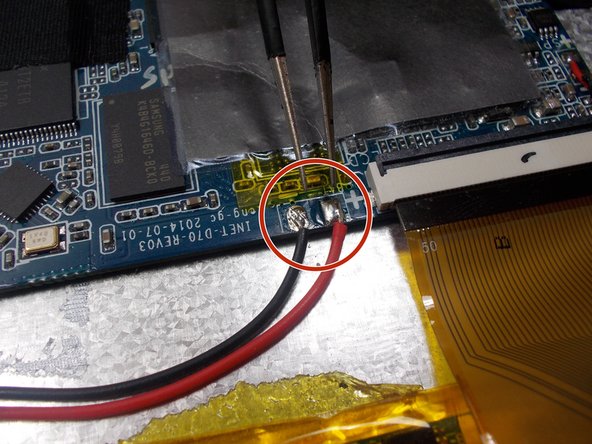
    • Wait for your soldering iron to be hot and hold directly next to or barely touching the solder joints until they are liquid

    • Once the solder joint are liquid the wires are free to be taken off

    • The second picture is the solder joints that you want to heat with your soldering iron and then remove them in order o get 1 step closer to replacing your battery.

  10. JLab Pro-7 Battery Replacement: 10 단계, 이미지 1/1
    • In this step we will be using our iFixit prying tool in order to take out the battery.

    • Taking off a battery should be handled with immense care. Take your time and make sure not to puncture the outer case of the battery. This can be both harmful to you and your device.

    • At this point the thermal tape and solder joints should be removed via previous steps. This picture just yields a good vantage point of the battery itself.

    • The red arrows show where you will carefully pry the battery upward in order to remove the battery from the back panel.

  11. JLab Pro-7 Battery Replacement: 11 단계, 이미지 1/1
    • Taking off a battery should be handled with immense care. Take your time and make sure not to puncture the outer case of the battery. This can be both harmful to you and your device.

    • Use the iFixit plastic pry tool in order to pry the battery up from the metal plate it's stuck to.

    • Make sure to work your way around the battery marked by the red box. Slowly and gently prying up until it is completely detached from the back plate.

  12. JLab Pro-7 Battery Replacement: 12 단계, 이미지 1/1
    • Taking off a battery should be handled with immense care. Take your time and make sure not to puncture the outer case of the battery. This can be both harmful to you and your device.

    • Be careful of the wireless antenna when removing the battery using the pry tool

    • Make sure not to pry where the antenna is circled so you don't damage your device.

결론

To reassemble your device, follow these instructions in reverse order.

다른 한 분이 해당 안내서를 완성하였습니다.

Richard Pooler

회원 가입일: 03/27/17

431 평판

안내서 4개 작성하였습니다

UMass Dartmouth, Team S2-G3, Isaacson Spring 2017 UMass Dartmouth, Team S2-G3, Isaacson Spring 2017 회원

UMASSD-ISAACSON-S17S2G3

3 회원들

안내서 12개 작성하였습니다

댓글 2개

I have but one question. Maybe the most important one. Where do I find a replacement battery? Other wise this is a perfect guide I am ready to tackle.

Aaron Loyd - 답글

I Found it and I fixed it.

2000mAh 3.7V lipo rechargeable Battery 306070 polymer lithium Li-Po USA

https://www.ebay.com/itm/224159433635

Aaron Loyd -

댓글 쓰기

조회 통계:

24 시간 전: 0

7일 전: 3

30일 전: 13

전체 시간: 700