주요 콘텐츠로 건너뛰기

JLab Pro-7 Front Facing Camera Replacement

필요한 것

  1. JLab Pro-7 Front Facing Camera Replacement, JLab Pro-7 Disassembly: 1 단계, 이미지 1/1
    • The tools needed in order to complete this task are above in the tools section.

    • Grab your tablet and have your tools ready in order to open it and fix the components inside.

  2. JLab Pro-7 Front Facing Camera Replacement: 2 단계, 이미지 1/1
    • At the bottom of the tablet there are two screws.

    • One screw is on the bottom left corner and the other is in the bottom right corner.

    • Here, you need to grab a small Phillips screwdriver and carefully take out these screws. Be careful not to strip the screws when taking them out.

  3. JLab Pro-7 Front Facing Camera Replacement: 3 단계, 이미지 1/1
    • Now grab your iFixit prying tool and try to carefully pry off the back casing.

    • The back doesn't want to dislodge easily so make sure the end of your pry tool is underneath the screen in order to get enough leverage to start popping off the back case from the screen.

    • Be careful when prying the edge of your tablet! Avoid snapping the volume and lock buttons. Also try not to dig into the tablet too deep with your prying tool so you don't damage any components inside.

  4. JLab Pro-7 Front Facing Camera Replacement: 4 단계, 이미지 1/1
    • Make sure to make your way around the perimeter of the tablet in order to take off the back casing.

    • Put small amounts of pressure around the perimeter until you see that section pop off.

    • Keep moving your way clockwise or counterclockwise until the back is fully removed.

  5. JLab Pro-7 Front Facing Camera Replacement: 5 단계, 이미지 1/1
    • There you have it now the back should be fully removed.

    • Make sure to inspect your tablet for any damage from prying off the back panel of your panel.

    • If any internals did fall out or seem to be damaged check out our guides we may be able to help you!

  6. JLab Pro-7 Front Facing Camera Replacement, Front Facing Camera: 6 단계, 이미지 1/2 JLab Pro-7 Front Facing Camera Replacement, Front Facing Camera: 6 단계, 이미지 2/2
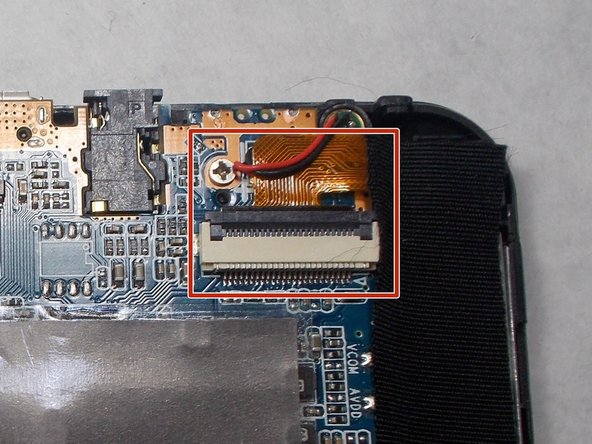
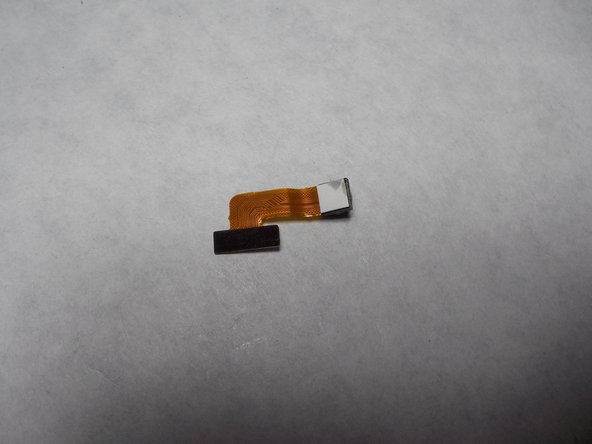
    • This guide will show you how to remove the front facing camera.

    • At the top right of the motherboard there is a ribbon cable. The red rectangle shows where we are referring to.

  7. JLab Pro-7 Front Facing Camera Replacement: 7 단계, 이미지 1/1
    • Disconnecting ribbon connectors don't need a lot of force to be done. Like always, be gentle with all of the components that you're working with.

    • In order to disconnect you are going to need your iFixit pry tool to lift the black tab. The black tab is shown using red arrows in the picture.

    • Once the black tab is flipped up you can easily just pull the ribbon connector out of the ribbon cable connector.

  8. JLab Pro-7 Front Facing Camera Replacement: 8 단계, 이미지 1/2 JLab Pro-7 Front Facing Camera Replacement: 8 단계, 이미지 2/2
    • Once the ribbon connector and cable have been properly separated the front facing camera will just pop out.

    • Now the front facing camera can be easily replaced.

결론

To reassemble your device, follow these instructions in reverse order.

Richard Pooler

회원 가입일: 03/27/17

431 평판

안내서 4개 작성하였습니다

UMass Dartmouth, Team S2-G3, Isaacson Spring 2017 UMass Dartmouth, Team S2-G3, Isaacson Spring 2017 회원

UMASSD-ISAACSON-S17S2G3

3 회원들

안내서 12개 작성하였습니다

댓글 0개

댓글 쓰기

조회 통계:

24 시간 전: 0

7일 전: 0

30일 전: 1

전체 시간: 91