소개
Ce tutoriel explique comment retirer le boîtier en plastique extérieur de la Xbox One X. Cela pourrait être utile pour remplacer le boîtier lui-même s’il est endommagé. Le retrait du boîtier extérieur est également nécessaire pour remplacer l’un des composants intérieurs. Avant de commencer, il est recommandé de vous assurer de disposer des bons outils, ainsi que d'un environnement propre avec suffisamment d'espace pour organiser les composants. Sachez que désassembler votre Xbox peut annuler votre garantie, vous voudrez peut-être lire les conditions du fabricant au préalable.
필요한 것
-
-
Utilisez un tournevis Torx T9 pour retirer la vis de 13 mm située sous et à gauche de l'entrée d'alimentation.
-
-
-
Orientez le boîtier de sorte que l'avant de la Xbox (le côté avec le bouton d'alimentation) soit face à vous.
-
Retirez le haut du boîtier en le faisant glisser vers vous.
Bitte auch diesen Schritt überarbeiten. Es wird lediglich das Gehäuse für ca 2-4 Zentimeter nach hinten verschoben, dann sollte bereits das erste Hinterniss kommen, welches man ohne Gewalt nicht bewältigen kann. Hier muss das Gehäuse auf der Rechten Seite angehoben werden, dann lässt sich das Gehäuse ohne Probleme entfernen. Auch beim Zusammenbauen. Erst auf der Linkenseite bis zum ersten Plastik Haken (ca 2-4 Zentimeter vom Ende entfern) anlegen, danach auf der Rechten seite einklicken. Das Gehäuse kann auf der Rechten Seite auch etwas gedehnt werden, dabei geht nichts kaputt.
Please also revise this step. It is only the case for about 2-4 centimeters moved backwards, then should already come the first butt that you can not cope without violence. Here, the housing must be raised on the right side, then the housing can be removed without problems. Also when assembling. First put on the left side until the first plastic hook (about 2-4 centimeters from the end), then click on the right side. The case can also be slightly stretched on the right side, nothing breaks.
-
-
-
-
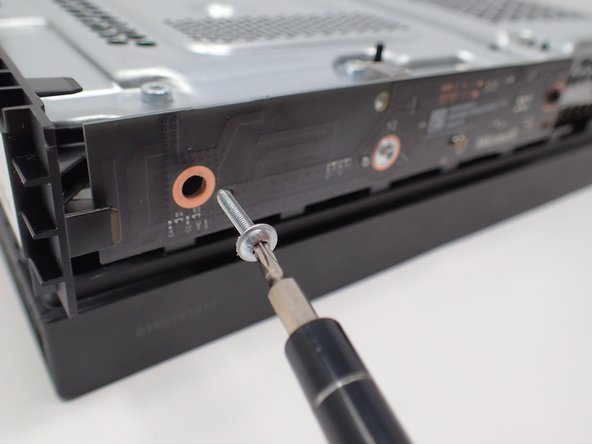
À l'aide d'un tournevis Torx T9, retirez les deux vis argentées de 15 mm qui maintiennent une carte de circuit imprimé / un panneau sur le côté du boîtier métallique intérieur.
-
À l'aide du même tournevis, retirez la vis noire de 9 mm située plus loin à droite sur le même circuit imprimé / panneau.
I feel like someone wanted to use a T9 for everything, but these were T8.
You can use a T8 or T9 for this step. I was able to get all three screws with a T9 but there’s so little difference that both will work.
-
-
-
Tirez le bord supérieur de la pince blanche vers le bas, puis retirez le connecteur blanc du panneau disloqué à l'aide d'une pince de précision.
Unfortunately the manual is not correct here. Above the black slot is a white switch / pen, fold it over with your fingernail, so fold it over to the front. Then the cable can be easily removed without any problems and tweezers. GERMAN: Hier ist die Anleitung leider nicht korrekt. Oberhalb des schwarzen Steckplatzes befindet sich ein weißer Schalter/Stift, diesen mit dem Fingernagel umklappen, also praktisch zu der Vorderseite umklappen. Danach lässt sich das Kabel ohne Probleme und Pinzette einfach abziehen.
Thanks for telling me that
NR26 -
Thank you. Had no idea what the !&&* this guy was talking about with the “pull down" part. You flip it downward gently like a flap.
It is not necessary to remove the white flat cable. After removing the three gold screws from the board, go to the next steps and in step 9 remove the cover while hold the board against the cover to prevent stress on the white cable.
Whole Witt - 답글
@Whole Witt, I second this. When you get to step 9 to remove the cover, just carefully remove the board, then remove the cover along with the board. You can leave the board in the cover.
-
-
-
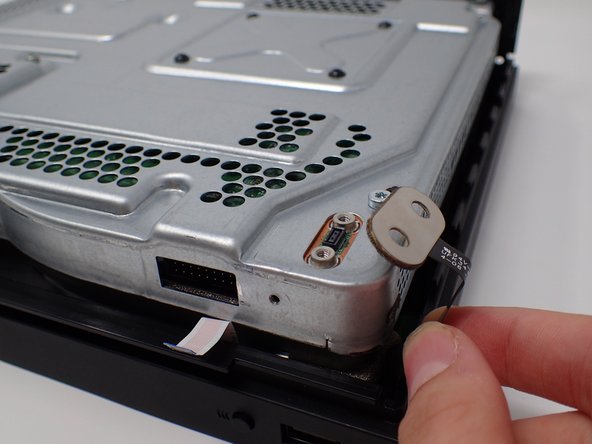
Au sommet de l'appareil, dans le coin situé directement au-dessus du connecteur blanc, se trouve une plaque ovale maintenue en place par deux vis.
-
Retirez les deux vis de 7 mm avec un tournevis Torx T9.
-
Soulevez la plaque détachée sur le côté.
These are actually T8. Be careful trying to use a T9.
what is the name of this strip it tore on mine how do I get it replaced?
-
-
-
Utilisez un tournevis Torx T9 pour retirer les six vis de 47 mm de long, qui fixent la partie inférieure du boîtier extérieur.
These are all T10 on my Scorpio.
These are T10 on the Xbox One X MFR Date 22-OCT-2017. You could get away with T9 and would be careful.
My manufacture date is 15-JUN-18 and is not a Scorpio and is still T10. I would not recommend using a T9.
They are t-10 and t-8
-
-
-
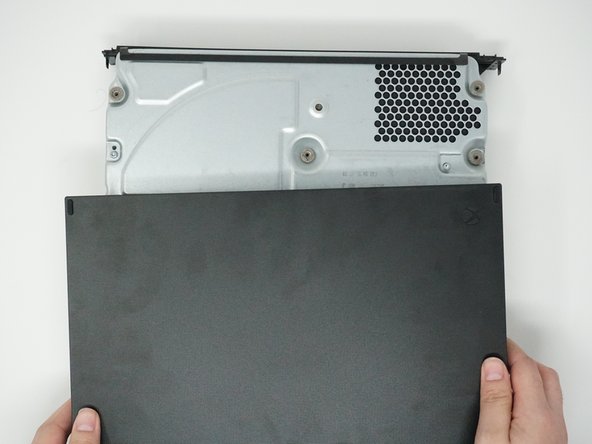
Tournez la Xbox, de sorte que le bas de l'affaire est sur le dessus.
-
Soulevez le bas du boîtier de la Xbox en le tirant vers le haut et vers vous.
I had to slide it forward off of the disc drive a little bit before I could lift up.
When putting this cover back on, lay it flat and slide the case into it, slightly angling the front down so the plastic lugs on the BD-ROM fascia board slide into the slots in the cover You’ll have to push to the left slightly (with the cover flat side down and the front facing you) so as to depress the clip on the left-front side of the cover. You can check that the cover is on correctly by looking at the back of the cover and case and ensuring the screw holes on the cover line up with the case bezel.
-


Pour remonter votre appareil, suivez ces instructions dans l’ordre inverse.
Pour remonter votre appareil, suivez ces instructions dans l’ordre inverse.
다른 7명이 해당 안내서를 완성하였습니다.
다음 번역가들에게 특별히 감사 드립니다:
100%

이 번역자 분들은 저희가 세상을 수리하는데 동참해 주시는 분입니다! 기여하시겠습니까?
번역 시작하기 ›
팀

Cal Poly, Team S2-G6, Livingston Winter 2018 Cal Poly, Team S2-G6, Livingston Winter 2018 회원
CPSU-LIVINGSTON-W18S2G6
4 회원들
안내서 23개 작성하였습니다
댓글 2개
Where do you get the outer case from? And if I only want to replace the outer case could I just follow the first 3 steps?
Following. I need a replacement project Scorpio case. the system I got it from was from Mercari and the guy did a poor job in taking care of the case and I need a top Scorpio case.