주요 콘텐츠로 건너뛰기

Repairing GEN 2 Wheelchair Patching a Tire Tube

필요한 것

  1. Repairing GEN 2 Wheelchair Patching a Tire Tube, Repairing GEN 2 Wheelchair Patching a Tire Tube: 1 단계, 이미지 1/3 Repairing GEN 2 Wheelchair Patching a Tire Tube, Repairing GEN 2 Wheelchair Patching a Tire Tube: 1 단계, 이미지 2/3 Repairing GEN 2 Wheelchair Patching a Tire Tube, Repairing GEN 2 Wheelchair Patching a Tire Tube: 1 단계, 이미지 3/3
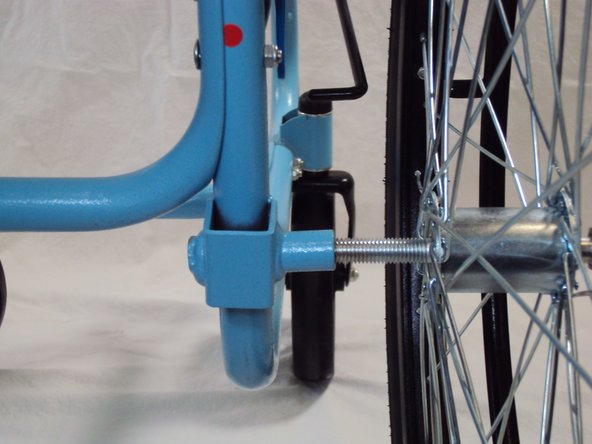
    • Unscrew the axle nut with a 19 mm wrench.

    • Unscrew the the axle bolt with a 19 mm socket wrench.

    • Remove the wheel from the wheelchair.

  2. Repairing GEN 2 Wheelchair Patching a Tire Tube: 2 단계, 이미지 1/2 Repairing GEN 2 Wheelchair Patching a Tire Tube: 2 단계, 이미지 2/2
    • Insert the 19 mm socket wrench between the rubber tire and the metal frame.

    • Any rigid flat metal object can be used for this step.

    • Carefully slide the 19 mm socket wrench all the way around the tire. Bend the wrench down to pop the tire out of the bead of the rim.

    • When undoing the tire, be careful using the back of the wrench because the tool can damage the tire tube and or wheel frame.

    • Reach inside the tire and remove the tube from the metal frame.

  3. Repairing GEN 2 Wheelchair Patching a Tire Tube: 3 단계, 이미지 1/1
    • Take the inner tube from inside the tire and submerge the tube in water.

    • Squeeze the tube gently looking for bubbles from the tube in the water.

    • You can use where the bubbles are forming to locate the hole in the tube.

  4. Repairing GEN 2 Wheelchair Patching a Tire Tube: 4 단계, 이미지 1/1
    • Dry off the tube.

    • Pull the tube out of the water and mark the location of the hole on the tube so that it can be found again.

  5. Repairing GEN 2 Wheelchair Patching a Tire Tube: 5 단계, 이미지 1/1
    • Use sand paper to texturize the tire tube.

    • Wipe off any excess rubber that was sanded off the tube.

  6. Repairing GEN 2 Wheelchair Patching a Tire Tube: 6 단계, 이미지 1/2 Repairing GEN 2 Wheelchair Patching a Tire Tube: 6 단계, 이미지 2/2
    • Apply a thin layer of rubber cement over the area that was marked.

    • The layer should be slightly bigger than the size of the hole.

    • Let the rubber cement set for 5 minutes.

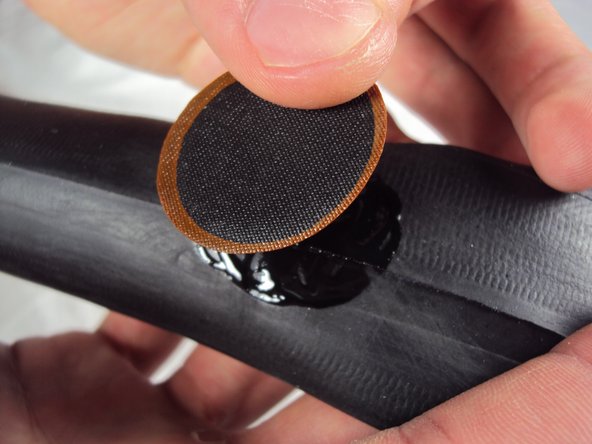
    • Peel the patch off of the plastic backing.

    • Place patch over the area with the rubber cement and firmly press down until the patch is securely attached.

  7. Repairing GEN 2 Wheelchair Patching a Tire Tube: 7 단계, 이미지 1/1
    • Feel along the tire to check for and remove any objects stuck in the tire before replacing the tube.

    • Line up the air valve on the newly patched (partially deflated) tube with the hole on the metal frame before trying to insert the tube.

    • Working all around the tire, carefully push the tube back into place inside the tire.

  8. Repairing GEN 2 Wheelchair Patching a Tire Tube: 8 단계, 이미지 1/1
    • Inflate the tire to 50 psi. If there is no gauge, inflate the tire until the tire is hard.

  9. Repairing GEN 2 Wheelchair Patching a Tire Tube: 9 단계, 이미지 1/2 Repairing GEN 2 Wheelchair Patching a Tire Tube: 9 단계, 이미지 2/2
    • Insert the axle bolt into the center of the rear wheel.

    • Insert the wheel with the axle bolt into the lower back of the frame by screwing in the bolt.

  10. Repairing GEN 2 Wheelchair Patching a Tire Tube: 10 단계, 이미지 1/2 Repairing GEN 2 Wheelchair Patching a Tire Tube: 10 단계, 이미지 2/2
    • Secure the nut on the opposite side of the axle bolt and wheel. Tighten with 1/2 in or 19 mm wrench.

결승점

다른 한 분이 해당 안내서를 완성하였습니다.

Kali Slaughter

회원 가입일: 04/19/13

207 평판

안내서 5개 작성하였습니다

Cal Poly, Team 14-8, Maness Spring 2013 Cal Poly, Team 14-8, Maness Spring 2013 회원

CPSU-MANESS-S13S14G8

5 회원들

안내서 7개 작성하였습니다

댓글 0개

댓글 쓰기

조회 통계:

24 시간 전: 0

7일 전: 0

30일 전: 4

전체 시간: 696