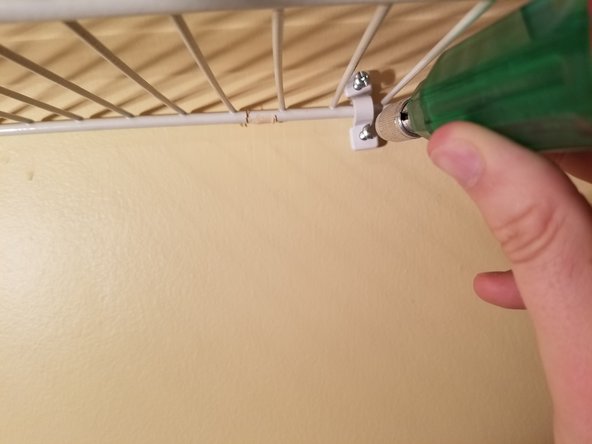
주요 콘텐츠로 건너뛰기

Repairing and Reinforcing a Closet Rack

필요한 것

  1. Repairing and Reinforcing a Closet Rack, Brackets Braces C-Clamps: 1 단계, 이미지 1/1
    • Use the putty knife and spread the dry wall compound filling any holes and damage made to the wall.

  2. Repairing and Reinforcing a Closet Rack: 2 단계, 이미지 1/1
    • Allow the compound to dry off so as to reach maximum hardness.

  3. Repairing and Reinforcing a Closet Rack: 3 단계, 이미지 1/1
    • Use the 100 grit sandpaper and gently sand down the areas that were puttied, thus making them flush with the wall.

    • Use safety glasses and a dust mask protecting both your lungs and eyes from any particles coming off the wall.

  4. Repairing and Reinforcing a Closet Rack: 4 단계, 이미지 1/1
    • Measure and mark where the new holes will go for the brackets, c-clamps, and braces.

    • Allow 11"-12" of space between the side wall and the first bracket and each subsequent bracket.

    • Mark holes for the c-clamps half the distance between the brackets.

    • Use a level to guarantee the rack will be straight.

  5. Repairing and Reinforcing a Closet Rack: 5 단계, 이미지 1/1
    • Use a drill with a 1/4" drill bit and make holes at each mark.

    • Use safety glasses when operating the drill, and be cautious and careful when handling the drill. Careless handling of the drill can lead to injury. For more information on how to properly handle a drill refer to this guide's introduction.

  6. Repairing and Reinforcing a Closet Rack: 6 단계, 이미지 1/1
    • Use a hammer and knock the plastic anchors into the wall where the holes were drilled.

    • Use #8 plastic anchors for best results.

  7. Repairing and Reinforcing a Closet Rack: 7 단계, 이미지 1/1
    • Use a brush and matching wall paint to coat the areas that were puttied and allow it to dry.

  8. Repairing and Reinforcing a Closet Rack: 8 단계, 이미지 1/1
    • Use a flathead screwdriver and screw the brackets into the plastic anchors.

    • Use 1-1/4" flathead screws for best results.

  9. Repairing and Reinforcing a Closet Rack: 9 단계, 이미지 1/1
    • Take the closet rack and place it onto the brackets.

  10. Repairing and Reinforcing a Closet Rack: 10 단계, 이미지 1/1
    • Use a Phillips screw driver to screw the c-clamps into the plastic anchors and reinforce the rack.

    • Use Phillips #8 1-1/4" screws for best results.

  11. Repairing and Reinforcing a Closet Rack: 11 단계, 이미지 1/1
    • Place the support braces on the rack.

    • Use a Phillips screw driver to screw them into the plastic anchors.

결승점

다른 2명이 해당 안내서를 완성하였습니다.

Bojan Krtinic

회원 가입일: 05/12/20

247 평판

안내서 1개 작성함

York University, Team S1-G16, O'Regan Summer 2020 York University, Team S1-G16, O'Regan Summer 2020 회원

YORK-O'REGAN-SU20S1G16

1 회원

안내서 2개 작성하였습니다

댓글 한 개

Just a question what if you wanted to install a heavier more solid longer rod?

Chris M - 답글

댓글 쓰기

조회 통계:

24 시간 전: 9

7일 전: 87

30일 전: 429

전체 시간: 7,440