주요 콘텐츠로 건너뛰기

Replace BIOS battery

보관된 가이드
해당 안내서는 단지 역사적인 목적으로 보관됩니다. 최신 버전 안내서를 사용하여 수리 하십시오.

필요한 것

  1. Replace BIOS battery, Battery: 1 단계, 이미지 1/3 Replace BIOS battery, Battery: 1 단계, 이미지 2/3 Replace BIOS battery, Battery: 1 단계, 이미지 3/3
    • Open the latch on the right side that secures the battery in place.

    • Open the latch on the left side that secures the battery in place.

    • Now remove the battery.

  2. Replace BIOS battery, Access to the components 1: 2 단계, 이미지 1/3 Replace BIOS battery, Access to the components 1: 2 단계, 이미지 2/3 Replace BIOS battery, Access to the components 1: 2 단계, 이미지 3/3
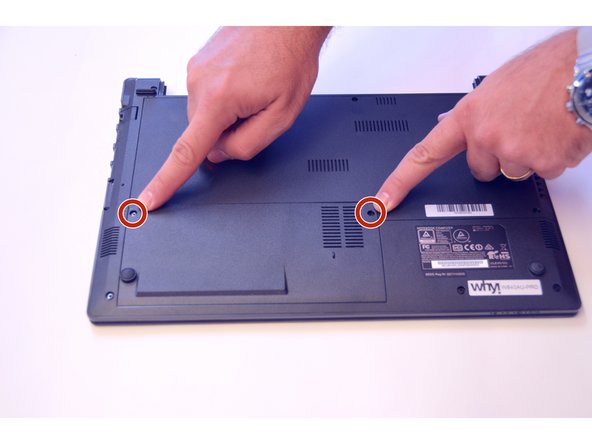
    • Use the Philips screwdriver to remove the two screws on the bottom cover.

    • Check the markers to determine how to remove the cover.

    • Now remove the cover as prescribed by the markers.

  3. Replace BIOS battery: 3 단계, 이미지 1/1
    • The components HDD hard disk and BIOS battery are now visible.

  4. Replace BIOS battery, BIOS battery: 4 단계, 이미지 1/2 Replace BIOS battery, BIOS battery: 4 단계, 이미지 2/2
    • Pull out the plug of the battery first.

    • Then carefully remove the battery (attention glue).

결론

To assemble the device again, proceed in reverse order.

다음 번역가들에게 특별히 감사 드립니다:

de en

100%

irlanda님은 저희가 세상을 수리하는데 동참하신 분입니다! 기여하시겠습니까?
번역 시작하기 ›

Felice Suglia

회원 가입일: 06/15/13

30,884 평판

안내서 264개 작성하였습니다

댓글 0개

댓글 쓰기

조회 통계:

24 시간 전: 0

7일 전: 0

30일 전: 1

전체 시간: 185