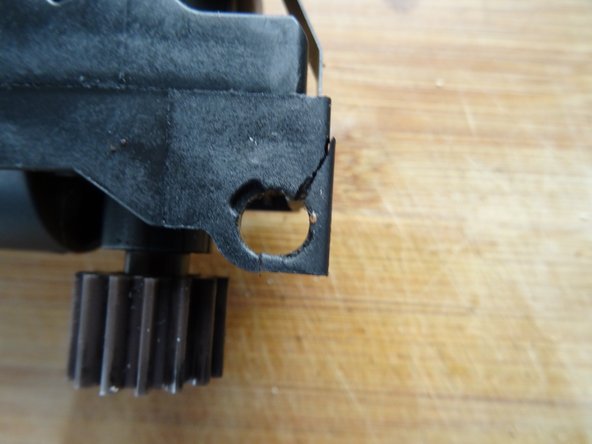
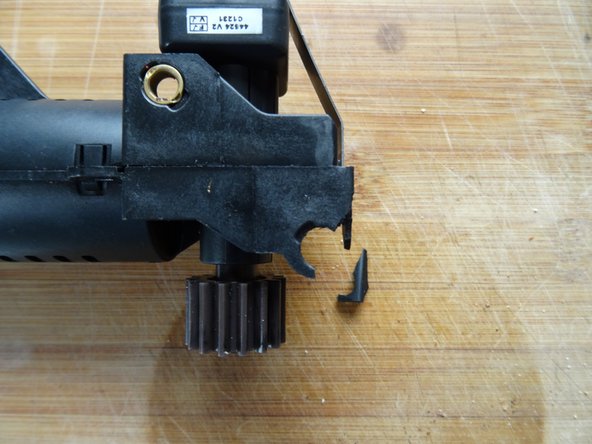
주요 콘텐츠로 건너뛰기

Replace Jura ENA micro gear motor

필요한 것

  1. Replace Jura ENA micro gear motor, Jura ENA micro 9 opening procedure: 1 단계, 이미지 1/1
    • Pull out the power plug!

    • Remove all attachments, such as the water reservoir, coffee grounds drawer, and bean compartment lid.

    • Remove all coffee beans.

  2. Replace Jura ENA micro gear motor, Top covers: 2 단계, 이미지 1/2 Replace Jura ENA micro gear motor, Top covers: 2 단계, 이미지 2/2
    • The top covers do not necessarily have to be removed for all repairs. However, it is indispensable for thorough cleaning. It may be easier to loosen the top covers if the side panels are removed first. The process is somewhat tricky.

    • Pry the central ventilation cover up.

  3. Replace Jura ENA micro gear motor: 3 단계, 이미지 1/3 Replace Jura ENA micro gear motor: 3 단계, 이미지 2/3 Replace Jura ENA micro gear motor: 3 단계, 이미지 3/3
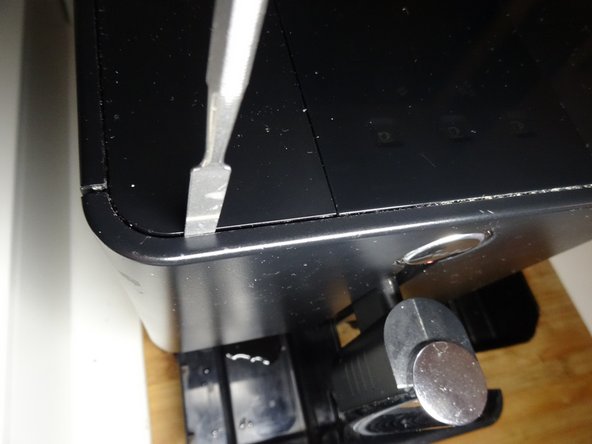
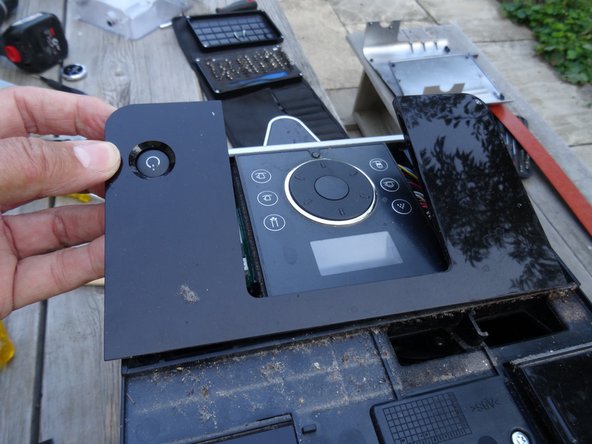
    • Use the spudger to press in on both sides of the marked area. Then the front cover around the on / off switch is unlocked. You can then lift it up at the front and pull it out at an angle.

    • If the side openings for the spudger cannot be found, the model is slightly different. With this version you have to insert the spudger into the gap between the front panel and cover, about 3 cm from the edge and then push it firmly towards the center to unlock. At the same time, lift the cover a little at the front.

  4. Replace Jura ENA micro gear motor: 4 단계, 이미지 1/2 Replace Jura ENA micro gear motor: 4 단계, 이미지 2/2
    • Flip up the front cover.

    • Remove the cover. In the model with the side holes, you can pull them out at an angle to the front. With the other model, you have to push it back a little to unhook it, then lift it up.

  5. Replace Jura ENA micro gear motor: 5 단계, 이미지 1/1
    • This is what it looks like when the two lids are gone. A lot of dirt built up.

  6. Replace Jura ENA micro gear motor, Side panels: 6 단계, 이미지 1/1
    • The side parts are pushed out to the rear. However, they are secured with two screws and a lock at the top and a wedge-shaped catch on the sides.

    • Unscrew the two T15 Torx screws that secure the side panels at the top.

  7. Replace Jura ENA micro gear motor: 7 단계, 이미지 1/3 Replace Jura ENA micro gear motor: 7 단계, 이미지 2/3 Replace Jura ENA micro gear motor: 7 단계, 이미지 3/3
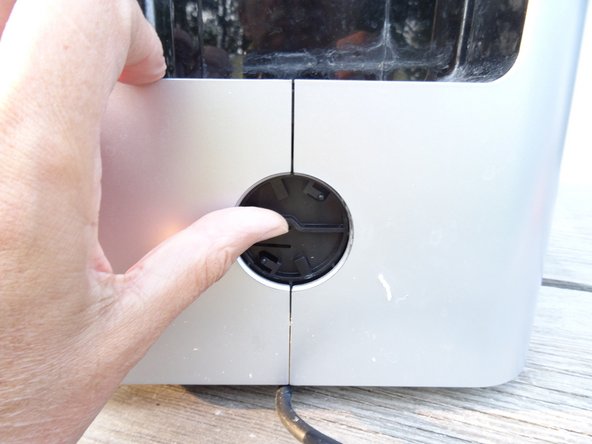
    • The lock is located under the Jura badge on the back. Turn it counterclockwise about 20 degrees, then you can remove it.

    • Unfortunately, this one is very stuck. Nothing helped with this device, no suction cup or stiff adhesive tape. Here it is opened with a somewhat more rustic method:

    • Two small holes were drilled a few millimeters deep, then two small screws were screwed in. The badge could finally be turned and removed with a pair of pliers.

  8. Replace Jura ENA micro gear motor: 8 단계, 이미지 1/3 Replace Jura ENA micro gear motor: 8 단계, 이미지 2/3 Replace Jura ENA micro gear motor: 8 단계, 이미지 3/3
    • This is what it looks like underneath. The lock is secured with an oval head screw. It looks like a rivet. To open you need a special oval head bit, in an emergency you can use pliers.

    • Remove the oval head screw.

    • Push the lock firmly upwards as far as possible.

  9. Replace Jura ENA micro gear motor: 9 단계, 이미지 1/1
    • The side parts are held at the top and bottom with three hooks each. Therefore, they have to be moved backwards to detach them. However, they are secured against shifting with wedge-shaped notches at the front. The next step shows how they can be solved.

    • The notches must be lifted out of the openings. They are located on both sides at the top and bottom about 1.5 cm from the edge and 7 cm from the front edge.

    • This is what the wedge-shaped notches look like

  10. Replace Jura ENA micro gear motor: 10 단계, 이미지 1/3 Replace Jura ENA micro gear motor: 10 단계, 이미지 2/3 Replace Jura ENA micro gear motor: 10 단계, 이미지 3/3
    • Lay the machine on its side.

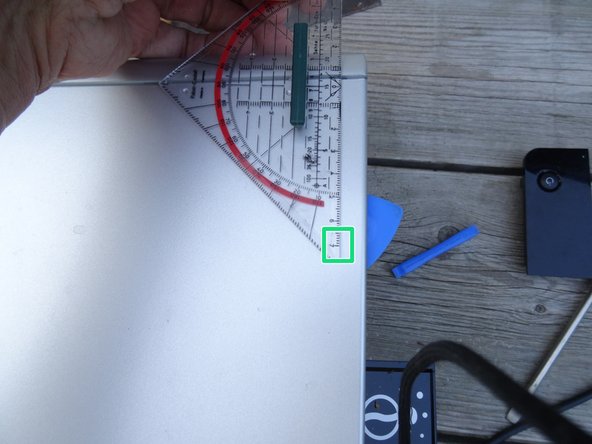
    • Pry the side panel about 7 cm from the front edge, about 3 mm high. This will cause the catch to come out of its opening. Use a strong tool, preferably one made of plastic.

    • Position of the wedge-shaped notch: 7 cm from the front edge, 1.5 cm from the top or bottom edge.

    • Leave the tool in place. Insert an opening pick 7 cm from the front edge so that the wedge-shaped notch can no longer engage in its opening. Pull out the tool.

    • In the same way, insert another opening pick on the opposite edge.

    • Now both notches are free and the side part can be moved in the next step.

  11. Replace Jura ENA micro gear motor: 11 단계, 이미지 1/1
    • Push the side panel firmly backwards. It may get stuck a bit and you need to use a plastic pry tool to help.

    • Take off the side panel and set it aside.

    • Repeat for the other side panel.

  12. Replace Jura ENA micro gear motor: 12 단계, 이미지 1/3 Replace Jura ENA micro gear motor: 12 단계, 이미지 2/3 Replace Jura ENA micro gear motor: 12 단계, 이미지 3/3
    • Release the catches on the top of the inner cover.

    • Flip the inner cover down and lift it out. The brew group becomes now visible.

    • The third picture shows a view of the other side.

  13. Replace Jura ENA micro gear motor, Gear Motor: 13 단계, 이미지 1/3 Replace Jura ENA micro gear motor, Gear Motor: 13 단계, 이미지 2/3 Replace Jura ENA micro gear motor, Gear Motor: 13 단계, 이미지 3/3
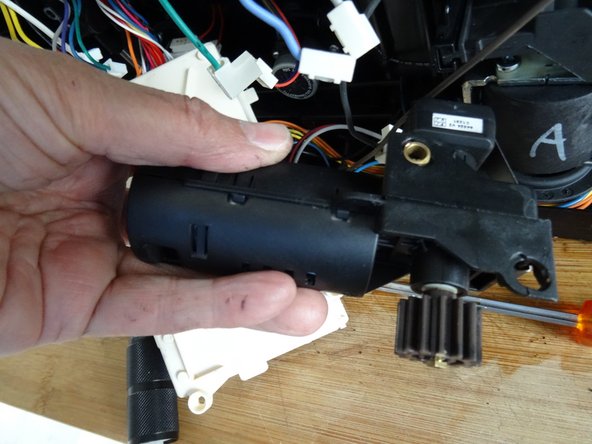
    • The gear motor is located behind the electronics box. First this path has to be cleared.

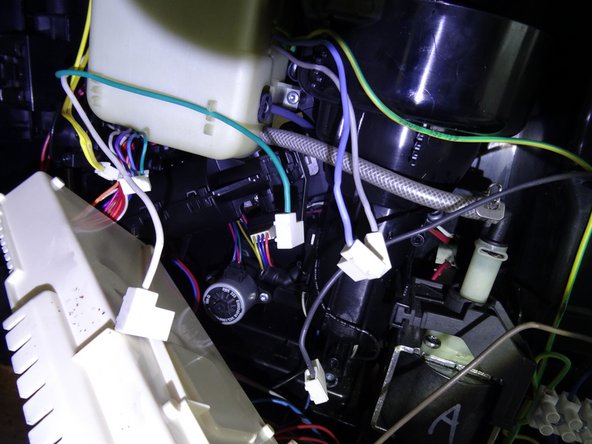
    • Disconnect the cables on the top row. Be sure to note which connector is plugged in where.

    • Detach the cables on the left side as well

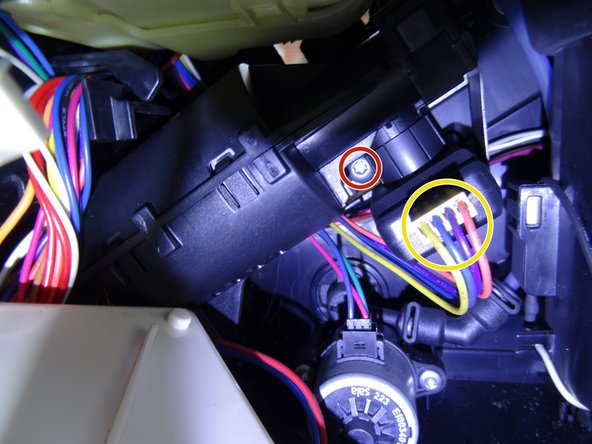
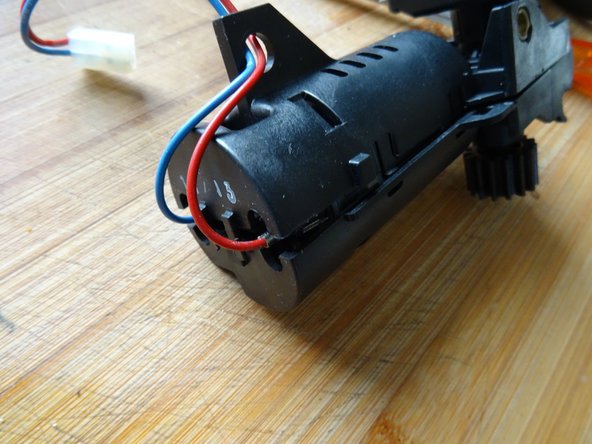
    • From the bottom row you only need to loosen the plug (here blue-red) that belongs to the motor.

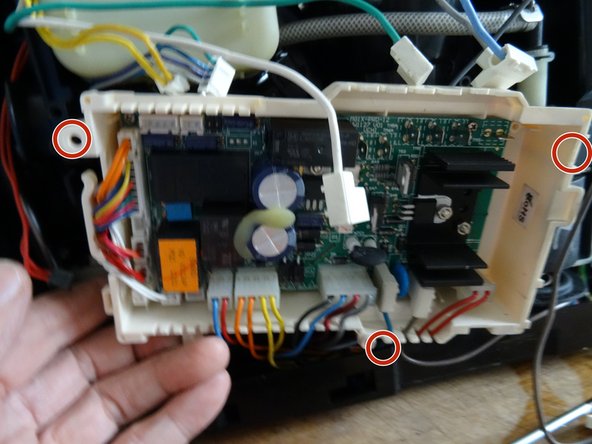
    • Unscrew the three Torx T10 screws that hold the box in place.

    • Set the box aside.

  14. Replace Jura ENA micro gear motor: 14 단계, 이미지 1/3 Replace Jura ENA micro gear motor: 14 단계, 이미지 2/3 Replace Jura ENA micro gear motor: 14 단계, 이미지 3/3
    • The motor is attached with two Torx T20 screws. Remove those. The screws are fastened with some threadlocker. Use this for the re-assembly as well.

    • Unplug the connector from the encoder.

    • Carefully lift out the motor.

    • Disconnect the connecting wires.

  15. Replace Jura ENA micro gear motor: 15 단계, 이미지 1/2 Replace Jura ENA micro gear motor: 15 단계, 이미지 2/2
    • The error is clearly visible: the fastening eyelet has torn out.

  16. Replace Jura ENA micro gear motor: 16 단계, 이미지 1/2 Replace Jura ENA micro gear motor: 16 단계, 이미지 2/2
    • Detach the bracket from the encoder and remove the encoder.

    • Disconnect the two connecting wires.

    • Transfer the parts to the new motor

결론

Complete the steps in reverse order to reassemble your device.

다른 2명이 해당 안내서를 완성하였습니다.

다음 번역가들에게 특별히 감사 드립니다:

de en

100%

oldturkey03님은 저희가 세상을 수리하는데 동참하신 분입니다! 기여하시겠습니까?
번역 시작하기 ›

VauWeh

회원 가입일: 10/19/15

212,879 평판

안내서 265개 작성하였습니다

Repair is War on Entropy Repair is War on Entropy 회원

Community

27 회원들

안내서 1,209개 작성하였습니다

댓글 한 개

Perfekt, viele Dank für die Instruktionen. Ich habe die Problem mit den Motor und es ist in Ordnung

Olivier Hamal - 답글

댓글 쓰기

조회 통계:

24 시간 전: 4

7일 전: 19

30일 전: 61

전체 시간: 1,819