주요 콘텐츠로 건너뛰기

Replace the thermal fuse on a GHD Classic V

필요한 것

  1. Replace the thermal fuse on a GHD Classic V, Thermal fuse: 1 단계, 이미지 2개 중 1개 Replace the thermal fuse on a GHD Classic V, Thermal fuse: 1 단계, 이미지 2개 중 2개
    • Before you begin, unplug your ghd hair straightener.

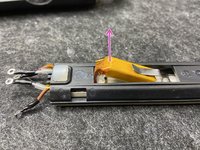
    • Remove the two plastic hinge covers located on each side of the ghd by using a thin and flat spudger.

    • The plastic hinge covers are attached via two clips. Be careful not to break the clips.

  2. Replace the thermal fuse on a GHD Classic V: 2 단계, 이미지 2개 중 1개 Replace the thermal fuse on a GHD Classic V: 2 단계, 이미지 2개 중 2개
    • Unscrew the right side hinge support.

    • Remove the centering tube.

    • If unscrewing proves difficult, try using a Philips screwdriver on both sides of the tube.

  3. Replace the thermal fuse on a GHD Classic V: 3 단계, 이미지 1개 중 1개
    • Unscrew both Philips screws to remove the cover.

    • The heat fuse is on the power button's side.

  4. Replace the thermal fuse on a GHD Classic V: 4 단계, 이미지 2개 중 1개 Replace the thermal fuse on a GHD Classic V: 4 단계, 이미지 2개 중 2개
    • Unscrew the 4 screws from the the plate and then remove it.

    • The outer screws corresponds to the "Fuse" fuse. The center screws corresponds to the ceramic plate fuse.

  5. Replace the thermal fuse on a GHD Classic V: 5 단계, 이미지 3개 중 1개 Replace the thermal fuse on a GHD Classic V: 5 단계, 이미지 3개 중 2개 Replace the thermal fuse on a GHD Classic V: 5 단계, 이미지 3개 중 3개
    • Slowly lift the fuse and cut the two cables with your wire cutter.

    • You can now remove the fuse from its compartment as well as the two cables by pulling on them towards the front.

  6. Replace the thermal fuse on a GHD Classic V: 6 단계, 이미지 3개 중 1개 Replace the thermal fuse on a GHD Classic V: 6 단계, 이미지 3개 중 2개 Replace the thermal fuse on a GHD Classic V: 6 단계, 이미지 3개 중 3개
    • Start by inserting your new fuse's cables and let about a centimeter of slack.

    • Insert the end of the fuse.

    • Pull on both cables outward to completely fit the fuse in its compartment.

  7. Replace the thermal fuse on a GHD Classic V: 7 단계, 이미지 1개 중 1개
    • Watch out: the two white cables are screwed in the center; the brown cables are screwed at the outer posts.

결론

To reassemble your device, follow these instructions in reverse order.

다른 2명이 해당 안내서를 완성하였습니다.

다음 번역가들에게 특별히 감사 드립니다:

fr en

100%

이 번역인들은 저희가 세상을 수리하는 데 도움을 주고 있어요! 기여하시겠습니까?
번역 시작하기 ›

작성자

2다른 기여자 명과 함께

Caplou.com

회원 가입일: 03/24/21

193 평판

안내서 1개를 작성함

Caplou Caplou 회원

Business

1 회원

안내서 2개를 작성함

댓글 3개

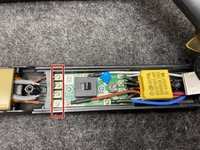
Thanks for this! I am searching for a suitable fuse replacement, will this one work?

TB05-BB5D-145 (up to 160°C)

https://www.conrad.de/de/p/tb05-bb5d-145...

Francisco - 답글

Bonjour, non ce fusible thermique n'est pas compatible, la température de déclenchement n'est pas la bonne, de plus la taille de celui-ci est trop large et le branchement ne comporte pas les deux connecteurs.

Si vous avez besoin du modèle correct, veuillez nous contacter ici: https://caplou.com

Belle journée

L'équipe Caplou

Caplou.com -

Parfait merci beaucoup il re fonctionne !!!

sourya lasfar - 답글

댓글 쓰기

조회 통계:

지난 24시간: 2

지난 7일: 20

지난 30일: 68

전체 시간: 9,539