주요 콘텐츠로 건너뛰기

Replacement of the motherboard of Xiaomi Redmi Note 7 Pro Motherboard Replacement

  1. Replacement of the motherboard of Xiaomi Redmi Note 7 Pro Motherboard Replacement, The motherboard: 1 단계, 이미지 1/1
    • Before you begin, switch off your phone.

    • Heat your phone to about 195 degrees Fahrenheit (90 C).

  2. Replacement of the motherboard of Xiaomi Redmi Note 7 Pro Motherboard Replacement: 2 단계, 이미지 1/1
    • Lift the back cover to create a gap between the glass and the frame.

    • Insert an opening pick into the gap.

  3. Replacement of the motherboard of Xiaomi Redmi Note 7 Pro Motherboard Replacement: 3 단계, 이미지 1/1
    • Start sliding the opening pick from the lower left corner along the side of the device to cut the adhesive

    • Leave the opening pick in the side to prevent the adhesive from resealing.

  4. Replacement of the motherboard of Xiaomi Redmi Note 7 Pro Motherboard Replacement: 4 단계, 이미지 1/1
    • Lift the cover open like a book, but be careful to make sure you do not damage the flex cable while it’s still connected.

  5. Replacement of the motherboard of Xiaomi Redmi Note 7 Pro Motherboard Replacement: 5 단계, 이미지 1/2 Replacement of the motherboard of Xiaomi Redmi Note 7 Pro Motherboard Replacement: 5 단계, 이미지 2/2
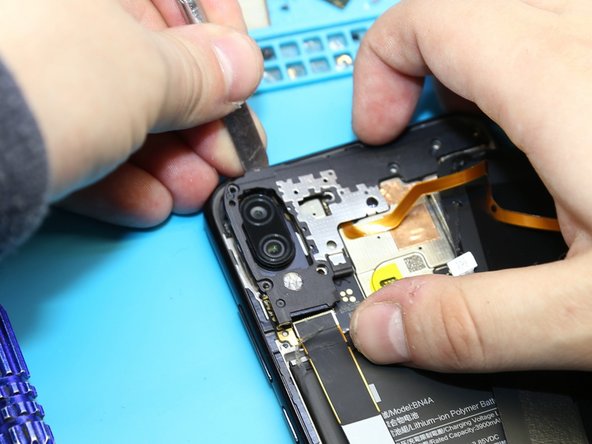
    • Using a screwdriver (1.5 mm ), unscrew 4 screw and remove the bracket holding the connector.

  6. Replacement of the motherboard of Xiaomi Redmi Note 7 Pro Motherboard Replacement: 6 단계, 이미지 1/1
    • Disconnect the connector to avoid a possible short circuit during disassembly.

    • Disconnect connectors and remove the inter-board cable.

  7. Replacement of the motherboard of Xiaomi Redmi Note 7 Pro Motherboard Replacement: 7 단계, 이미지 1/3 Replacement of the motherboard of Xiaomi Redmi Note 7 Pro Motherboard Replacement: 7 단계, 이미지 2/3 Replacement of the motherboard of Xiaomi Redmi Note 7 Pro Motherboard Replacement: 7 단계, 이미지 3/3
    • Using a screwdriver (1.5 mm), unscrew the 7 screws.

    • Remove the cover.

  8. Replacement of the motherboard of Xiaomi Redmi Note 7 Pro Motherboard Replacement: 8 단계, 이미지 1/1
    • Pry up on the connector and remove the fingerprint sensor cable.

  9. Replacement of the motherboard of Xiaomi Redmi Note 7 Pro Motherboard Replacement: 9 단계, 이미지 1/1
    • Disconnect the connector on PCB, and remove the front facing (selfie) camera.

  10. Replacement of the motherboard of Xiaomi Redmi Note 7 Pro Motherboard Replacement: 10 단계, 이미지 1/1
    • Disconnect the connectors on the PCB.

  11. Replacement of the motherboard of Xiaomi Redmi Note 7 Pro Motherboard Replacement: 11 단계, 이미지 1/1
    • Pull off and remove the PCB.

결론

To reassemble your device, follow these instructions in reverse order.

다른 18명이 해당 안내서를 완성하였습니다.

다음 번역가들에게 특별히 감사 드립니다:

es en

100%

이 번역자 분들은 저희가 세상을 수리하는데 동참해 주시는 분입니다! 기여하시겠습니까?
번역 시작하기 ›

Remphone.ru

회원 가입일: 10/02/19

654 평판

안내서 1개 작성함

댓글 한 개

Give Me Your Phone Number..

The Comedy King - 답글

댓글 쓰기

조회 통계:

24 시간 전: 5

7일 전: 33

30일 전: 268

전체 시간: 10,976