주요 콘텐츠로 건너뛰기

Replacing a Patagonia Freewheeler Luggage Handle

필요한 것

동영상 개요

Freewheeler handle replacement overview.

  1. Replacing a Patagonia Freewheeler Luggage Handle, Handle Replacment: 1 단계, 이미지 1/2 Replacing a Patagonia Freewheeler Luggage Handle, Handle Replacment: 1 단계, 이미지 2/2
    • Lay your Wheeled Luggage on its back on a table.

    • Unzip the main zipper.

  2. Replacing a Patagonia Freewheeler Luggage Handle: 2 단계, 이미지 1/3 Replacing a Patagonia Freewheeler Luggage Handle: 2 단계, 이미지 2/3 Replacing a Patagonia Freewheeler Luggage Handle: 2 단계, 이미지 3/3
    • Open the main compartment of your bag until it lays flat on the table.

  3. Replacing a Patagonia Freewheeler Luggage Handle: 3 단계, 이미지 1/3 Replacing a Patagonia Freewheeler Luggage Handle: 3 단계, 이미지 2/3 Replacing a Patagonia Freewheeler Luggage Handle: 3 단계, 이미지 3/3
    • Unzip the the zipper in the grey lining of the bag, opening the lining as you go.

  4. Replacing a Patagonia Freewheeler Luggage Handle: 4 단계, 이미지 1/2 Replacing a Patagonia Freewheeler Luggage Handle: 4 단계, 이미지 2/2
    • Remove the four, red Phillips #1 screws from the frame.

  5. Replacing a Patagonia Freewheeler Luggage Handle: 5 단계, 이미지 1/3 Replacing a Patagonia Freewheeler Luggage Handle: 5 단계, 이미지 2/3 Replacing a Patagonia Freewheeler Luggage Handle: 5 단계, 이미지 3/3
    • Remove the two black plastic retaining brackets from the frame.

  6. Replacing a Patagonia Freewheeler Luggage Handle: 6 단계, 이미지 1/1
    • Depress the button on the handle by gripping firmly.

    • With the button handle still depressed, pull the handle straight out of the bag.

    • This may require some force. If the handle doesn't come out right away you may have to pull harder.

    • When inserting a new handle, be sure to push the handle in until there is a loud click, and the brackets on the handle lay flush with the bag.

  7. Replacing a Patagonia Freewheeler Luggage Handle: 9 단계, 이미지 1/3 Replacing a Patagonia Freewheeler Luggage Handle: 9 단계, 이미지 2/3 Replacing a Patagonia Freewheeler Luggage Handle: 9 단계, 이미지 3/3
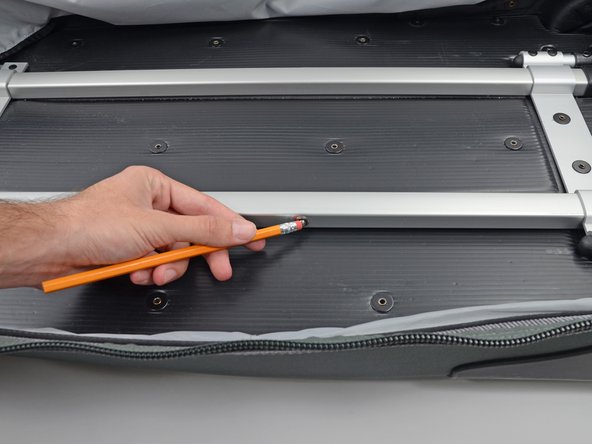
    • If you are still having trouble with your handle, check the pins inside the bag.

    • When you depress the button on the handle, the two pins on the sides of the handle should retract, freeing the handle to slide.

    • If either pin is not retracting use a pencil, screwdriver, or other thin object to push the pin into the hole.

  8. Replacing a Patagonia Freewheeler Luggage Handle: 10 단계, 이미지 1/2 Replacing a Patagonia Freewheeler Luggage Handle: 10 단계, 이미지 2/2
    • With the pin depressed, squeeze the handle and pull it from the bag.

결론

To reassemble your device, follow these instructions in reverse order.

다른 5명이 해당 안내서를 완성하였습니다.

Brittany McCrigler

회원 가입일: 03/05/12

89,017 평판

안내서 131개 작성하였습니다

iFixit iFixit 회원

Staff

135 회원들

안내서 17,189개 작성하였습니다

댓글 2개

I depressed the pins. It worked once or twice. But now, I have to depress the pins every time to get the handle to work OR even with the pins depressed it will still not retract or if retracted it will still not open.

What is the solution?

I love this suitcase otherwise, but the handle has always been tricky needing just the right angle on the way in and having to jiggle it to get it out.

Help Patagonia!

Sharon - 답글

Hi Sharon,

The solution to depress the pins was meant to be a temporary solution when your handle is stuck in the extended position. Unfortunately, it means that your handle needs to be replaced as the handle trigger mechanism and pins are not functioning properly. Contact Patagonia for a new handle. You can either call us and we will can ship you a new one and you can replace yourself, or you can go to a Patagonia Retail Store and get a new handle there, afterwhich you can use the handing guidelines for replacement. Please visit our website for phone number and to locate a store near you. Copy and paste this URL in your search engine bar or click on the link.

http://www.patagonia.com/us/patagonia.go...

Marty Chapman -

댓글 쓰기

조회 통계:

24 시간 전: 7

7일 전: 81

30일 전: 313

전체 시간: 30,049