소개
The purpose of this tutorial is to help you replace the keyboard connection cable connector locking flap on a MacBook Pro Retina. It is applicable to all types of ZIF connectors for flexible cables used by Apple. It requires a lot of dexterity and ideally fine tweezers.
필요한 것
-
-
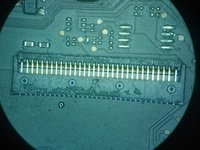
A Locking flap with the markings "DDF" and "30d" visible on the top is shown in the first photo. It is positioned in the right direction to be replaced.
-
If the locking flap is positioned the wrong way it is easy to turn it around.
-
-
-
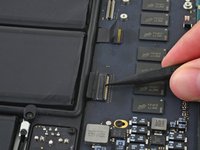
Lift the back of the locking flap to position it vertical to the ZIF connector.
-
Insert one side of the flap first. A slight resistance will be felt before it is positioned.
-
The gold pins of the connectors must fit inside the flap. The "grid" of the flap is therefore positioned between the gold pins and the silver pins.
-
-
-
-
Finish by inserting the left side in the same way as the right side.
-
Finish by pushing the flap as far as possible inside the connector.
-


You can now resume reassembly where you left off.
다른 11명이 해당 안내서를 완성하였습니다.
다음 번역가들에게 특별히 감사 드립니다:
100%

이 번역인들은 저희가 세상을 수리하는 데 도움을 주고 있어요! 기여하시겠습니까?
번역 시작하기 ›

7가이드 댓글
Bonjour
Vous pouvez me confirmer que le connecteur ne fonctionne pas sans le clapet ? Je l'ai cassé et le clavier ne marche plus.. J'ai commandé 5 connecteurs pour essayer de remettre le clapet.. Merci
Hichem Ben - 답글
Bonjour. Un connecteur bien enfoncé, avec un bout de scotch pour le maintenir en place pourrait fonctionner, mais il pourrait aussi ne pas fonctionner ou tomber en panne par intermittence. Vous pouvez faire le test, dans l'attente de l'arrivée de vos connecteurs neufs, en sachant que si ça ne maarche plus, cela vient surement de là !
Merci pour votre réponse.
Après avoir cassé le clapet, j'ai essayé d'insérer la nappe et d'allumer, ça ne marche pas car le bouton d'allumage fait partie du clavier.. J'ai maintenu une pression avec mon doigt ça marche pour quelques boutons.. J'attends la pièce pour récupérer uniquement le clapet, j'espère que c à cause de ça (logiquement si) malgré que je n'ai pas compris son réel rôle ce clapet.. Car la nappe me semble touchée les dents du connecteur !
Hichem Ben - 답글
Pour le détail bien enfoncé je n'arrive pas à le faire il persiste 1mm de la partie blanche de la nappe à l'extérieur comme sur votre photo.. Donc le scotch si il servira qu'à maintenir la nappe en place ça ne va pas régler le problème.. Io faut maintenir la pression par le clapet
Hichem Ben - 답글
J'ai réussi à le mettre mais beaucoup de boutons ne fonctionne pas.. Je pense que j'ai abîmé la nappe à force de la manipulé..
Hichem Ben - 답글