주요 콘텐츠로 건너뛰기

Replacing the Reservoir Membrane of a Sterwins Booster Pump (900W, 19L, 3800L/h)

필요한 것

  1. Replacing the Reservoir Membrane of a Sterwins Booster Pump (900W,  19L, 3800L/h), Tools Needed: 1 단계, 이미지 1/3 Replacing the Reservoir Membrane of a Sterwins Booster Pump (900W,  19L, 3800L/h), Tools Needed: 1 단계, 이미지 2/3 Replacing the Reservoir Membrane of a Sterwins Booster Pump (900W,  19L, 3800L/h), Tools Needed: 1 단계, 이미지 3/3
    • Before fiddling with the booster pump, verify that it is not plugged in.

    • Tools Needed:

    • Flathead screwdriver

    • Flat wrench (size 14mm and 12mm)

    • L-shaped socket wrench (size 14mm)

    • Flat wrench (size 28mm) or an adjustable wrench

  2. Replacing the Reservoir Membrane of a Sterwins Booster Pump (900W,  19L, 3800L/h), Depressurize the reservoir: 2 단계, 이미지 1/3 Replacing the Reservoir Membrane of a Sterwins Booster Pump (900W,  19L, 3800L/h), Depressurize the reservoir: 2 단계, 이미지 2/3 Replacing the Reservoir Membrane of a Sterwins Booster Pump (900W,  19L, 3800L/h), Depressurize the reservoir: 2 단계, 이미지 3/3
    • Unscrew the cap covering the valve that regulates the internal pressure of the reservoir.

    • Using the screwdriver, push on the valve core to depressurize the reservoir.

  3. Replacing the Reservoir Membrane of a Sterwins Booster Pump (900W,  19L, 3800L/h), Unscrew the seal plate: 3 단계, 이미지 1/3 Replacing the Reservoir Membrane of a Sterwins Booster Pump (900W,  19L, 3800L/h), Unscrew the seal plate: 3 단계, 이미지 2/3 Replacing the Reservoir Membrane of a Sterwins Booster Pump (900W,  19L, 3800L/h), Unscrew the seal plate: 3 단계, 이미지 3/3
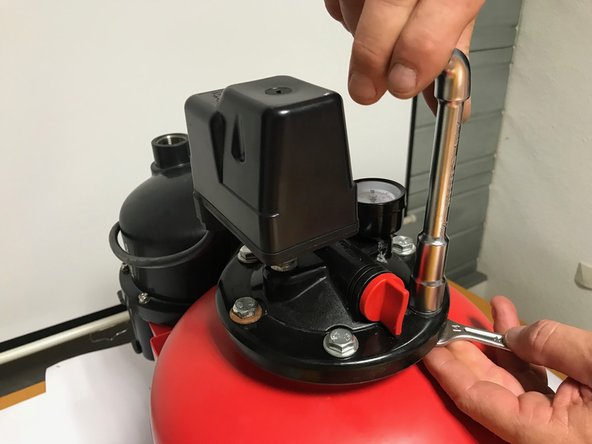
    • Using a flat wrench (size 14mm) and a socket wrench (size 14mm), unscrew the 6 bolts holding the seal plate in place.

  4. Replacing the Reservoir Membrane of a Sterwins Booster Pump (900W,  19L, 3800L/h), Remove the seal plate: 4 단계, 이미지 1/2 Replacing the Reservoir Membrane of a Sterwins Booster Pump (900W,  19L, 3800L/h), Remove the seal plate: 4 단계, 이미지 2/2
    • Unscrew the connection between the head of the pump and the tank with a flat wrench (size 28mm or adjustable)

  5. Replacing the Reservoir Membrane of a Sterwins Booster Pump (900W,  19L, 3800L/h), Remove the reservoir: 5 단계, 이미지 1/3 Replacing the Reservoir Membrane of a Sterwins Booster Pump (900W,  19L, 3800L/h), Remove the reservoir: 5 단계, 이미지 2/3 Replacing the Reservoir Membrane of a Sterwins Booster Pump (900W,  19L, 3800L/h), Remove the reservoir: 5 단계, 이미지 3/3
    • Unscrew the valve nut with a flat wrench (size 12mm).

    • Position the tank upright at 90° to remove the reservoir.

  6. Replacing the Reservoir Membrane of a Sterwins Booster Pump (900W,  19L, 3800L/h), Replace the reservoir: 6 단계, 이미지 1/3 Replacing the Reservoir Membrane of a Sterwins Booster Pump (900W,  19L, 3800L/h), Replace the reservoir: 6 단계, 이미지 2/3 Replacing the Reservoir Membrane of a Sterwins Booster Pump (900W,  19L, 3800L/h), Replace the reservoir: 6 단계, 이미지 3/3
    • Put the valve back into the fastening tab of the reservoir.

    • Locate the valve's original spot in the bottom of the tank.

    • Insert the reservoir into the tank.

  7. Replacing the Reservoir Membrane of a Sterwins Booster Pump (900W,  19L, 3800L/h), Set the reservoir in place: 7 단계, 이미지 1/3 Replacing the Reservoir Membrane of a Sterwins Booster Pump (900W,  19L, 3800L/h), Set the reservoir in place: 7 단계, 이미지 2/3 Replacing the Reservoir Membrane of a Sterwins Booster Pump (900W,  19L, 3800L/h), Set the reservoir in place: 7 단계, 이미지 3/3
    • With your hands, put the valve back in its spot inside the tank.

    • With a flat wrench (size 12mm), put the nut holding the valve back in place.

    • Position the lip of the reservoir on the outside rim of the tank.

  8. Replacing the Reservoir Membrane of a Sterwins Booster Pump (900W,  19L, 3800L/h), Put the seal plate back on: 8 단계, 이미지 1/3 Replacing the Reservoir Membrane of a Sterwins Booster Pump (900W,  19L, 3800L/h), Put the seal plate back on: 8 단계, 이미지 2/3 Replacing the Reservoir Membrane of a Sterwins Booster Pump (900W,  19L, 3800L/h), Put the seal plate back on: 8 단계, 이미지 3/3
    • Reposition the seal plate on the tank.

    • Screw the 6 bolts back into place with a flat wrench (size 14mm) and a socket wrench (size 14mm).

    • Screw the nut between the head of the pump and the tank back into place, with a flat wrench (size 28 mm or adjustable).

    • Repressurize the tank to 1.8 bar max

결승점

다른 2명이 해당 안내서를 완성하였습니다.

다음 번역가들에게 특별히 감사 드립니다:

fr en

100%

이 번역자 분들은 저희가 세상을 수리하는데 동참해 주시는 분입니다! 기여하시겠습니까?
번역 시작하기 ›

iRobot

회원 가입일: 09/24/09

1 평판

안내서 636개 작성하였습니다

댓글 2개

Thank you so much for your tutorial. I am a window cleaner and it is a essential for me. After my pump broke last week I was planning on buying a new one but now its fixed because of you.

Neil Glass - 답글

Where can I buy the membrane?

Periklis Tsogkas - 답글

댓글 쓰기

조회 통계:

24 시간 전: 4

7일 전: 25

30일 전: 110

전체 시간: 5,656