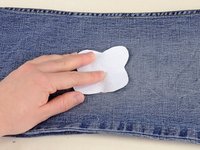
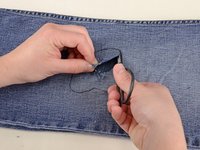
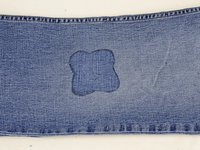
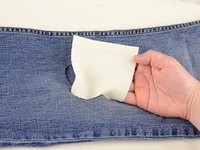
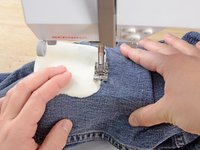
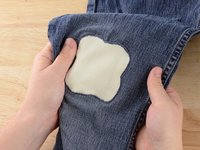
주요 콘텐츠로 건너뛰기

Reverse Applique Patch

필요한 것

  1. Reverse Applique Patch, Reverse Applique Patch: 1 단계, 이미지 1/3 Reverse Applique Patch, Reverse Applique Patch: 1 단계, 이미지 2/3 Reverse Applique Patch, Reverse Applique Patch: 1 단계, 이미지 3/3
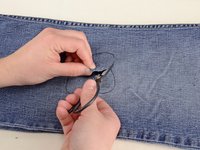
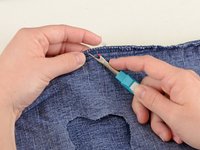
    • Examine the damage. Clip any long threads, and remove any debris from the hole.

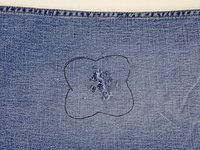
    • Measure the damaged area.

    • In our case it looks to be 2" by 2".

  2. Reverse Applique Patch: 2 단계, 이미지 1/2 Reverse Applique Patch: 2 단계, 이미지 2/2
    • Draw any the shape you'd like your patch to be on a piece of paper. Be sure your design is at least 1/8" larger than the damaged area.

    • Cut out your design.

  3. Reverse Applique Patch: 3 단계, 이미지 1/2 Reverse Applique Patch: 3 단계, 이미지 2/2
    • Lay the cutout of your design over the hole in the jeans to make sure that it is the correct size and looks how you want it to.

  4. Reverse Applique Patch: 4 단계, 이미지 1/3 Reverse Applique Patch: 4 단계, 이미지 2/3 Reverse Applique Patch: 4 단계, 이미지 3/3
    • Using a pencil, pen, or tailor's chalk, trace the design onto the jeans.

  5. Reverse Applique Patch: 5 단계, 이미지 1/3 Reverse Applique Patch: 5 단계, 이미지 2/3 Reverse Applique Patch: 5 단계, 이미지 3/3
    • Cut the design out of your jeans.

    • Be sure to only cut one layer of denim, or you will cut through the back of your jeans and need two patches!

  6. Reverse Applique Patch: 6 단계, 이미지 1/3 Reverse Applique Patch: 6 단계, 이미지 2/3 Reverse Applique Patch: 6 단계, 이미지 3/3
    • Take the scrap of fabric you will use for a patch and insert it into the hole.

  7. Reverse Applique Patch: 7 단계, 이미지 1/2 Reverse Applique Patch: 7 단계, 이미지 2/2
    • Slide the pant leg with the patch over the arm of the sewing machine.

    • You may need to remove the sewing machine table for the pant to fit over the sewing machine.

    • If you are still having trouble getting the pant around the arm of the sewing machine, you can rip the side seam of the pant leg to allow room to sew.

    • Be sure that the pant leg is around the arm, and that you are not accidentally sewing the two layers of the pant leg together.

  8. Reverse Applique Patch: 8 단계, 이미지 1/2 Reverse Applique Patch: 8 단계, 이미지 2/2
    • Adjust the sewing machine for a zig-zag stitch.

    • Set the stitch length to just under 1/2.

  9. Reverse Applique Patch: 9 단계, 이미지 1/2 Reverse Applique Patch: 9 단계, 이미지 2/2
    • Align the edge of the patch with the center of the pressor foot.

    • Be sure that the patch is laying flat.

    • Lower the pressor foot.

    • Begin sewing the zig-zag stitch, following the edge of the hole so that the zig-zag stitch covers the area where the two fabrics meet.

  10. Reverse Applique Patch: 10 단계, 이미지 1/3 Reverse Applique Patch: 10 단계, 이미지 2/3 Reverse Applique Patch: 10 단계, 이미지 3/3
    • Sew all the way around the patch.

    • Overlap the stitching at the end with the first two or three stitches.

  11. Reverse Applique Patch: 11 단계, 이미지 1/2 Reverse Applique Patch: 11 단계, 이미지 2/2
    • Lift the pressor foot and needle.

    • Slide the pant leg off of the arm of the sewing machine.

    • Clip any threads, and admire your work.

결승점

다른 5명이 해당 안내서를 완성하였습니다.

Brittany McCrigler

회원 가입일: 03/05/12

88,898 평판

안내서 131개 작성하였습니다

iFixit iFixit 회원

Staff

136 회원들

안내서 16,573개 작성하였습니다

댓글 2개

To keep the pattern from entirely fraying or catching on things, it may also help to flip the pants right-side-out and sew again around the pattern edge with the zigzag or a flat stitch.

Alisa - 답글

worked! i’ve been wearing these torn pants for years. thanks so much!

Meenal Raval - 답글

댓글 쓰기

조회 통계:

24 시간 전: 10

7일 전: 59

30일 전: 299

전체 시간: 13,491