주요 콘텐츠로 건너뛰기

Ricoh Shotmaster 130Z Shutter LED Replacement

필요한 것

  1. Ricoh Shotmaster 130Z Shutter LED  Replacement, Shutter LED: 1 단계, 이미지 1/3 Ricoh Shotmaster 130Z Shutter LED  Replacement, Shutter LED: 1 단계, 이미지 2/3 Ricoh Shotmaster 130Z Shutter LED  Replacement, Shutter LED: 1 단계, 이미지 3/3
    • Using a Phillips J00 head remove the three 5mm screws on both left and right side of the camera as well as the one in back of it.

  2. Ricoh Shotmaster 130Z Shutter LED  Replacement: 2 단계, 이미지 1/1
    • Using the same J00 phillips head screwdriver proceed to removing the remaining four 5mm screws on the bottom of the camera.

    • Last, using the same #00 phillips head screwdriver remove the two 0.6mm screws which are one on each side of the tripod connection dip.

  3. Ricoh Shotmaster 130Z Shutter LED  Replacement: 3 단계, 이미지 1/2 Ricoh Shotmaster 130Z Shutter LED  Replacement: 3 단계, 이미지 2/2
    • The case can now be removed from the camera.

    • Using a blue opening tool start by lifting the back part of the case right where the tripod dip is. Lift until the back part of the case is released and can be easily removed

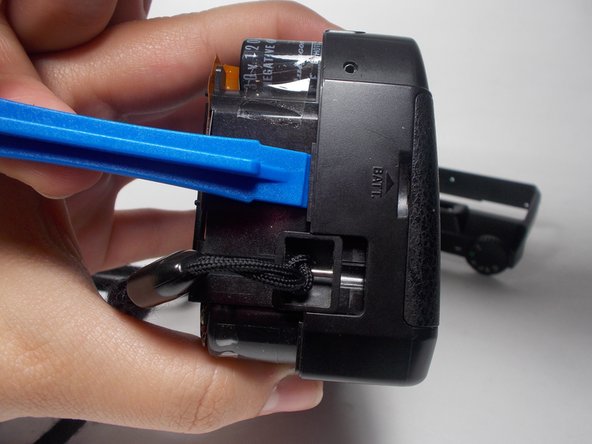
    • Next, using the same opening tool lift and push by the battery compartment as shown in the second picture. Do this until the front part of the case is released and can be easily removed.

  4. Ricoh Shotmaster 130Z Shutter LED  Replacement: 4 단계, 이미지 1/2 Ricoh Shotmaster 130Z Shutter LED  Replacement: 4 단계, 이미지 2/2
    • The LED diode to be replaced can be found in the front of the camera next to the zooming lens.

    • Desolder the LED to remove it from the motherboard

결론

To reassemble your device, follow these instructions in reverse order.

anna carolina von einem

회원 가입일: 10/19/16

450 평판

안내서 4개 작성하였습니다

UMass Dartmouth, Team 3-4, Isaacson Fall 2016 UMass Dartmouth, Team 3-4, Isaacson Fall 2016 회원

UMASSD-ISAACSON-F16S3G4

3 회원들

안내서 10개 작성하였습니다

댓글 0개

댓글 쓰기

조회 통계:

24 시간 전: 0

7일 전: 0

30일 전: 9

전체 시간: 193