주요 콘텐츠로 건너뛰기

Ridgid Angle Grinder R10202 Wiring Assembly Replacement

필요한 것

  1. Ridgid Angle Grinder R10202 Wiring Assembly Replacement, Wiring Assembly: 1 단계, 이미지 1/2 Ridgid Angle Grinder R10202 Wiring Assembly Replacement, Wiring Assembly: 1 단계, 이미지 2/2
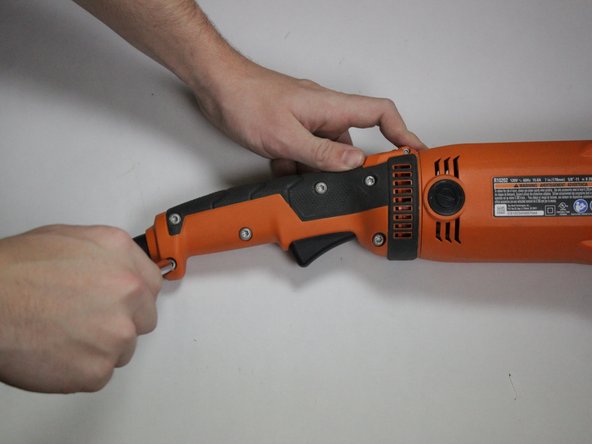
    • Take hold of the Side Assembly Handle [8] and unscrew to detach from the grinder.

  2. Ridgid Angle Grinder R10202 Wiring Assembly Replacement: 2 단계, 이미지 1/1
    • To get to the guard, unscrew and remove the Clamp Nut [34], Grinding Wheel (not pictured) [35], and Backing Flange [36].

  3. Ridgid Angle Grinder R10202 Wiring Assembly Replacement: 3 단계, 이미지 1/1
    • To remove the Guard [38], press and hold the Guard Lever [39] and rotate the head to line up the two arrows inlayed within the metal as seen in the photograph provided.

    • Once the arrows line up lift the Guard [38] from the grinder.

  4. Ridgid Angle Grinder R10202 Wiring Assembly Replacement: 4 단계, 이미지 1/3 Ridgid Angle Grinder R10202 Wiring Assembly Replacement: 4 단계, 이미지 2/3 Ridgid Angle Grinder R10202 Wiring Assembly Replacement: 4 단계, 이미지 3/3
    • Use TORX T20 Screwdriver to unscrew and remove 5 M5 x 16 mm, TORX Screws [28].

    • Use TORX T20 Screwdriver to unscrew and remove 1 M5 x 28 mm, TORX Screw [1].

    • Use TORX T10 Screwdriver to unscrew and remove 1 M3 x 10 mm Screw [26].

  5. Ridgid Angle Grinder R10202 Wiring Assembly Replacement: 5 단계, 이미지 1/2 Ridgid Angle Grinder R10202 Wiring Assembly Replacement: 5 단계, 이미지 2/2
    • You should now be able to separate each side of the Handle Assembly [27] as seen in the first photograph.

    • Remove the side that should easily separate from the other.

    • One side will remain as seen in the second picture as it is still screwed in.

  6. Ridgid Angle Grinder R10202 Wiring Assembly Replacement: 6 단계, 이미지 1/3 Ridgid Angle Grinder R10202 Wiring Assembly Replacement: 6 단계, 이미지 2/3 Ridgid Angle Grinder R10202 Wiring Assembly Replacement: 6 단계, 이미지 3/3
    • Use a Hex Screwdriver to unscrew and remove the 2 8-16 x 1/2 in. Screws [29].

  7. Ridgid Angle Grinder R10202 Wiring Assembly Replacement: 7 단계, 이미지 1/1
    • The Cord Clamp [30] should be easily removed as seen separated from the Power Cord [32].

  8. Ridgid Angle Grinder R10202 Wiring Assembly Replacement: 8 단계, 이미지 1/3 Ridgid Angle Grinder R10202 Wiring Assembly Replacement: 8 단계, 이미지 2/3 Ridgid Angle Grinder R10202 Wiring Assembly Replacement: 8 단계, 이미지 3/3
    • Use a screwdriver to unscrew and remove 1 M4 x 14 mm Screw [23].

  9. Ridgid Angle Grinder R10202 Wiring Assembly Replacement: 9 단계, 이미지 1/3 Ridgid Angle Grinder R10202 Wiring Assembly Replacement: 9 단계, 이미지 2/3 Ridgid Angle Grinder R10202 Wiring Assembly Replacement: 9 단계, 이미지 3/3
    • The whole wiring assembly should be able to be lifted out of where it currently is as seen in the first photograph.

    • Allow the wiring assembly to hang from the grinder as seen in the second picture.

    • Press and hold the Handle Lock Button [24] to release the second side of the Handle Assembly [27].

  10. Ridgid Angle Grinder R10202 Wiring Assembly Replacement: 10 단계, 이미지 1/3 Ridgid Angle Grinder R10202 Wiring Assembly Replacement: 10 단계, 이미지 2/3 Ridgid Angle Grinder R10202 Wiring Assembly Replacement: 10 단계, 이미지 3/3
    • Use screwdriver to unscrew 4 M3.5 x 7 mm Screws [22].

    • The Switch [21], Power Cord [32], and Motor Housing [11] should now all be separated as seen in the third photograph.

결론

To reassemble your device, follow these instructions in reverse order.

다른 2명이 해당 안내서를 완성하였습니다.

Parker Massie

회원 가입일: 01/10/19

607 평판

안내서 4개 작성하였습니다

댓글 한 개

Be careful while jointing the wires because it can cause you some electric issues for more info you can read this guide.

Fahed - 답글

댓글 쓰기

조회 통계:

24 시간 전: 0

7일 전: 2

30일 전: 13

전체 시간: 1,293