주요 콘텐츠로 건너뛰기

Ryobi RJ1861V Motor Housing Replacement

필요한 것

  1. Ryobi RJ1861V Motor Housing Replacement, Saw Bar Assembly: 1 단계, 이미지 1/1
    • Use a Torx T5 screwdriver to remove the single 8 mm screw securing the shoe.

  2. Ryobi RJ1861V Motor Housing Replacement: 2 단계, 이미지 1/2 Ryobi RJ1861V Motor Housing Replacement: 2 단계, 이미지 2/2
    • Remove the rubber sleeve.

    • You may have to use some force as it has a tight fit.

  3. Ryobi RJ1861V Motor Housing Replacement: 3 단계, 이미지 1/1
    • Use a Torx T5 screwdriver to remove the six screws on the underside of the device.

  4. Ryobi RJ1861V Motor Housing Replacement: 4 단계, 이미지 1/1
    • Use a Torx T5 screwdriver to remove the four screws on the top of the gear case.

    • There are two screws on each side of the device.

  5. Ryobi RJ1861V Motor Housing Replacement: 5 단계, 이미지 1/1
    • Remove the backside panel.

  6. Ryobi RJ1861V Motor Housing Replacement: 6 단계, 이미지 1/1
    • Unscrew the four T5 Torx screws that hold the assembly bar in place.

  7. Ryobi RJ1861V Motor Housing Replacement: 7 단계, 이미지 1/1
    • Lift the assembly bar up and out of the chassis.

  8. Ryobi RJ1861V Motor Housing Replacement, Assembly Bar Bearing: 8 단계, 이미지 1/1
    • Begin with the top of the device facing up.

  9. Ryobi RJ1861V Motor Housing Replacement: 9 단계, 이미지 1/1
    • Insert needle nose pliers to remove the retaining pin at the top of the bearing.

  10. Ryobi RJ1861V Motor Housing Replacement: 10 단계, 이미지 1/1
    • Once the retaining pin has been removed, pull off the damaged bearing and insert a new one.

  11. Ryobi RJ1861V Motor Housing Replacement, Motor Housing: 11 단계, 이미지 1/2 Ryobi RJ1861V Motor Housing Replacement, Motor Housing: 11 단계, 이미지 2/2
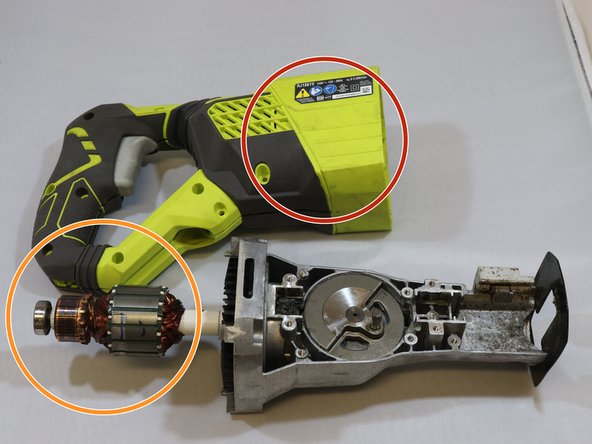
    • After following prerequisite guides to get to the presented step, remove motor assembly from back housing.

    • Motor Assembly will be greasy

    • Motor Assembly

    • Motor Assembly Housing

  12. Ryobi RJ1861V Motor Housing Replacement: 12 단계, 이미지 1/1
    • Using pliers to grab onto the elongated aluminium exterior of the housing, begin to slowly wiggle the motor assembly housing until it comes loose.

  13. Ryobi RJ1861V Motor Housing Replacement: 13 단계, 이미지 1/1
    • Detach red wires from base of the back of the housing .

  14. Ryobi RJ1861V Motor Housing Replacement: 14 단계, 이미지 1/1
    • After the wires have been detached it should be relatively easy to remove and replace the Motor Assembly Housing

    • Motor Assembly Housing

결론

To reassemble your device, follow these instructions in reverse order.

Ryan Quinlivan

회원 가입일: 04/08/19

306 평판

안내서 2개 작성하였습니다

댓글 0개

댓글 쓰기

조회 통계:

24 시간 전: 0

7일 전: 0

30일 전: 1

전체 시간: 65