주요 콘텐츠로 건너뛰기

SONY SRS-X2 Battery Replacement

필요한 것

  1. SONY SRS-X2 Battery Replacement, Face Plate: 1 단계, 이미지 1/2 SONY SRS-X2 Battery Replacement, Face Plate: 1 단계, 이미지 2/2
    • Use the metal spudger to pry the face screen open. Pull away from the device to remove.

  2. SONY SRS-X2 Battery Replacement: 2 단계, 이미지 1/2 SONY SRS-X2 Battery Replacement: 2 단계, 이미지 2/2
    • Remove seven, 27 mm long Phillips #1 screws.

    • Remove three, 11mm long Phillips #1 screws.

    • Remove four, 10 mm long Phillips#1 screws.

  3. SONY SRS-X2 Battery Replacement: 3 단계, 이미지 1/2 SONY SRS-X2 Battery Replacement: 3 단계, 이미지 2/2
    • Before removing the host plate, face the feet of the speaker to you. The wiring allows for minimal access to the inner components.

    • Use the spudger to remove the speaker host plate. Insert the metal tip in the seam between the host plate and the shell.

    • Be very careful when pulling the speaker host plate (described in the next step) as there are wiring connected to the host plate. This wiring is soldered to the plate and to the shell of the device. The wires are flexible and you can still open the device as shown in the second picture.

    • Center the spudger on the top of the device, this is furthest from the wiring, in wiggling the spudger under the plate, the plate should move up and out of the shell, you can finish lifting the plate away with your fingers.

  4. SONY SRS-X2 Battery Replacement: 4 단계, 이미지 1/2 SONY SRS-X2 Battery Replacement: 4 단계, 이미지 2/2
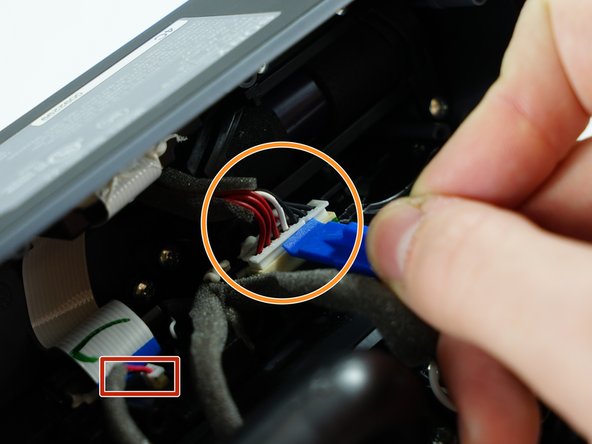
    • Be gentle when using the opening tool, wiggle the opening tool on each side of the socket to be sure the plastic does not snap.

    • Be careful not to damage the wires, pull from the plastic base to unplug.

    • Unplug the power cable connector shown using the plastic opening tool. Wiggle the tool under the lip of the plug, the smaller area and odd angle means lifting up with the plastic tool in the setup shown.

    • Unplug the power connector shown using the plastic opening tool lift from the front of the plug shown and move the opening tool to either side to get it all the way out of the socket.

  5. SONY SRS-X2 Battery Replacement, Battery: 5 단계, 이미지 1/2 SONY SRS-X2 Battery Replacement, Battery: 5 단계, 이미지 2/2
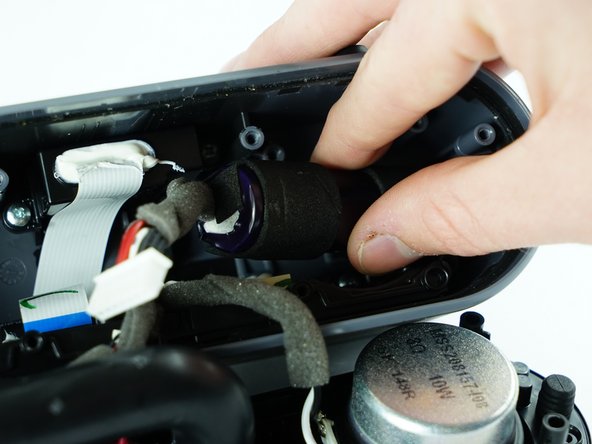
    • Remove the four, 11 mm, Phillips#1 screws on the battery cover plate.

  6. SONY SRS-X2 Battery Replacement: 6 단계, 이미지 1/2 SONY SRS-X2 Battery Replacement: 6 단계, 이미지 2/2
    • Remove the battery cover plate carefully then proceed to remove the battery.

    How many mAh has it?

    Daniel - 답글

    Thanks for this. 3.5 volt, 1,950 mah

    Dave - 답글

    grazie. faccio notare che nel mio sony SRS-X2 posizione e dimensioni nelle viti non corrisponde. consiglio farsi uno schema per non perdere tempo nel montaggio

    Paolo Holidays - 답글

    Step 4 only remove the power cable of the battery (the wide multicable plug) , not the small one. The tool is not needed if you carefully and gently wiggle the plug off.

    Coclsch - 답글

    What type of cell is that? 16650 or 18650?

    Task514 - 답글

결론

To reassemble your device, follow these instructions in reverse order.

다른 11명이 해당 안내서를 완성하였습니다.

Yubei Wu

회원 가입일: 10/04/16

662 평판

안내서 3개 작성하였습니다

USF Tampa, Team 3-3, Sullivan Fall 2016 USF Tampa, Team 3-3, Sullivan Fall 2016 회원

USFT-SULLIVAN-F16S3G3

4 회원들

안내서 6개 작성하였습니다

댓글 5개

The top two red in the middle and the bottom two orange in the middle are reversed. Other than that the instructions are good.

Ryan Lacharity - 답글

THANKS! You are the best!

Gustavo Crescente - 답글

Can anyone recommend an online store to buy a battery with the attached cable?

Mario Santos - 답글

2400mAh Battery For Sony Bluetooth Wireless Speaker SRS-X2,9-885-197-08,SF-02

https://www.ebay.com/itm/165154920649?ha...

João Arthur Rezende - 답글

FYI the original Sony battery cell is a LG ME1 (LGDAME11865) 18650 cell 3.65V 2100mAh rated.

Equivalent to LG ICR18650ME1, 3.6V 2000mAh

Sony's battery labelling says SR7767BP

3.6V / 1950mAh / 7.0Wh

Task514 - 답글

댓글 쓰기

조회 통계:

24 시간 전: 2

7일 전: 14

30일 전: 59

전체 시간: 14,929