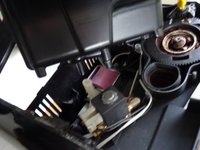
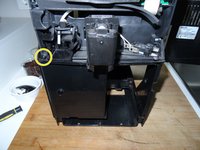
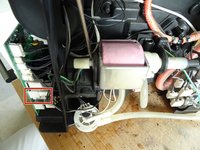
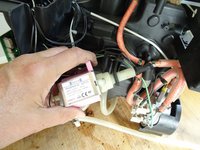
주요 콘텐츠로 건너뛰기

Saeco Minuto Pump Replacement

필요한 것

  1. Saeco Minuto Pump Replacement, Open a Saeco Minuto: 1 단계, 이미지 1/1
    • Disconnect the power plug!

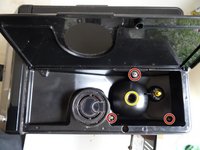
    • Remove the water tank.

    • Remove all the coffee beans.

    • Remove the brewing assembly.

    • Remove the drip tray and the coffee grounds drawer.

  2. Saeco Minuto Pump Replacement: 2 단계, 이미지 1/3 Saeco Minuto Pump Replacement: 2 단계, 이미지 2/3 Saeco Minuto Pump Replacement: 2 단계, 이미지 3/3
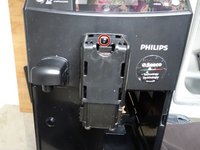
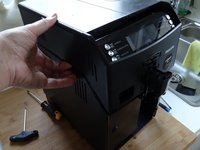
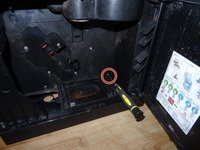
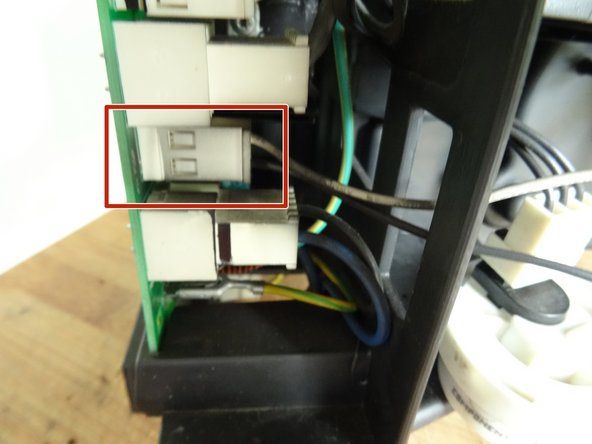
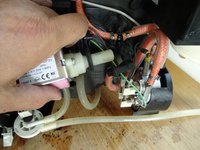
    • Pry up with a plastic opening tool at the bottom edge of the chrome-plated cover to lift up the coffee dispensing spout. This cover is often very tight, so you have to pry hard and hope that the part does not break.

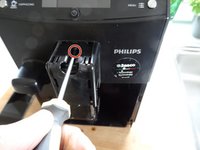
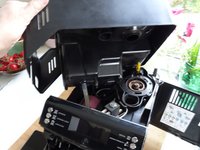
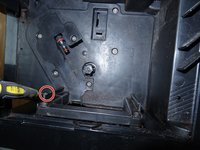
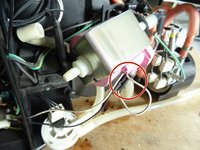
    • When the lower edge of the spout is released, you can pry on the side edge until the chrome cover comes off completely.

  3. Saeco Minuto Pump Replacement: 3 단계, 이미지 1/2 Saeco Minuto Pump Replacement: 3 단계, 이미지 2/2
    • Remove the Torx T10 screw at the top edge of the coffee dispensing spout.

  4. Saeco Minuto Pump Replacement: 4 단계, 이미지 1/2 Saeco Minuto Pump Replacement: 4 단계, 이미지 2/2
    • Lift off the black cover over the coffee dispensing spout. The sliding nozzles will come off at the same time.

  5. Saeco Minuto Pump Replacement: 5 단계, 이미지 1/1
    • Remove both Torx T10 screws on the left and right at the bottom edge of the coffee dispensing spout.

    • Pull off the hot water dispensing spout.

  6. Saeco Minuto Pump Replacement: 6 단계, 이미지 1/2 Saeco Minuto Pump Replacement: 6 단계, 이미지 2/2
    • Remove the Torx T20 screw on the finger guard of the grinder. Remove the finger guard.

    • If the screws are covered with coffee remains, you should first clean them with a needle and a vacuum cleaner.

    • Remove three Torx T10 screws in the bean container.

  7. Saeco Minuto Pump Replacement: 7 단계, 이미지 1/1
    • Remove the three Torx T10 screws under the water tank.

  8. Saeco Minuto Pump Replacement: 8 단계, 이미지 1/3 Saeco Minuto Pump Replacement: 8 단계, 이미지 2/3 Saeco Minuto Pump Replacement: 8 단계, 이미지 3/3
    • Grab the upper cover on the sides and lift it up.

    • The cover is still connected with a cable and a tube.

    • Take off the silicone tube.

  9. Saeco Minuto Pump Replacement: 9 단계, 이미지 1/1
    • Remove the water level sensor cable from its brackets.

    • Carefully remove the plug from the water level sensor.

    • The cover is now free and can be removed.

  10. Saeco Minuto Pump Replacement, Saeco Minuto outer case: 10 단계, 이미지 1/3 Saeco Minuto Pump Replacement, Saeco Minuto outer case: 10 단계, 이미지 2/3 Saeco Minuto Pump Replacement, Saeco Minuto outer case: 10 단계, 이미지 3/3
    • Open the service Dior.

    • Remove five Torx T10 screws.

  11. Saeco Minuto Pump Replacement: 11 단계, 이미지 1/1
    • Remove one T10 Torx screw securing the top of the grinder.

  12. Saeco Minuto Pump Replacement: 12 단계, 이미지 1/2 Saeco Minuto Pump Replacement: 12 단계, 이미지 2/2
    • If you haven't already done so: Unscrew the center Torx T10 screw at the bottom of the coffee spout distributor.

    • Unscrew the Torx T10 screw in the middle left front.

    • Lift the service door up and remove it.

  13. Saeco Minuto Pump Replacement: 13 단계, 이미지 1/2 Saeco Minuto Pump Replacement: 13 단계, 이미지 2/2
    • Unscrew the Torx T10 screw securing the coffee spout distributor inside.

  14. Saeco Minuto Pump Replacement: 14 단계, 이미지 1/1
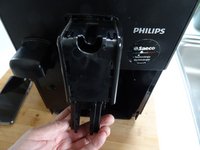
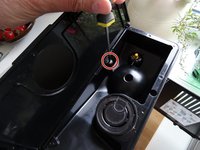
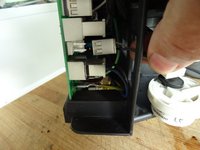
    • Lift the coffee spout distributor up and remove it.

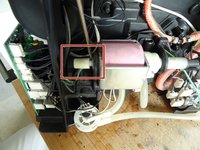
    • The coffee spout distributor tends to be dirty. Open it and clean it thorougly.

  15. Saeco Minuto Pump Replacement: 15 단계, 이미지 1/1
    • You should now be able to lift the inner frame out of the outer one. On some models, it is still attached with other screws.

    • Lift the inner frame up and remove it from the outer case. It may get stuck a bit, help with a plastic lever tool.

  16. Saeco Minuto Pump Replacement: 16 단계, 이미지 1/3 Saeco Minuto Pump Replacement: 16 단계, 이미지 2/3 Saeco Minuto Pump Replacement: 16 단계, 이미지 3/3
    • This is what the inner frame looks like from three sides. All components are easily accessible, especially the pump, the flowmeter and the heater.

  17. Saeco Minuto Pump Replacement: 17 단계, 이미지 1/1
    • And this is what the completely gutted outer case looks like. It can now be cleaned well.

  18. Saeco Minuto Pump Replacement, Pump: 18 단계, 이미지 1/3 Saeco Minuto Pump Replacement, Pump: 18 단계, 이미지 2/3 Saeco Minuto Pump Replacement, Pump: 18 단계, 이미지 3/3
    • Pull the pump cable connector to disconnect it from the PCB.

  19. Saeco Minuto Pump Replacement: 19 단계, 이미지 1/2 Saeco Minuto Pump Replacement: 19 단계, 이미지 2/2
    • Slide the water inlet off the left side of the pump using a flat screwdriver.

    • Get the pump out of the left rubber holder.

  20. Saeco Minuto Pump Replacement: 20 단계, 이미지 1/3 Saeco Minuto Pump Replacement: 20 단계, 이미지 2/3 Saeco Minuto Pump Replacement: 20 단계, 이미지 3/3
    • Place the cables tightly around the pump and unscrew the pump from the connection - the pressure relief valve - on the right side

    • Get the pump out of the right rubber holder.

    • If the replacement pump is not equipped with a thermal fuse, you must disconnect it from the old pump and transfer it to the new one. (marked red in the third picture)

결론

To reassemble your device, follow the above steps in reverse order.

다른 2명이 해당 안내서를 완성하였습니다.

다음 번역가들에게 특별히 감사 드립니다:

de en

100%

VauWeh님은 저희가 세상을 수리하는데 동참하신 분입니다! 기여하시겠습니까?
번역 시작하기 ›

VauWeh

회원 가입일: 10/19/15

206,786 평판

안내서 255개 작성하였습니다

Repair is War on Entropy Repair is War on Entropy 회원

Community

25 회원들

안내서 1,165개 작성하였습니다

댓글 한 개

Sehr gute, leicht verständliche Schritt für Schritt Anleitung! Überhaupt die Dokumentation mit den Fotos ist Top !!!!

Suuuper!

Hat perfekt funktioniert!!

Ich besitze die Saeco/Philips HD 8831 ist anscheinend identisch mit der Minuto :-)

Erich Roßmann - 답글

댓글 쓰기

조회 통계:

24 시간 전: 8

7일 전: 29

30일 전: 113

전체 시간: 4,584