주요 콘텐츠로 건너뛰기

Samsung Chromebook 3 Daughterboard Replacement

필요한 것

  1. Samsung Chromebook 3 Daughterboard Replacement, Bottom Case: 1 단계, 이미지 1/2 Samsung Chromebook 3 Daughterboard Replacement, Bottom Case: 1 단계, 이미지 2/2
    • Place the Chromebook face down so that the bottom case is exposed.

    • Using a Phillips #00 screwdriver, remove nine 4.6mm screws from the back casing.

  2. Samsung Chromebook 3 Daughterboard Replacement: 2 단계, 이미지 1/3 Samsung Chromebook 3 Daughterboard Replacement: 2 단계, 이미지 2/3 Samsung Chromebook 3 Daughterboard Replacement: 2 단계, 이미지 3/3
    • Use a iFixit opening tool to gently pry the case up from the vent on the hinge side of the Chromebook.

    • You should hear a popping sound as the connectors disengage inside the case.

  3. Samsung Chromebook 3 Daughterboard Replacement: 3 단계, 이미지 1/1
    • Lift the case up and off the device

  4. Samsung Chromebook 3 Daughterboard Replacement, Battery: 4 단계, 이미지 1/2 Samsung Chromebook 3 Daughterboard Replacement, Battery: 4 단계, 이미지 2/2
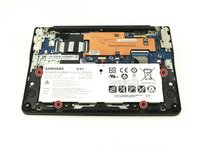
    • Locate the battery and remove the four 4.6mm screws at the corners which attach it to case using a Phillips #00 screwdriver.

  5. Samsung Chromebook 3 Daughterboard Replacement: 5 단계, 이미지 1/2 Samsung Chromebook 3 Daughterboard Replacement: 5 단계, 이미지 2/2
    • Use a spudger to gently pry the power cable cord upwards from the motherboard.

  6. Samsung Chromebook 3 Daughterboard Replacement: 6 단계, 이미지 1/1
    • Lift the battery up and out from the case.

  7. Samsung Chromebook 3 Daughterboard Replacement, Daughterboard: 7 단계, 이미지 1/2 Samsung Chromebook 3 Daughterboard Replacement, Daughterboard: 7 단계, 이미지 2/2
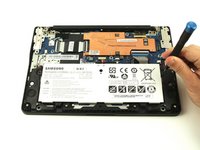
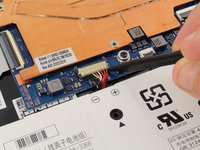
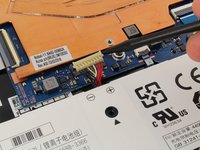
    • Before you begin the process of removing the daughterboard, you will need to remove the port case. Using a Phillips #00 screwdriver, remove the three 4.6mm screws.

  8. Samsung Chromebook 3 Daughterboard Replacement: 8 단계, 이미지 1/2 Samsung Chromebook 3 Daughterboard Replacement: 8 단계, 이미지 2/2
    • Use a spudger to unhook the cable connecter from the speaker cable.

  9. Samsung Chromebook 3 Daughterboard Replacement: 9 단계, 이미지 1/3 Samsung Chromebook 3 Daughterboard Replacement: 9 단계, 이미지 2/3 Samsung Chromebook 3 Daughterboard Replacement: 9 단계, 이미지 3/3
    • Pry the small coaxial cables upwards from the connecters on the wireless chip.

  10. Samsung Chromebook 3 Daughterboard Replacement: 10 단계, 이미지 1/2 Samsung Chromebook 3 Daughterboard Replacement: 10 단계, 이미지 2/2
    • Using the Phillips #00, unscrew one 4.6mm screw from the daughterboard.

  11. Samsung Chromebook 3 Daughterboard Replacement: 11 단계, 이미지 1/3 Samsung Chromebook 3 Daughterboard Replacement: 11 단계, 이미지 2/3 Samsung Chromebook 3 Daughterboard Replacement: 11 단계, 이미지 3/3
    • Use a spudger to lift the gray plastic bar on the zif connecter up, then use your fingers to remove the cable ribbon.

  12. Samsung Chromebook 3 Daughterboard Replacement: 12 단계, 이미지 1/1
    • Loosen the daughterboard from the USB port with a spudger as there is some adhesive underneath, and you're ready to remove the daughterboard.

결론

To reassemble your device, follow these instructions in reverse order.

다른 3명이 해당 안내서를 완성하였습니다.

Sarah Westberg

회원 가입일: 03/11/19

23,134 평판

안내서 70개 작성하였습니다

iFixit iFixit 회원

Staff

135 회원들

안내서 16,817개 작성하였습니다

댓글 0개

댓글 쓰기

조회 통계:

24 시간 전: 0

7일 전: 1

30일 전: 7

전체 시간: 1,186