소개
This guide demonstrates effective replacement of the Samsung Galaxy Alpha Display. Within six steps, you will be able to safely remove and reassemble your device.
필요한 것
-
-
On the back panel of the phone, find the slot that is on the top left side next to the flashlight.
-
Insert your fingernail or prying tool into the slot and lift up to slightly open the top left corner of the back panel.
-
Slide your fingernail or prying tool around the outer edge of the back panel to fully release it from the phone.
-
-
-
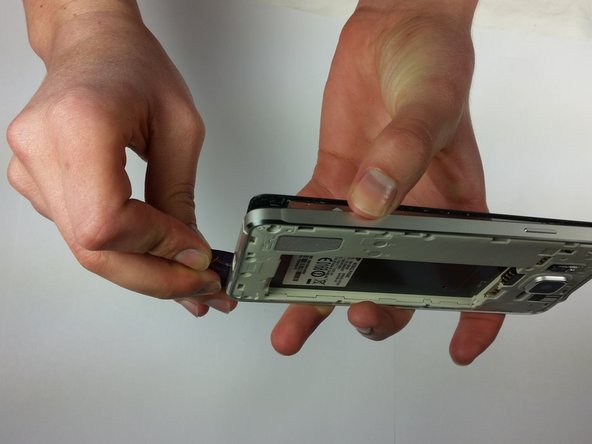
Locate the slot at the base of the battery and insert your thumb.
-
Push slightly toward the battery and out, away from the phone to free the battery.
-
-
-
To remove the back panel of the device, first find the slot next to the flashlight. Then insert your fingernail or prying tool into the slot and lift gently, around the perimeter, to fully remove the panel.
-
-
-
-
Use a JIS #000 screwdriver to remove all twelve 3mm screws that surround the back of the phone.
-
-
-
Heat your iOpener in the microwave for 30 seconds.
-
Place the iOpener on the front screen. Move the iOpener so all parts of the screen are heated evenly.
-
After multiple heating cycles, proceed to next step.
Avvertenza: Il display lcd è attaccato con un biadesivo alla scocca del telefono sia lungo il contorno sia nella parte centrale (per quest'ultimo, che è ben più largo e tenace, vedere la foto n. 3 nel passo n. 8 di questa guida). Se il display lcd funziona è molto difficile, specialmente a causa del biadesivo centrale, distaccarlo senza danneggiarlo, salvo che si usi una piastra separatrice.
Premesso ciò, a vostro rischio, se non avete iOpener, potete usare anche una hair gun ad una distanza di 15-20 cm dal display. Riscaldarlo ad una temperatura tra 80° e 110° (non >120° per non danneggiare la mainboard) per circa 3' - 5'. Riscaldare senza fermarsi troppo su un punto, facendo movimenti oscillatori. Per controllare la temperatura usate un rilevatore (a contatto e/o ad infrarossi).
-
-
-
Slide opening pick around perimeter of the glass. Make sure not to push edge too far under the screen.
1) Avvertenza: se il display lcd funziona è molto difficile distaccarlo senza danneggiarlo, salvo che si usi una piastra separatrice. 2) Durante la fase del distacco attenzione a non recidere i 2 cavi flat del display (ma se quest'ultimo fosse rotto non importa se vi capitasse di troncarli): uno nella zona dello spigolo in alto a destra e uno nella zona vicino al tasto di spegnimento. 3) Molta attenzione a non recidere i soft key che sono sotto il display ai lati sinistro e destro del tasto Home'. Inoltre, se questi risultino incollati al display, separarli con cura senza danneggiarli. 4) Nota: Se durante la fase del distacco qualche parte risulta ancora tenace, riscaldare di nuovo quella zona per un pò.
-
-
-
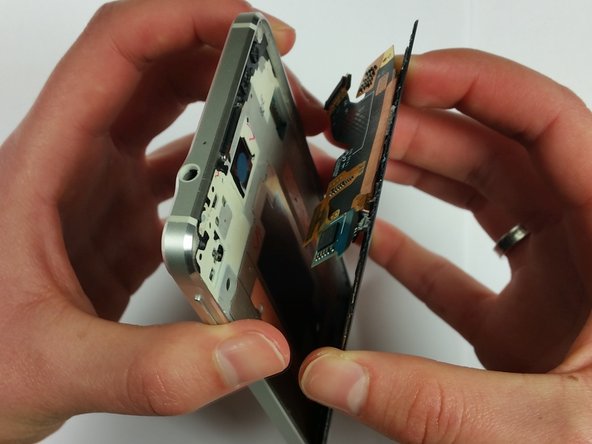
Gently pry the screen up and lift off.
Se dovete sostituire il display lcd potete continuare consultando la guida su ifixit riguardante il Samsung Galaxy S5 Neo, dove ho inserito dei commenti su come procedere. Il link è il seguente:
-


To reassemble your device, follow these instructions in reverse order. Pay attention to the grid that covers the earpiece speaker. Use the old grid if a replacement is not included in parts.
To reassemble your device, follow these instructions in reverse order. Pay attention to the grid that covers the earpiece speaker. Use the old grid if a replacement is not included in parts.
다른 30명이 해당 안내서를 완성하였습니다.
팀

Cal Poly, Team 20-17, Maness Winter 2015 Cal Poly, Team 20-17, Maness Winter 2015 회원
CPSU-MANESS-W15S20G17
4 회원들
안내서 5개 작성하였습니다
댓글 4개
Do i need an adhesive for the new screen? If so what is a good brand etc for me to order? thank you for the guide broke the first screen when I replaced the usb port for charging after it got wet while charging.
Same question here. Any answer?
Hi, I did it twice with two different types of LCD. typically the LCD has a glue on the borders and so you do not need to apply additional glue. The glue you have on the borders of the new LCD is protected by a thin film: Just remove it before applying LCD to the Frame
Actually just lifting the screen will break the LCD as the LCD is double sided taped to the phone. It needs to be gently lifting the screen and the LCD while heating up the phone and softening the adhesive, doing this while preventing from cutting unnecessary connections. I had my phone sent to Samsung Service Center after breaking the LCD while I left the bottom still sticking. Guess what, the technician cut my "back" button connection, and then told me to change the power module as well(!). Apparently, they did not follow step #9 of Samsung Galaxy Alpha Teardown