주요 콘텐츠로 건너뛰기

Samsung Galaxy Core Prime Back Camera Replacement

필요한 것

  1. Samsung Galaxy Core Prime Back Camera Replacement, Battery: 1 단계, 이미지 1/1
    • Turn the smartphone off by using the power button on the right-hand side.

  2. Samsung Galaxy Core Prime Back Camera Replacement: 2 단계, 이미지 1/1
    • Turn the smartphone over so that the rear camera is face up.

  3. Samsung Galaxy Core Prime Back Camera Replacement: 3 단계, 이미지 1/1
    • Use your fingernail or a flat tool to lift the back cover.

  4. Samsung Galaxy Core Prime Back Camera Replacement: 4 단계, 이미지 1/2 Samsung Galaxy Core Prime Back Camera Replacement: 4 단계, 이미지 2/2
    • Locate the battery near the bottom of the phone. The battery is square, flat, and is labeled 'SAMSUNG'.

  5. Samsung Galaxy Core Prime Back Camera Replacement: 5 단계, 이미지 1/1
    • Use your fingernail or a flat tool to lift the battery out.

  6. Samsung Galaxy Core Prime Back Camera Replacement, Rear Camera: 6 단계, 이미지 1/2 Samsung Galaxy Core Prime Back Camera Replacement, Rear Camera: 6 단계, 이미지 2/2
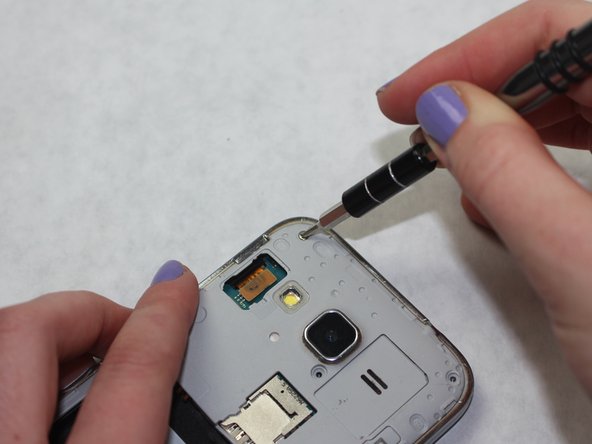
    • Use a Phillips #00 screw driver to remove all eight 4mm screws from the midframe.

  7. Samsung Galaxy Core Prime Back Camera Replacement: 7 단계, 이미지 1/1
    • Heat the frame with a heat gun or hair dryer until the adhesive is loose.

    • Take care when using these heat tools.

  8. Samsung Galaxy Core Prime Back Camera Replacement: 8 단계, 이미지 1/1
    이 단계에 사용된 도구:
    iFixit Opening Tool
    $1.99
    구매
  9. Samsung Galaxy Core Prime Back Camera Replacement: 9 단계, 이미지 1/2 Samsung Galaxy Core Prime Back Camera Replacement: 9 단계, 이미지 2/2
    • Disconnect the power ribbon on the left side of the phone either with your fingers or tweezers

  10. Samsung Galaxy Core Prime Back Camera Replacement: 10 단계, 이미지 1/1
    이 단계에 사용된 도구:
    iFixit Opening Tool
    $1.99
    구매
  11. Samsung Galaxy Core Prime Back Camera Replacement: 11 단계, 이미지 1/2 Samsung Galaxy Core Prime Back Camera Replacement: 11 단계, 이미지 2/2
    이 단계에 사용된 도구:
    Metal Spudger
    $2.99
    구매
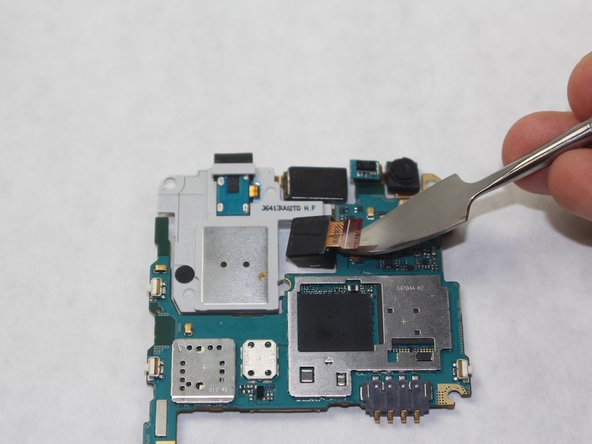
    • Turn the Motherboard over and disconnect the ribbon connecting the camera to the Motherboard with an iFixit Metal Spudger.

결론

To reassemble your device, follow these instructions in reverse order.

다른 2명이 해당 안내서를 완성하였습니다.

Adrian Sanchez

회원 가입일: 10/09/18

169 평판

안내서 1개 작성함

Sam Houston State, Team S11-G2, Blackburne Fall 2018 Sam Houston State, Team S11-G2, Blackburne Fall 2018 회원

SHSU-BLACKBURNE-F18S11G2

4 회원들

안내서 5개 작성하였습니다

댓글 0개

댓글 쓰기

조회 통계:

24 시간 전: 1

7일 전: 3

30일 전: 8

전체 시간: 1,457