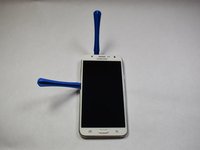
주요 콘텐츠로 건너뛰기
Samsung Galaxy J7 Midframe Replacement

Samsung Galaxy J7 Midframe Replacement

Timothy Grubb

Timothy Grubb7 다른 기여자

최종 수정일 January 10, 2025

10 분
조정
액션 샷
누락된 단계
더 나은 소개글

필요한 것

도구

  1. Samsung Galaxy J7 Midframe Replacement, Back Cover: 1 단계, 이미지 2개 중 1개 Samsung Galaxy J7 Midframe Replacement, Back Cover: 1 단계, 이미지 2개 중 2개
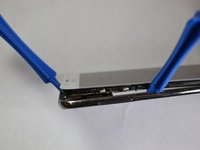
    • Locate the Tab: Find the tab at the top left corner of the back cover. (highlighted by red square)

    • Insert the tool: Use a fingernail or a plastic opening tool to lift the tab gently

    • Pry open the cover: Carefully work around the edges to remove the back cover completely

    • If the cover is stuck do not force it open use a plastic opening tool to avoid scratching the case.

  2. Samsung Galaxy J7 Midframe Replacement, Battery: 2 단계, 이미지 2개 중 1개 Samsung Galaxy J7 Midframe Replacement, Battery: 2 단계, 이미지 2개 중 2개
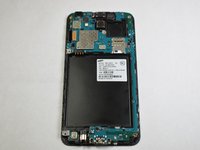
    • Locate the Battery slot: Find the small slit at the bottom right corner of the battery (highlighted by red square)

    • Remove Battery: Gently pop out the edge and carefully pull out the battery.

    • Tip: Ensure the battery is disconnected from the motherboard before removing it.

  3. Samsung Galaxy J7 Midframe Replacement, Midframe: 3 단계, 이미지 1개 중 1개
    • Using the Phillips #000 screwdriver, remove the ten 4.2 mm screws around the edge of the midframe.

  4. Samsung Galaxy J7 Midframe Replacement: 4 단계, 이미지 3개 중 1개 Samsung Galaxy J7 Midframe Replacement: 4 단계, 이미지 3개 중 2개 Samsung Galaxy J7 Midframe Replacement: 4 단계, 이미지 3개 중 3개
    • Lift up the back of the device with the iFixit opening tool and disconnect it from the front.

    • If the back panel is difficult to remove, gently heat the edges using a hair dryer or heat gun to soften the adhesive.

결론

To reassemble your device, follow these instructions in reverse order.

다른 2명이 해당 안내서를 완성하였습니다.

작성자

7다른 기여자 명과 함께

Timothy Grubb

회원 가입일: 02/05/19

680 평판

안내서 3개를 작성함

댓글 0개

댓글 쓰기

조회 통계:

지난 24시간: 0

지난 7일: 4

지난 30일: 12

전체 시간: 1,324