소개
This guide will teach you how to replace the charging port in your Samsung Galaxy 10.1 2014 edition.
필요한 것
-
-
Using the nylon spudger or plastic opening tool along the edges of the screen, separate the back case off of the device.
-
-
-
Place your finger on the thin black bar at the end of the ribbon tape and flip each one up.
-
Gently pull the ribbon tape on the battery away from the bar. Repeat this process for the second ribbon tape.
-
-
-
-
Remove the six 3mm screws around the battery with the Phillips PH000 screwdriver.
-
-
-
Lift up the battery from the bottom and situate the black nylon spudger underneath the battery.
-
Use the black nylon spudger to disconnect the multi-colored wires from the rest of the device.
-
-
-
Using the PH000 screwdriver, remove the two black 3mm screws at the bottom of the device.
-
-
-
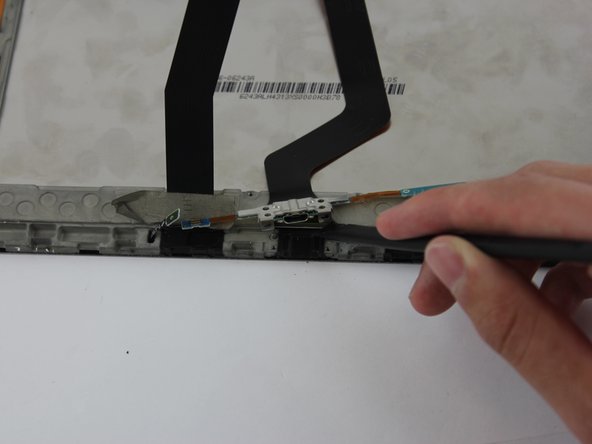
After disconnecting the two blue electronic connectors, unhinge the metal part of the charging port with the black nylon spudger.
What is name of left little socket in the picture.My socket tape was cut and broken. Is it related to working home key?
-
To reassemble your device, follow these instructions in reverse order.
To reassemble your device, follow these instructions in reverse order.
다른 14명이 해당 안내서를 완성하였습니다.
댓글 4개
Great guide. It helped me find the right component to order and gave me confidence to fix it myself. Actually the steps can be shortened. The battery does not need to be removed. So you need to do step 1 (remove the cover), first part of step 2 (remove the flat cable of the charge plug), step 5 and 6. Step 7 should be to replace the old part with the new part. And then of course the reversal of reconnecting via steps 6, 5, 2 and 1.
Great guide. thanks.
at the SIM card slot corner, there is a little cylinder connected to the SIM card slot, what is it. i accidentally cut the ribbon between the SIM card slot and this piece.
This guide enabled me to replace a bad charging port.
Note - the replacement microUSB port didn’t have the little chrome frame around the port - so I had to carefully scavenge the frame from the old one just to give the new port a little more support when plugging in a cable.
I’m going to use a magnetic charging adapter to reduce the wear and tear on the port, but this one saved the day.
Although I have changed this flat cable and also the relative micro USB connector and have installed the driver on the PC, the Tablet is not recognized, even if it charges the battery. I also tried to change micro USB cable and USB port on PC : - ((((


Remove stylus before you remove. There’s a nubbin on the main board that may dislodge it stylus is in place. it is easily reinserted, but easy hassle to avoid.
Matt - 답글
It’s worth mentioning that there is a part of the device casing, accessible from the back, that can be removed but has very fragile retaining clips. Although the picture does show that the prying tool is lifting the screen, it is hard to see. You will not be able to access the charge port by removing a portion of the casing. You must remove the case from the screen side.
Eden Mugg - 답글
Be careful!!!
the first picture of this first step and the instructions are misleading. What you need to remove is the back cover of the tablet. Use the opening tool along the edges of the back cover, NOT on the screen as the picture and the instructions say.
rene carmona - 답글
Its not misleading. You need to remove from the front as removing from the back you will tear the grey clipping from the glued back piece. You will not be able to replace the charge port from removing just the back either as you should be doing both.
Bradley Carr -
I agree this first step should be revised and include a warning.
My battery was swollen and the screen was separating from the case (big gap along edge).
Purchased new battery. Have spudger. Have done phone battery replacements before without issue.
I tried to do the separation but apparently was between the screen assembly and the back electronics rather than separating the entire electronics from the back casing.
The screen glass “exploded”…I’ll be finding glass particles in my office for the next few years I think. In addition, not realizing why things weren’t working I figured I would have to replace the screen anyway and continued on only to discover that a bunch of ribbon cables were destroyed during separation.
Given this process is listed as “EASY” there really should be some clear warnings about making sure the spudger doesn’t end up between the screen assembly and back electonics but rather ends up between the back case. The angle of the spudger in the photo doesn’t make this obvious.
What a waste.
mattp - 답글