소개
이 안내서를 사용하여 Samsung Galaxy Note10+ 배터리를 분리 또는 교체하세요. 배터리가 부풀어 올랐다면, 적절한 예방 조치를 취하세요.
안전을 위해서, 휴대폰을 분리하기 전에 25% 이하로 방전하세요. 이는 배터리 수리 도중 실수로 손상할 때 일어날 수 있는 열 화재 위험을 줄일 수 있습니다.
필요한 것
-
-
흡입 컵을 가열한 후면 커버 가장자리에 가능한 한 가깝게 부착하세요.
-
강하고 일정한 힘으로 흡입 컵을 당겨 후면 커버와 프레임 사이에 틈을 만드세요.
-
여는 픽의 뾰족한 끝을 틈에 넣으세요.
-
-
-
여는 픽을 왼편 가장자리를 따라서 왼편 하단 모서리를 향해 밀어 접착제를 자르세요.
-
접착제가 다시 붙지 않도록 왼편 하단 모서리에 여는 픽을 남겨 두세요.
-
-
-
휴대폰의 나머지 세 면에 이전 가열 및 절단 절차를 반복하세요.
-
다음 단계로 진행할 때 접착제가 다시 붙지 않도록 각 면에 여는 픽을 남겨 두세요.
-
-
-
후면 패널을 똑바로 들어올려 분리하세요.
Muy buena la guia. nada que añadir. para montar solo limpia el equipo donde estaba el tape anterior, y remoueve los el tape de la tapa nueva solo ponla y listo…
-
-
-
Phillips/십자 드라이버를 사용하여 무선 충전 코일을 고정하는 4mm 나사 다섯 개를 풀어주세요.
-
-
-
-
금속 실드를 위로 기울이면 손가락으로 잡을 수 있습니다.
-
무선 충전 코일을 기기에서 위로 벗겨 주세요.
-
무선 충전 코일을 분리하세요.
Can you reuse the wireless charging coil? I don’t see a replacement on the site. I just learning all this.
Jon Marble - 답글
-
-
-
Spudger/스퍼저의 뾰족한 끝을 사용하여 메인 인터커넥트 케이블을 마더보드에서 분리하세요.
-
마더보드에서 보조 인터커넥트 케이블을 분리하세요.
-
-
-
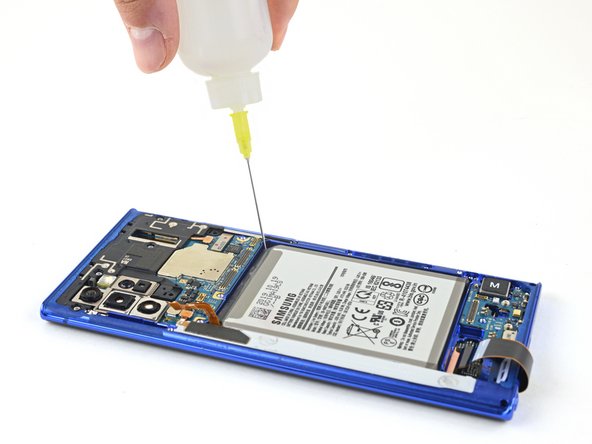
배터리 아랫면 모서리 근처 눈몰-모양 홈에 (90% 이상) 고 농도 이소프로필 알코올 몇 방울을 바르세요.
-
다음 단계로 진행하기 전에 이소프로필 알코올이 배터리 접착제를 부드럽게 할 때까지 약 2분 정도 기다리세요.
-
-
-
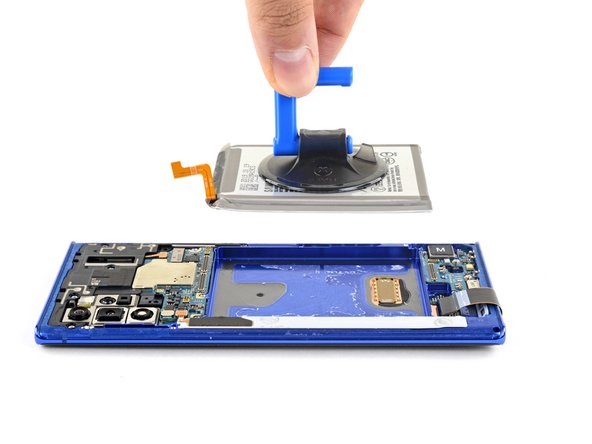
배터리 후면에 흡입 컵을 부착하세요.
-
강하고 일정한 힘으로 흡입 컵을 당겨 배터리를 프레임에서 분리하세요.
-
배터리와 프레임 사이에 생긴 틈으로 여는 픽의 뾰족한 끝을 끼우세요.
-
흡입 컵을 위로 당겨 배터리를 분리하세요.
-


결론
최적의 성능을 위하여, 이 안내서를 완료한 후 새로 설치한 배터리를 교정하세요.
새 교체 부품을 원래 부품과 비교하세요—설치하기 전에 나머지 부품을 옮기거나 새 부품에서 접착 뒷면을 제거해야 할 수 있습니다.
- 기기를 재조립하려면, 위의 지침들을 역순으로 따르세요.***
전자 폐기물을 R2 또는 e-Stewards 인증 재활용 센터로 가져가세요.
수리가 계획대로 진행되지 않았습니까? 기본 문제 해결, 또는 자사의
답변 커뮤니티에서 도움을 받으세요.
결론
최적의 성능을 위하여, 이 안내서를 완료한 후 새로 설치한 배터리를 교정하세요.
새 교체 부품을 원래 부품과 비교하세요—설치하기 전에 나머지 부품을 옮기거나 새 부품에서 접착 뒷면을 제거해야 할 수 있습니다.
- 기기를 재조립하려면, 위의 지침들을 역순으로 따르세요.***
전자 폐기물을 R2 또는 e-Stewards 인증 재활용 센터로 가져가세요.
수리가 계획대로 진행되지 않았습니까? 기본 문제 해결, 또는 자사의
답변 커뮤니티에서 도움을 받으세요.
다른 20명이 해당 안내서를 완성하였습니다.
다음 번역가들에게 특별히 감사 드립니다:
100%

Christian Kim님은 저희가 세상을 수리하는데 동참하신 분입니다! 기여하시겠습니까?
번역 시작하기 ›


댓글 12개
What kind of adhesive would you recommend to adhere the back glass to the phone after repair?
Hey! Here’s a link to the rear cover adhesive!
Thank you! I have all my stuff ordered now. I can’t wait to follow this guide and get my battery back to new!
Do I only need the rear cover adhesive or the perimeter adhesive as well?
I performed the battery replacement following instructions to the letter, but now I'm stuck in a custom OS warning screen loop and nothing I do seems to get me out of it.
It finally came out of it on its own. When I started up, however, I quickly discovered why it happened in the first place: my volume buttons aren't working, so perhaps the adhesive is blocking them. Also, NFC and camera aren't working, so I have to figure it all out.
PDADoc -
Switch worked really good ACCEPT that my fingerprint reader is now broken (it doesnt readout anymore).
I think it got something to do with the alcohol getting under it (i used premium 99%)
Update: after several restarts and a slight heatbed treatment the sensor managed to store a fingerprint. It seems to work just fine, although i get a feeling, that the sensor definitely isnt working as reliable as before .... i keep you updated
Last Update: after working just fine the whole day the display randomly stopped working and is now completely dead. Phone is therefore destroyed.
Screen destroyed itself shortly after the repair. Phone was working just fine, than began to reject inputs, followed by ghost touches. Shortly after that the screen turned black and is unfunctional since.
Like I said, the phone was working just fine after the repair, so I can pretty much foreclose a installtion error.
Ifixit support sadly wasnt helping at all.
Fingerprint sensor didn't work until I move a small grey sticker from the original battery carefully placing it in the same spot on the new battery
I have an adjustable hot plate. I bought it when I replaced the back and battery on a previous note. I am wondering about some type of shim so that the camera bump is not in contact with the hot plate. I am thinking about fender washers. Is there a better way?
Rusty Lingenfelter - 답글