주요 콘텐츠로 건너뛰기

Samsung Galaxy Prevail Headphone Jack Replacement

필요한 것

  1. Samsung Galaxy Prevail Headphone Jack Replacement, Headphone Jack: 1 단계, 이미지 1/1
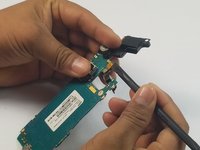
    • Using your hands, carefully remove the back panel by popping the open slit, near the headphone jack, outwards.

  2. Samsung Galaxy Prevail Headphone Jack Replacement: 2 단계, 이미지 1/1
    • Using your fingernail or nylon spudger, remove the battery by lifting upward in the recess of the bottom right corner.

  3. Samsung Galaxy Prevail Headphone Jack Replacement: 3 단계, 이미지 1/1
    • Remove the (6) 4mm screws using a Phillips #00 screwdriver.

  4. Samsung Galaxy Prevail Headphone Jack Replacement: 4 단계, 이미지 1/1
    • Using the nylon spudger, carefully unhinge and pry the secondary rear panel using the recessed tabs on the left and right sides.

    • The secondary rear panel houses the camera lens and speaker assembly,

    • The metal trim of the headphone jack may come loose during this process.

  5. Samsung Galaxy Prevail Headphone Jack Replacement: 5 단계, 이미지 1/1
    • Using the spudger lift the speaker assembly upward, so you may have access to the headphone assembly.

    • Battery is connected to the motherboard with adhesive backing so use some force when removing the speaker assembly.

  6. Samsung Galaxy Prevail Headphone Jack Replacement: 6 단계, 이미지 1/2 Samsung Galaxy Prevail Headphone Jack Replacement: 6 단계, 이미지 2/2
    • Using the spudger, carefully unplug and remove the headphone port assembly by lifting upward on the ribbon cable.

    • The headphone jack should lift off of the motherboard.

결론

To reassemble your device, follow these instructions in reverse order.

다른 한 분이 해당 안내서를 완성하였습니다.

Ricardo Zuloaga

회원 가입일: 09/15/16

525 평판

안내서 5개 작성하였습니다

USF Tampa, Team 17-6, Blackwell Fall 2016 USF Tampa, Team 17-6, Blackwell Fall 2016 회원

USFT-BLACKWELL-F16S17G6

3 회원들

안내서 5개 작성하였습니다

댓글 0개

댓글 쓰기

조회 통계:

24 시간 전: 0

7일 전: 0

30일 전: 0

전체 시간: 300