이 번역은 원본 안내서의 최신 업데이트를 반영하지 않을 수 있습니다. 번역 업데이트를 돕거나 아니면 원본 안내서 보기를 참조하세요.
소개
후면 커버 키트에 포함된 모든 접착 스트립을 어떻게 해야 할지 잘 모르겠습니까? 제대로 잘 오셨습니다! 이 안내서는 유리 후면 커버 Galaxy S 시리즈용 (S7 이상) 후면 커버 접착 키트 사용법을 알려줍니다. 또한 후면 베젤 및 지문 센서와 같은 다양한 후면 덮개 부품의 이동 및 설치 방법에 대한 지침도 포함하고 있습니다.
키트에 포함된 모든 접착 스트립을 사용할 필요는 없습니다. 지문 센서를 옮기는 경우 Tesa/테사 테이프 같은 양면 테이프가 필요합니다.
Galaxy S 휴대폰용 접착 스트립 목록은 [[ 잘못된 부품 링크 ]].
이런 접착 스트립을 붙일 때 사용하는 팁:
- 일반적으로, 접착 스트립에는 유색 면 및 무색 (종이 또는 투명한 플라스틱) 면이 있습니다. 무색 면이 먼저 붙여야 할 스트립 표면을 결정합니다.
- 접착제를 쉽게 붙이기 위해서, 스트립을 휴대폰의 원하는 위치에 맞춘 다음
스트립의 한쪽 가장자리를 붙여 스트립을 제위치에 고정하세요. 이렇게 하면 라이너를 벗길때 스트립의 맞춘 위치를 놓치지 않고 접착제를 드러낼 수 있습니다.
필요한 것
-
-
배터리 접착제를 설치하려면 이 안내서를 따르세요.
-
지문 센서와 개스킷을 옮기고 설치하려면 다음 단계부터 시작하세요.
-
후면 베젤을 옮기고 설치하려면 5단계로 건너 뛰세요.
-
후면 커버 지원 접착제를 설치하려면 9단계로 건너 뛰세요.
-
후면 덮개 둘레 접착제를 설치하려면 13단계로 건너 뛰세요.
-
-
-
iOpener를 가열하고 지문 센서에 일 분 동안 대주세요.
-
여는 도구를 사용하여 후면 커버에 닿아있는 지문 센서의 하단 이음새를 살짝 들어 올리세요.
-
지문 개스킷 이음새, 상단 이음새는 들어 올리지 마세요.
-
-
-
iOpener를 가열하고 일 분 동안 후면 베젤에 대주세요.
-
후면 덮개의 바깥 쪽에서 시작하여 손가락으로 베젤을 안쪽으로 밀어 베젤을 컷아웃에서 느슨하게 하세요.
-
또는 열기 도구를 사용하여 베젤을 들어 올려 후면 커버에서 느슨하게 하세요.
-
-
-
-
접착 스트립의 윤곽을 접착 잔여물 및 휴대폰 프레임과 맞춰서 지원 스트립이 표면에 어떻게 정렬하는지 알아보세요.
-
여는 도구와 고농도 이소프로필 알코올을 사용하여 휴대폰 프레임에서 모든 접착제 잔여물을 제거하세요.
-
후면 커버를 재-사용하는 경우 후면 커버에서 모든 접착제 잔여물을 제거하세요.
For my Galaxy S7, it appeared to me there were some minor placement inconsistencies (a millimeter or two) where the Back Cover Support adhesive pads (support strips) were on the backing sheet versus the actual phone. Difficult to know for sure since it is hard to tell where the original pads were after the back cover is pried off. I removed the clear backing to expose the strips and blocks, but placed the clear backing covering 80% of the phone as I transferred one portion of the unconnected adhesive strips at a time where they best appeared to be needed. This falls in the category of tweaking.
The adhesive sheet for the back cover was 100% accurate.
-
-
-
지원 접착 스트립에서 투명 라이너를 벗겨 접착면을 드러내세요.
-
끈끈한 표면을 만지지 않도록 주의하면서 스트립의 끈적한 면은 위로 향하고 휴대폰 프레임 위에 조심스럽게 내려 놓으세요.
-
접착 윤곽이 프레임과 일치하도록 접착 스트립을 휴대폰 프레임에 정렬하세요.
-
두 개의 작은 지원 스트립이 있는 경우 두 스트립에 이 과정을 반복하세요.
This process of putting the colored plastic with adhesive onto the phone and then sandwiching the back panel on top seemed counter-intuitive so I decided to remove the colored plastic and place the adhesive + clear plastic onto the back of the phone’s guts.
DON’T BE ME!
Follow the instructions and save yourself close to an hour of hassle. The adhesive loves the colored plastic way more than the clear.
It actually worked!!!
-
-
-
후면 커버를 드러난 지원 스트립 위로 조심히 내리세요. 이렇게 하면 접착제는 후면 덮개의 올바른 위치로 옮겨집니다.
I found it easier to lower the back cover onto the support strips using a suction cup. I felt like this gave me more control over placement and my fingers didn't get in the way on the edges.
-
-
-
나머지 단계들은 후면 커버 둘레 접착제 설치 방법입니다.
-
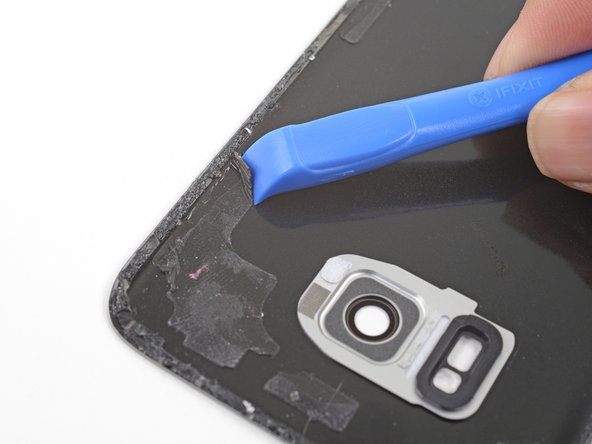
여는 도구와 고농도 이소프로필 알코올을 사용하여 휴대폰 프레임에서 모든 접착제 잔여물을 제거하세요.
-
후면 커버를 재-사용하는 경우 후면 커버에서 모든 접착제 잔여물을 제거하세요.
Scrape and peel the adhesive, using goo gone only after systematically scraping the adhesive as much as possible. The goo gone should only be used to clean up residue once manual scraping has been completed, otherwise the adhesive will become tacky and only scrape off in microscopic layers at a time, which takes forever to remove.
-
-
-
투명 라이너를 둘레 접착 스트립에서 벗겨 접착면을 드러내세요.
-
스트립의 탭을 잡고 접착제의 긴 가장자리를 후면 커버의 가장자리에 조심히 맞추세요.
-
뒷면 커버에 접착제를 놓고 손가락으로 커버를 누르세요.
-
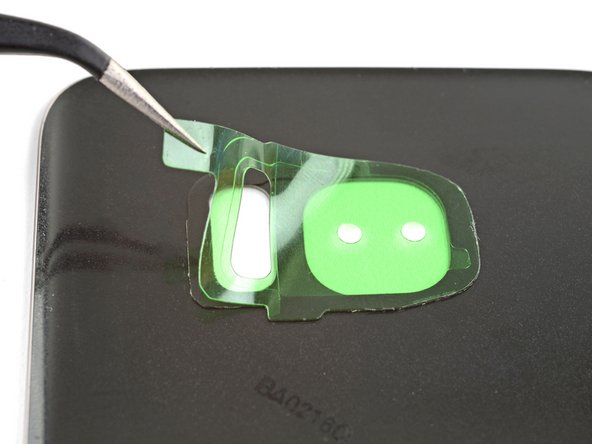
둘레 접착 스트립에서 유색 라이너를 벗겨 접착면을 드러내세요.
(Galaxy S7 kit): I peeled away the clear liner (Step 1), aligned it to the cover edge (Step 2) and pressed it down (Step 3).
When I peeled off the tabbed "coloured" liner (Step 4), it turned out to be two layers: a clear, tabbed one that came away and a green one consisting of a central part and a thin, outer strip that still covered the adhesive.
This thin strip had been partially lifted by the removal of the clear tabbed layer, so I started to remove it all. As I slowly and carefully pulled it, it tried to lift the adhesive strip itself off the cover so I held that down with the tweezer points. That still left the main green part in the centre of the case, but that was easily removed.
However, when I turned the back cover over I saw that where the adhesive strip had lifted slightly it had detached some of the cover's coloured film, leaving it buckled and a bit of a mess.
Alan Olrog - 답글
When I tried to pull away the cover strip, the adhesive stuck to it. I also have no idea why the clear liner and green liner are attached to each other.
The pictures don’t match what is received for the Galaxy S8+. It’s also not clear where to attach the perimeter adhesive. On the lip of the back cover or just inside the well area. In addition, after exposing the adhesive (after removing the clear side), no matter how weel you pre-align the position, you can’t count on the adhesive to stick to whichever method questioned above, without some of it not releasing cleanly from the colored backing. Yes. firm pressure was applied before moving a little further down. At times the adhesive stuck so strongly to the colored backing, it stretched the adhesive out of shape.
I have repaired hundreds of laptops and all in ones, so I understand there are subtleties in a repair, and I found it quite confusing replacing the battery and fingerprint sensor and other necessary parts related to doing that repair with the either inaccurate, outdated, or lack of detail provided (but much needed) in this guide.
If you're like most people and the original back glass (S8) cracked upon removal, and you've ordered and received a plastic replacement from iFixit, remove the adhesive that comes on the replacement plastic back panel, and use the adhesive in this kit. The back panel adhesive in this kit is THICC and seems like it would create a much better seal than what comes preinstalled on the replacement back panel.
-


다른 123명이 해당 안내서를 완성하였습니다.
다음 번역가들에게 특별히 감사 드립니다:
66%

Christian Kim님은 저희가 세상을 수리하는데 동참하신 분입니다! 기여하시겠습니까?
번역 시작하기 ›


댓글 14개
The flex cable for the fingerprint sensor is so short and delicate that it’s fiendishly difficult to locate and snap in. You only have a very narrow gap between the back cover and the phone, it wants to jump out of position if you misalign at all, and you can’t reach under there with normal size fingers. Not only that, it’s done with the rear cover adhesive in place so if that touches, it sticks.
I got it snapped on, and the flex cable broke at the same moment. So, no fingerprint sensor for me. Also, the new back cover arrived broken. If it was usable, the way to do it IMHO is to attach the flex cable first, then push the fingerprint sensor assembly on to the new back cover adhesive (it goes on from behind), then close the back cover.
Hey William,
If you bought the back cover from iFixit, please contact our support team here and we will get a replacement sorted out for you!
P.S. I got the battery and cover because the old cover was warped and separated, figured may as well replace the battery in a 2-year-old phone. Turns out, the battery was swollen and huge and it had pushed the back cover open. Not a good situation. So if your back cover is coming off, suspect that battery.
P.P.S. The fingerprint sensor flex cable connector probably could be manipulated into position with the tweezers from the tool kit and pressed down into place with the plastic screwdriver thingy, Just hover the back cover over it with your third hand (or a helper).
Will the phone still be water-resistant after this repair?
Hi Shai,
The phone won’t be as water resistant compared to when it is brand new. However, this is true even if you didn’t repair the phone—adhesive seals break down and lose water resistance over time.
Do you have custom-cut adhesive strips for Samsung galaxy s9+? Can’t find it in store.
Hi Michael,
We are currently in the process of sourcing the adhesive. Please check back in the future!
where i can buy the adhesive
It’s a little confusing going through the battery removal for the Samsung S10+ and then being sent to the Samsung S10 installation process instead of the Samsung S10+ install. Although moderately intuitive, it would be nice to have a specific article for a specific phone that identifies the actual process with the physical parts involved since The S10 and the S10+ are not the same back covers and the same parts involved.
Additionally, the inner wireless connector plate NEEDS to be connected to validate a connection otherwise the battery will not power the phone. This is a Requirement on the S10+.
I need to do the front gasket...is there an article for the front, I'm replacing my screen. Also, my child lost the earpiece mesh, is there something else I can use? Thanks
Kristabell - 답글
I got the S9 battery kit and all of the precut adhesive pieces had been cut backwards. The stiff green/blue plastic was on the wrong side. I had to remove the adhesive pieces entirely and try to use the clear plastic backing as the transfer agent instead of the stiffer, cut plastic pieces. I eventually did get it installed but it took a lot longer than planned.