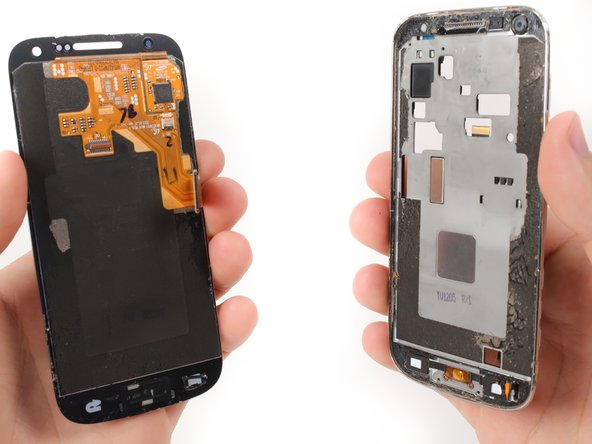
주요 콘텐츠로 건너뛰기

Samsung Galaxy S4 Mini Screen and Digitizer Replacement

필요한 것

  1. Samsung Galaxy S4 Mini Screen and Digitizer Replacement, Battery: 1 단계, 이미지 1/1
    • Press and hold the END key to power the phone down.

  2. Samsung Galaxy S4 Mini Screen and Digitizer Replacement: 2 단계, 이미지 1/1
    • Remove the back cover of the cell phone using a plastic opening tool.

  3. Samsung Galaxy S4 Mini Screen and Digitizer Replacement: 3 단계, 이미지 1/1
    • Pry the battery out using a plastic opening tool.

  4. Samsung Galaxy S4 Mini Screen and Digitizer Replacement, SIM Card: 4 단계, 이미지 1/2 Samsung Galaxy S4 Mini Screen and Digitizer Replacement, SIM Card: 4 단계, 이미지 2/2
    • Using tweezers, remove the SIM card by sliding it towards the bottom of the device.

  5. Samsung Galaxy S4 Mini Screen and Digitizer Replacement, SD Card: 5 단계, 이미지 1/1
    • Using a nylon spudger, push through the hole at the top of the memory card holder to slide it out.

  6. Samsung Galaxy S4 Mini Screen and Digitizer Replacement, Charging Assembly: 6 단계, 이미지 1/1
    • Remove the 10 4.0 mm Phillips screws on the back of the phone using the #00 Phillips screwdriver.

    • Not needed, but Tweezers can be helpful in removing the screws from their holes, as their size makes removal a tad difficult.

  7. Samsung Galaxy S4 Mini Screen and Digitizer Replacement: 7 단계, 이미지 1/1
    • Starting at the USB port, slide a plastic tool around the perimeter of the phone between the rear housing and frame. As you work your way around the edge you will feel the clips release.

  8. Samsung Galaxy S4 Mini Screen and Digitizer Replacement: 8 단계, 이미지 1/1
    • Carefully separate the rear housing and the mid-frame to reveal the inside of the phone.

  9. Samsung Galaxy S4 Mini Screen and Digitizer Replacement: 9 단계, 이미지 1/1
    • Remove the 2 flex cables shown that attach to the USB board, Tweezers can be especially helpful here.

  10. Samsung Galaxy S4 Mini Screen and Digitizer Replacement: 10 단계, 이미지 1/1
    • Gently pry underneath the charging port using the plastic opening tool to separate it from the double sided tape below.

  11. Samsung Galaxy S4 Mini Screen and Digitizer Replacement: 11 단계, 이미지 1/1
    • Once its released, gently lift the main board and remove the USB board containing the charging port.

  12. Samsung Galaxy S4 Mini Screen and Digitizer Replacement, LCD Screen & Digitizer Assembly: 12 단계, 이미지 1/2 Samsung Galaxy S4 Mini Screen and Digitizer Replacement, LCD Screen & Digitizer Assembly: 12 단계, 이미지 2/2
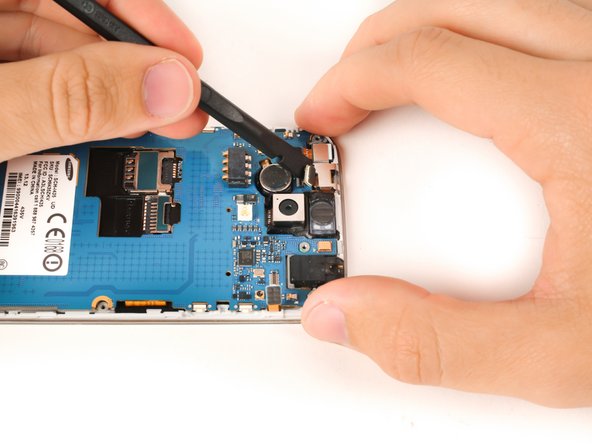
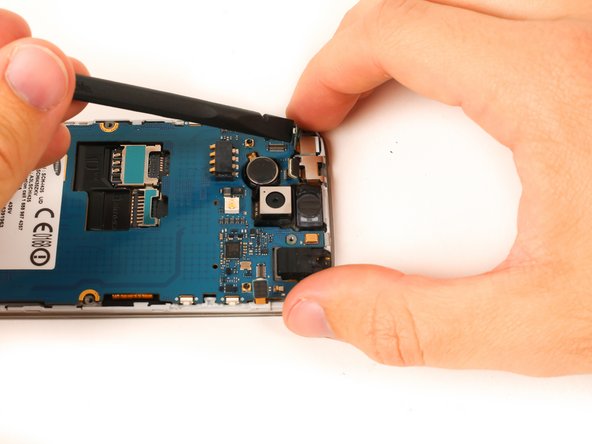
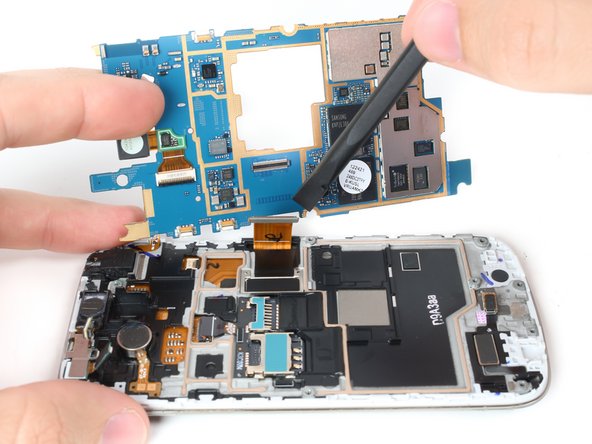
    • Use the flat end of a nylon spudger to lift the headphone jack press-fit connector up to release the ribbon cable.

  13. Samsung Galaxy S4 Mini Screen and Digitizer Replacement: 13 단계, 이미지 1/2 Samsung Galaxy S4 Mini Screen and Digitizer Replacement: 13 단계, 이미지 2/2
    • Use the flat end of a nylon spudger to lift the infrared sensor press-fit connector up to release the ribbon cable.

  14. Samsung Galaxy S4 Mini Screen and Digitizer Replacement: 14 단계, 이미지 1/2 Samsung Galaxy S4 Mini Screen and Digitizer Replacement: 14 단계, 이미지 2/2
    • Use the flat end of a nylon spudger to lift the front-facing camera press-fit connector up to release the ribbon cable.

  15. Samsung Galaxy S4 Mini Screen and Digitizer Replacement: 15 단계, 이미지 1/3 Samsung Galaxy S4 Mini Screen and Digitizer Replacement: 15 단계, 이미지 2/3 Samsung Galaxy S4 Mini Screen and Digitizer Replacement: 15 단계, 이미지 3/3
    • Gently lift the motherboard up and partially away from the device.

    • The digitizer ribbon cable is still attached to the underside of the motherboard.

  16. Samsung Galaxy S4 Mini Screen and Digitizer Replacement: 16 단계, 이미지 1/2 Samsung Galaxy S4 Mini Screen and Digitizer Replacement: 16 단계, 이미지 2/2
    • Put the flat end of a nylon spudger under the lip of the digitizer press-fit connector and lift up to release the connector and free the motherboard.

  17. Samsung Galaxy S4 Mini Screen and Digitizer Replacement: 17 단계, 이미지 1/1
    이 단계에 사용된 도구:
    iOpener
    $19.99
    구매
    • Use a heat gun or an iOpener to soften the adhesive underneath the perimeter of the screen.

  18. Samsung Galaxy S4 Mini Screen and Digitizer Replacement: 18 단계, 이미지 1/2 Samsung Galaxy S4 Mini Screen and Digitizer Replacement: 18 단계, 이미지 2/2
    이 단계에 사용된 도구:
    Jimmy
    $7.95
    구매
    • Use a suction cup to pull the screen away from the frame and create a small gap.

    • This should not require excessive force. Apply additional heat as needed to soften the screen adhesive.

    • Cover the screen with a layer of packaging tape if severe cracks or screen damage prevent a suction cup from obtaining a complete seal. The Galaxy S4 Mini also has enough of a gap between the frame and the screen to insert a jimmy or plastic opening pick. Carefully apply heat as needed, and wedge the screen free.

  19. Samsung Galaxy S4 Mini Screen and Digitizer Replacement: 19 단계, 이미지 1/3 Samsung Galaxy S4 Mini Screen and Digitizer Replacement: 19 단계, 이미지 2/3 Samsung Galaxy S4 Mini Screen and Digitizer Replacement: 19 단계, 이미지 3/3
    • Insert a plastic opening pick into the gap between the screen and the plastic housing.

    • Slide the plastic opening pick along the edge of the screen to free the screen from the adhesive.

  20. Samsung Galaxy S4 Mini Screen and Digitizer Replacement: 20 단계, 이미지 1/3 Samsung Galaxy S4 Mini Screen and Digitizer Replacement: 20 단계, 이미지 2/3 Samsung Galaxy S4 Mini Screen and Digitizer Replacement: 20 단계, 이미지 3/3
    • Remove the LCD screen and digitizer assembly completely.

    • Feed the digitizer ribbon cable gently through the frame.

결론

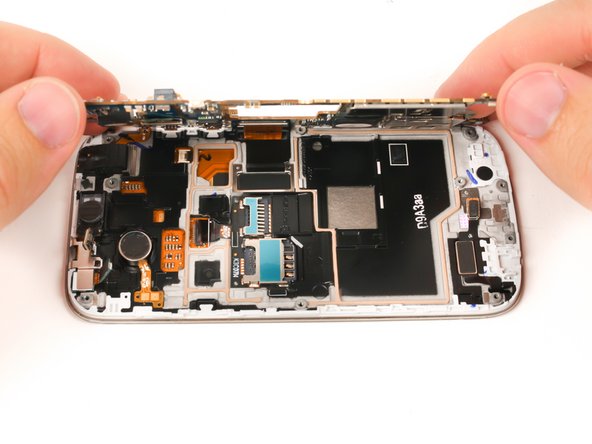
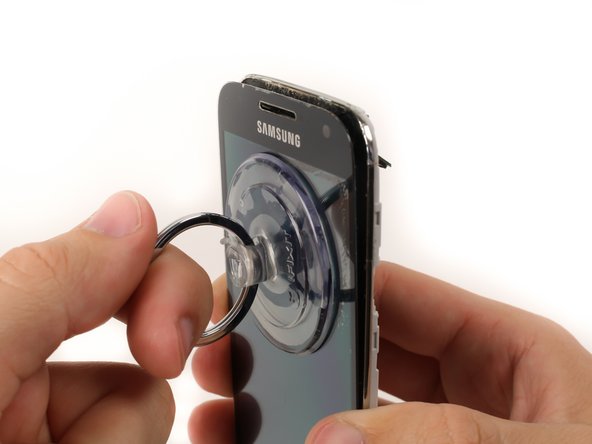
To reassemble your device, follow these instructions in reverse order.

다른 17명이 해당 안내서를 완성하였습니다.

Richard

회원 가입일: 02/07/17

29,741 평판

안내서 11개 작성하였습니다

iFixit iFixit 회원

Staff

135 회원들

안내서 16,475개 작성하였습니다

댓글 4개

VHAostartalomVHAostartalom köszönöm jékőinek! vagylök honlapnak!

Jenő Krivánszki - 답글

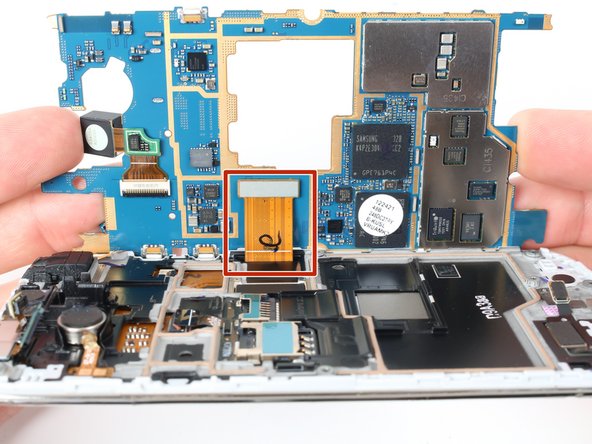
When removing the digitizer be sure to disconnect the connector for the sim card/sd card before removing the digitizer.

Chris Phelan - 답글

Just FYI, having got this far and realised you can just replace the screen if it cracked. It looks like you just heat up the screen to soften the seal and pull off the screen without the need to replace the digitiser. It’s certainly quicker, easier and cheaper to do this is its just the screen that’s cracked. I need a digitiser now as it didn’t survive the strip down. Not sure if its economic to repair now!

Geoff (pronounced Jeff) - 답글

Where and how to I transfer the home button????????

Babur Shah - 답글

댓글 쓰기

조회 통계:

24 시간 전: 1

7일 전: 5

30일 전: 37

전체 시간: 16,112