주요 콘텐츠로 건너뛰기

Samsung Galaxy S4 Rear Facing Camera Replacement

필요한 것

  1. Samsung Galaxy S4 Rear Facing Camera Replacement, Rear Case: 1 단계, 이미지 1/2 Samsung Galaxy S4 Rear Facing Camera Replacement, Rear Case: 1 단계, 이미지 2/2
    • Pry with a plastic opening tool, or your fingernail, in the divot to the left of the rear-facing camera, near the power button.

  2. Samsung Galaxy S4 Rear Facing Camera Replacement: 2 단계, 이미지 1/3 Samsung Galaxy S4 Rear Facing Camera Replacement: 2 단계, 이미지 2/3 Samsung Galaxy S4 Rear Facing Camera Replacement: 2 단계, 이미지 3/3
    • Lift the rear case by the corner nearest the divot and remove it from the phone.

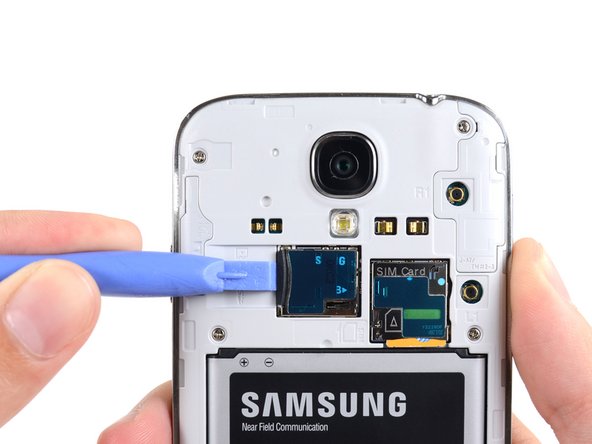
  3. Samsung Galaxy S4 Rear Facing Camera Replacement, MicroSD Card: 3 단계, 이미지 1/3 Samsung Galaxy S4 Rear Facing Camera Replacement, MicroSD Card: 3 단계, 이미지 2/3 Samsung Galaxy S4 Rear Facing Camera Replacement, MicroSD Card: 3 단계, 이미지 3/3
    • Use the flat end of a spudger, or your fingernail, to press the microSD card slightly deeper into its slot until you hear a click.

    • After the click, release the card and it will pop out of its slot.

    • Remove the microSD card.

    • For reassembly, push the microSD card into the slot until it clicks in place.

  4. Samsung Galaxy S4 Rear Facing Camera Replacement, Battery: 4 단계, 이미지 1/3 Samsung Galaxy S4 Rear Facing Camera Replacement, Battery: 4 단계, 이미지 2/3 Samsung Galaxy S4 Rear Facing Camera Replacement, Battery: 4 단계, 이미지 3/3
    • Insert a plastic opening tool, or your finger, into the notch of the battery compartment and lift the battery upward.

    • Remove the battery from your phone.

  5. Samsung Galaxy S4 Rear Facing Camera Replacement, SIM Card: 5 단계, 이미지 1/3 Samsung Galaxy S4 Rear Facing Camera Replacement, SIM Card: 5 단계, 이미지 2/3 Samsung Galaxy S4 Rear Facing Camera Replacement, SIM Card: 5 단계, 이미지 3/3
    • Use a plastic opening tool, or your fingernail, to press the SIM card slightly deeper into its slot until you hear a click.

    • After the click, release the card and it will pop out of its slot.

    • Remove the SIM card.

    • During reassembly, push the SIM card into the slot until it clicks in place.

  6. Samsung Galaxy S4 Rear Facing Camera Replacement, Midframe: 6 단계, 이미지 1/1
    • Remove the nine 4.0 mm Phillips #00 screws securing the midframe to the display assembly.

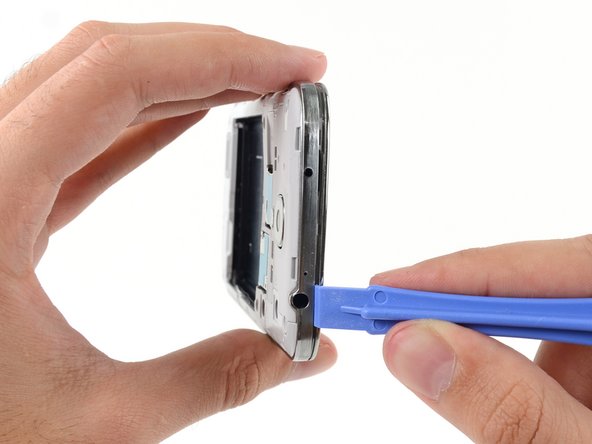
  7. Samsung Galaxy S4 Rear Facing Camera Replacement: 7 단계, 이미지 1/2 Samsung Galaxy S4 Rear Facing Camera Replacement: 7 단계, 이미지 2/2
    • The midframe is secured to the display assembly by several plastic clips behind the chrome bezel of the midframe. The next few steps will guide you through separating the clips to free the midframe.

    • Starting on the volume button side of the phone, insert your plastic opening tool between the chrome bezel around the display glass and the larger chrome border piece. Look for the seam between the two.

    • Slide the opening tool along the seam, separating the plastic clips as you go.

    • Be very gentle whilst prying, and pry only enough to separate the plastic clips—there are several thin points in the midframe bezel that may crack if you bend them too much.

  8. Samsung Galaxy S4 Rear Facing Camera Replacement: 8 단계, 이미지 1/2 Samsung Galaxy S4 Rear Facing Camera Replacement: 8 단계, 이미지 2/2
    • Continue prying around the corner of the phone.

    • Slide your opening tool along the seam between the midframe and display along the bottom of the device, releasing more of the plastic clips.

  9. Samsung Galaxy S4 Rear Facing Camera Replacement: 9 단계, 이미지 1/2 Samsung Galaxy S4 Rear Facing Camera Replacement: 9 단계, 이미지 2/2
    • Again, pry around the corner, to the power button side.

    • Slide the opening tool along the seam.

  10. Samsung Galaxy S4 Rear Facing Camera Replacement: 10 단계, 이미지 1/2 Samsung Galaxy S4 Rear Facing Camera Replacement: 10 단계, 이미지 2/2
    • Continue sliding the opening tool around the top of the phone, releasing the last of the clips and freeing the midframe from the display assembly.

    • At this point, you may want to run your plastic opening tool along the entire perimeter of the device again, to make sure you've released all of the plastic clips.

  11. Samsung Galaxy S4 Rear Facing Camera Replacement: 11 단계, 이미지 1/3 Samsung Galaxy S4 Rear Facing Camera Replacement: 11 단계, 이미지 2/3 Samsung Galaxy S4 Rear Facing Camera Replacement: 11 단계, 이미지 3/3
    • Remove the midframe from the display assembly.

  12. Samsung Galaxy S4 Rear Facing Camera Replacement, Motherboard Assembly: 12 단계, 이미지 1/3 Samsung Galaxy S4 Rear Facing Camera Replacement, Motherboard Assembly: 12 단계, 이미지 2/3 Samsung Galaxy S4 Rear Facing Camera Replacement, Motherboard Assembly: 12 단계, 이미지 3/3
    • Use the flat end of a spudger to disconnect the USB board connector.

    • Disconnect the front-facing camera cable connector.

    • Disconnect the earpiece speaker assembly cable connector.

  13. Samsung Galaxy S4 Rear Facing Camera Replacement: 13 단계, 이미지 1/3 Samsung Galaxy S4 Rear Facing Camera Replacement: 13 단계, 이미지 2/3 Samsung Galaxy S4 Rear Facing Camera Replacement: 13 단계, 이미지 3/3
    • Disconnect the headphone jack assembly cable connector.

    • Disconnect the display/digitizer cable connector.

    • Disconnect the antenna cable connector.

  14. Samsung Galaxy S4 Rear Facing Camera Replacement: 14 단계, 이미지 1/1
    • Remove the single 2.4 mm Phillips #00 screw from the motherboard assembly.

  15. Samsung Galaxy S4 Rear Facing Camera Replacement: 15 단계, 이미지 1/2 Samsung Galaxy S4 Rear Facing Camera Replacement: 15 단계, 이미지 2/2
    • Gently remove the motherboard.

    • Hold the motherboard by its edges to prevent ESD damage. Be careful not to snag it on any cables as you extract it from the display assembly.

  16. Samsung Galaxy S4 Rear Facing Camera Replacement, Rear Facing Camera: 16 단계, 이미지 1/1
    • Use the flat end of a spudger to disconnect the rear-facing camera connector.

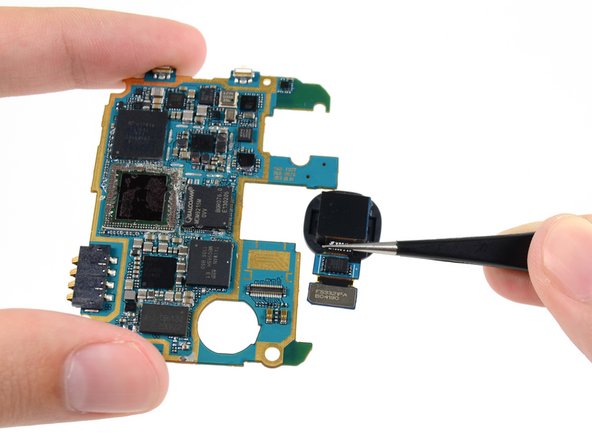
  17. Samsung Galaxy S4 Rear Facing Camera Replacement: 17 단계, 이미지 1/2 Samsung Galaxy S4 Rear Facing Camera Replacement: 17 단계, 이미지 2/2
    • Using tweezers, or your fingers, slide the rear-facing camera out of its notch in the motherboard.

결론

To reassemble your device, follow these instructions in reverse order.

다른 75명이 해당 안내서를 완성하였습니다.

Sam Goldheart

회원 가입일: 10/18/12

465,777 평판

안내서 538개 작성하였습니다

iFixit iFixit 회원

Staff

135 회원들

안내서 16,817개 작성하였습니다

댓글 11개

Where do you recommend getting the new rear facing camera from?

Justin - 답글

where do you recommend to buy a new rear camera?

sujatha - 답글

Useful step by step guide, I was able to replace the cracked lens on the camera following the instructions here. Without them I wouldn't have had a clue where to start and what to unclip. The kit I used was purchased from ebay and was straight forward enough to complete that part without the need for further instruction. For a few pounds I have increased the value of my phone for trade in at next upgrade. Very pleased with this result. Thank you for the comprehensive instructions.

Jenny Miller - 답글

what a great guide! took me less than an hour to replace the camera...this success gives me the inspiration to do the bigger job of replacing the sealed battery in my sisters macbook pro 13' late 2013 model...for those asking about where to get a replacement camera, I got mine from ebay for $19 AUD including postage!

gautamgoraya - 답글

Hi, Can the same technique and part be used on the Samsung Galaxy S4 mini?

vdthaoanh - 답글

댓글 쓰기

조회 통계:

24 시간 전: 0

7일 전: 5

30일 전: 14

전체 시간: 93,833