주요 콘텐츠로 건너뛰기

Samsung Galaxy S5 Mini Motherboard Replacement

필요한 것

  1. Samsung Galaxy S5 Mini Motherboard Replacement, Rear Panel: 1 단계, 이미지 1/3 Samsung Galaxy S5 Mini Motherboard Replacement, Rear Panel: 1 단계, 이미지 2/3 Samsung Galaxy S5 Mini Motherboard Replacement, Rear Panel: 1 단계, 이미지 3/3
    • Insert a fingernail or a plastic opening tool into the slot located above the power button.

    • Gently pull the panel off the back of the phone.

    • The plastic snaps will make a popping sound as they separate.

  2. Samsung Galaxy S5 Mini Motherboard Replacement, Battery: 2 단계, 이미지 1/3 Samsung Galaxy S5 Mini Motherboard Replacement, Battery: 2 단계, 이미지 2/3 Samsung Galaxy S5 Mini Motherboard Replacement, Battery: 2 단계, 이미지 3/3
    • Insert fingernail or plastic opening tool into the slot at the bottom of the battery.

    • Gently pry the battery away from the phone.

    • When replacing the battery, ensure the contacts are aligned and press lightly. The battery will appear to fit in multiple directions, so do not force it in.

  3. Samsung Galaxy S5 Mini Motherboard Replacement, Display Assembly: 3 단계, 이미지 1/3 Samsung Galaxy S5 Mini Motherboard Replacement, Display Assembly: 3 단계, 이미지 2/3 Samsung Galaxy S5 Mini Motherboard Replacement, Display Assembly: 3 단계, 이미지 3/3
    이 단계에 사용된 도구:
    iOpener
    $19.99
    구매
    • Flip the phone and lay it on a flat surface so that the back is facing towards you.

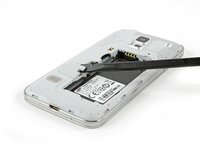
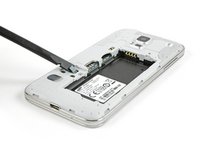
    • Use a spudger or plastic opening tool to pry up the home button cable connector and disconnect it.

    • For reassembly, insert the home button cable connector through the open slot in the display assembly.

    • Use an iOpener to loosen the adhesive beneath the display.

  4. Samsung Galaxy S5 Mini Motherboard Replacement: 4 단계, 이미지 1/3 Samsung Galaxy S5 Mini Motherboard Replacement: 4 단계, 이미지 2/3 Samsung Galaxy S5 Mini Motherboard Replacement: 4 단계, 이미지 3/3
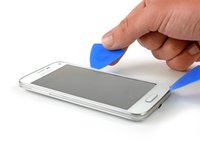
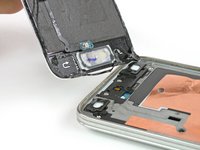
    • Flip the phone over so it is lying on its back.

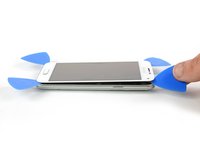
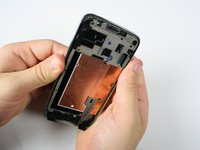
    • Insert a plastic opening tool or a plastic opening pick in the space between the screen and the frame and slide along the right side of the phone to loosen the adhesive.

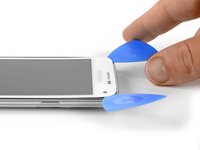
    • Gently lift the display assembly away from the frame until there is a small gap and leave the first opening pick in the bottom right corner next to your home button.

    • Insert a second opening pick and slide it up to the top left corner of the phone by loosening the adhesive beneath the display.

    • Do not insert the opening pick more than 1/8 inch. There are some components that can be harmed.

  5. Samsung Galaxy S5 Mini Motherboard Replacement: 5 단계, 이미지 1/3 Samsung Galaxy S5 Mini Motherboard Replacement: 5 단계, 이미지 2/3 Samsung Galaxy S5 Mini Motherboard Replacement: 5 단계, 이미지 3/3
    • Reheat the display of your phone with the iOpener. Especially the top and left side of the front.

    • Insert a third opening pick and slide it carefully to the top left corner of the phone. Be aware of the front camera and the loudspeaker!

  6. Samsung Galaxy S5 Mini Motherboard Replacement: 6 단계, 이미지 1/3 Samsung Galaxy S5 Mini Motherboard Replacement: 6 단계, 이미지 2/3 Samsung Galaxy S5 Mini Motherboard Replacement: 6 단계, 이미지 3/3
    • Insert a fourth opening pick and slide it to the lower left corner next to your home button.

    • Flip the opening pick in the top right corner to lift the display. If it is still sticky, move the four opening picks around the frame as you did before to find remains of adhesive.

    • Do not remove the display assembly from the frame. It is still connected by a cable.

  7. Samsung Galaxy S5 Mini Motherboard Replacement: 7 단계, 이미지 1/2 Samsung Galaxy S5 Mini Motherboard Replacement: 7 단계, 이미지 2/2
    • Keep the top portion of the display assembly next to the frame.

    • Unplug the display flex connector with a spudger.

  8. Samsung Galaxy S5 Mini Motherboard Replacement: 8 단계, 이미지 1/3 Samsung Galaxy S5 Mini Motherboard Replacement: 8 단계, 이미지 2/3 Samsung Galaxy S5 Mini Motherboard Replacement: 8 단계, 이미지 3/3
    이 단계에 사용된 도구:
    Suction Handle
    $2.99
    구매
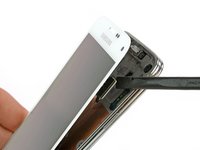
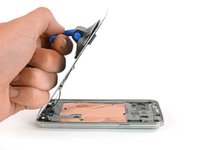
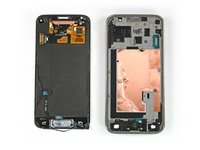
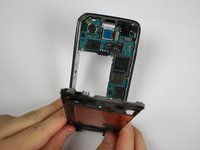
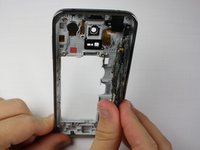
    • Use a suction handle to lift the display off of your phone. The home button cable connector should go with the display through a small gap in the mid frame. If it doesn't, use a tweezer to help a little.

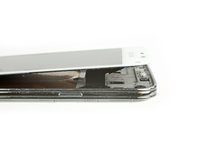
    • Pull the display assembly away from the phone to remove it.

  9. Samsung Galaxy S5 Mini Motherboard Replacement, Interior Midframe Assembly: 9 단계, 이미지 1/1
    • Remove the 12 4 mm Phillips screws #00 from the midframe.

  10. Samsung Galaxy S5 Mini Motherboard Replacement: 10 단계, 이미지 1/1
    • Flip the phone over and lay it on a flat surface so that the back is facing towards you.

    • Unscrew the 4 mm Phillips #00 screw next to the battery slot.

  11. Samsung Galaxy S5 Mini Motherboard Replacement: 11 단계, 이미지 1/1
    • Circle the midframe with a blow dryer or use the iOpener to loosen the adhesive on the midframe.

    • Circling the midframe for 10 to 30 seconds with a blowdryer should loosen the adhesive enough.

  12. Samsung Galaxy S5 Mini Motherboard Replacement: 12 단계, 이미지 1/3 Samsung Galaxy S5 Mini Motherboard Replacement: 12 단계, 이미지 2/3 Samsung Galaxy S5 Mini Motherboard Replacement: 12 단계, 이미지 3/3
    • Spread pressure out evenly to avoid damage or bending of the midframe.

    • Apply pressure to the battery slot on back of the phone to separate the midframes.

  13. Samsung Galaxy S5 Mini Motherboard Replacement, Motherboard Assembly: 13 단계, 이미지 1/3 Samsung Galaxy S5 Mini Motherboard Replacement, Motherboard Assembly: 13 단계, 이미지 2/3 Samsung Galaxy S5 Mini Motherboard Replacement, Motherboard Assembly: 13 단계, 이미지 3/3
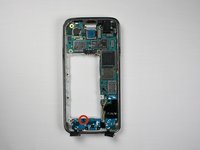
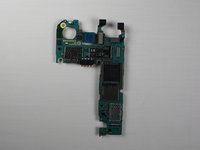
    • Unscrew the 3 mm Phillips #00 screw holding the daughterboard to the motherboard assembly.

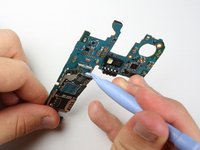
    • Use a plastic opening tool or spudger to pry the daughterboard from its socket.

    • Use tweezers to pull the cables connecting the daughterboard out from the motherboard.

  14. Samsung Galaxy S5 Mini Motherboard Replacement: 14 단계, 이미지 1/3 Samsung Galaxy S5 Mini Motherboard Replacement: 14 단계, 이미지 2/3 Samsung Galaxy S5 Mini Motherboard Replacement: 14 단계, 이미지 3/3
    • Remove the 3 mm Phillips #00 screw holding the motherboard to the frame.

    • Pull the motherboard from the frame and lay it on a flat surface.

  15. Samsung Galaxy S5 Mini Motherboard Replacement, Rear-Facing Camera: 15 단계, 이미지 1/2 Samsung Galaxy S5 Mini Motherboard Replacement, Rear-Facing Camera: 15 단계, 이미지 2/2
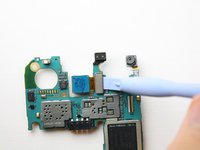
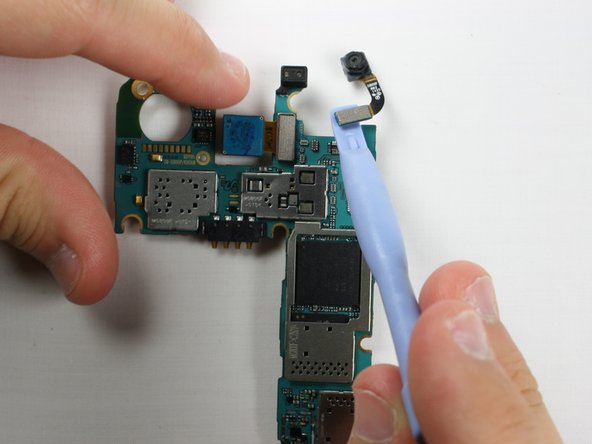
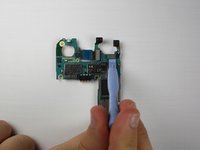
    • Use a plastic opening tool or spudger to pry off the rear-facing camera from the motherboard.

  16. Samsung Galaxy S5 Mini Motherboard Replacement, Front-Facing Camera: 16 단계, 이미지 1/3 Samsung Galaxy S5 Mini Motherboard Replacement, Front-Facing Camera: 16 단계, 이미지 2/3 Samsung Galaxy S5 Mini Motherboard Replacement, Front-Facing Camera: 16 단계, 이미지 3/3
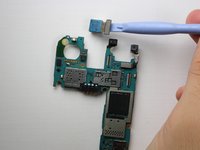
    • Use a plastic opening tool or spudger to pry off the front-facing camera from the motherboard.

  17. Samsung Galaxy S5 Mini Motherboard Replacement, Motherboard: 17 단계, 이미지 1/3 Samsung Galaxy S5 Mini Motherboard Replacement, Motherboard: 17 단계, 이미지 2/3 Samsung Galaxy S5 Mini Motherboard Replacement, Motherboard: 17 단계, 이미지 3/3
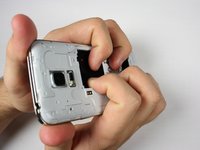
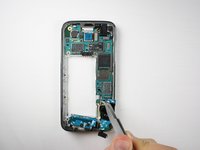
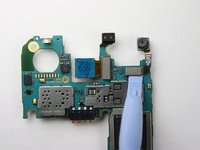
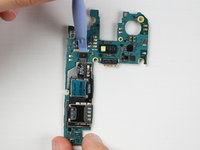
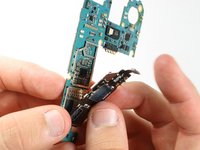
    • Use a plastic opening tool to pry up the SIM card assembly.

    • Peel the SIM card assembly away from the motherboard.

결론

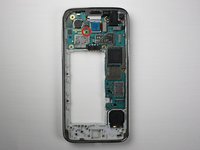
To reassemble your device, follow these instructions in reverse order.

다른 9명이 해당 안내서를 완성하였습니다.

Jon Kuzmich

회원 가입일: 09/29/14

1,963 평판

안내서 7개 작성하였습니다

Cal Poly, Team 12-4, Forte Fall 2014 Cal Poly, Team 12-4, Forte Fall 2014 회원

CPSU-FORTE-F14S12G4

5 회원들

안내서 38개 작성하였습니다

댓글 3개

Is it possible that you can add pictures of the daughter board because i have a problem with my charging port shorting. and due to lack of finding the part on the internet i would like to see it (in good order) before trying to repair mine

chickenoddle - 답글

Is it possible this is NOT the S5 Mini ? S5 Mini is MOdel GT-I9151 and has a completely different layout ...

tonyknors - 답글

Mine is s5 mini G800F and looks different im trying tho install new charger port and charger conector pins iv got the phone apart ok does any one no if the charger pins have to be soldered..

Clare Thorley - 답글

댓글 쓰기

조회 통계:

24 시간 전: 2

7일 전: 4

30일 전: 13

전체 시간: 8,693